Monthly Archive for December, 2013

PHP Game Coding: SVG Movement

flashEncapsulating Movement

Any sane person would abandon PHP for JavaScript, Ajax, jQuery or some other client-side language that would work directly with Web-based SVG graphic elements and attributes. In doing so, though, it would give up on both the OOP capacity of PHP (lacking in these other languages) and low cost (no open socket server) inter-internet games (i.e., remote multiplayer games.)

Ironically (for some), the easiest part of creating action games is the game physics. You just need to take a formula from physics (e.g., deceleration, acceleration) and turn it into an algorithm. Eventually, we’ll get to that luxury, but first we need to work out the mechanics of changing the position of a SVG graphic on a grid. Before getting into that discussion, click the Play button to see the end results (goal) and the Download button to see the code:
PlayDownload

As you will see, there’s not a lot to play with, but it does deal with two velocity issues; velocity itself and capacity. It’s like comparing the velocity of a 2014 Rolls-Royce Wraith with that of a 1988 Trabant 601. Both cars can attain speeds of 100 km/hr (62 mph), but the Wraith can do it much faster and go far above that speed because it has a more powerful engine. It has greater capacity.

The Space Grid

In the previous post on using SVG graphics in making games, you can see the grid setup, and in that grid you can determine distance and collision using simple geometry. If you’ve spend any time with SVG graphics, you will find a animation system to move graphics along paths. The problem with that system (for now at least) is working out position and collision detection. Movement along paths has grid-like parameters in defining X and Y locations on a grid, but paths can also be defined in terms of curves, and knowing the position of an object at any given time can be problematic. Further, movement is a function of timing using the SVG animateMotion element. For example, consider the following path:

animateMotion fill=”freeze” path=”M 0 0 L 100 150″ dur=”.5s”

It moves an SVG object from 0,0 to 100,150 in a half a second (0.5 seconds). There is no checking along the way for collision. Using a Bézier curve the following movement goes from 0,0 to 300,0 in two seconds (2s) but it curves downward before reaching its destination.

animateMotion fill=”freeze” path=”M 0 0 T 100 150 T 300 0″ dur=”2s”

Again, what it may have collided with is unknown given both the timing of the motion and the curve. This is not to say that every point could not somehow be tracked, but at this point I’d rather take a more familiar route to movement and collision detection.

Moving SVG objects involves changing their X and Y values. I’m calling the frequency with which the X and Y values are updated, “capacity” and the amount of change “velocity.” Rather than using the animateMotion SVG element, this example changes the object’s X value through timed updates and variable values in the number of pixels each timed update generates. For example, an update of every 50 milliseconds is faster than one of every 100 milliseconds—there’s less time between each update pause. Likewise, an X increment of 10 pixels will cause faster movement than an update of 5 pixels.

A timed loop fires a function that changes the ship’s position:

?View Code JAVASCRIPT
function moveShip()
{
     // Change the ship's position
     shipX += $this->velocity;
     shipX = shipX % 500;
     oopz.setAttribute("x", shipX);
}

As you can see the code is JavaScript using a PHP variable ($this->velocity) to set the speed. I would have preferred to do it using all PHP, but needed to use the JavaScript setAttribute method for moving the ship’s X position without having to create a new object. Changing the speed using capacity (loop timing) and velocity (amount of variable increment) requires PHP to create another SVG object, and for demonstration purposes, that’s fine. In an action game, though, it’d eat up a lot of resources.

The “ship” (rectangle) only moves from left to right at this time, and when it leaves “the galaxy” it loops around and comes in the other end. Using the modulus of 500 (% 500), the value will always be calculated correctly when moving from left to right (in both JavaScript and PHP); however, moving from right to left, as soon as the X position is 0, it fails. (See this post on game algorithms for a detailed explanation and comparison of how the modulus operator works differently in Python than PHP and JavaScript). It’s an easy fix using conditional statements, but that’s so…I don’t know…inelegant? See what you can do. For now, continue on to see how the Move class is created and used.
Continue reading ‘PHP Game Coding: SVG Movement’

PHP OOP Game Coding: Collision Detection

ropeDistance in 2D Space
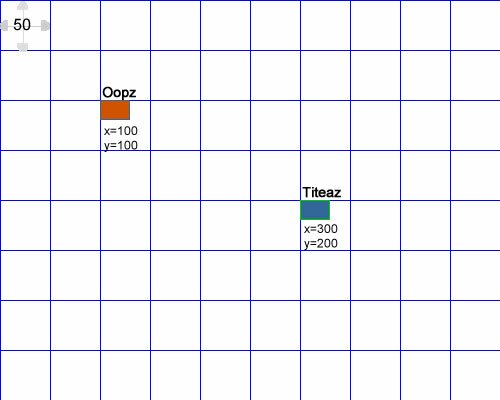
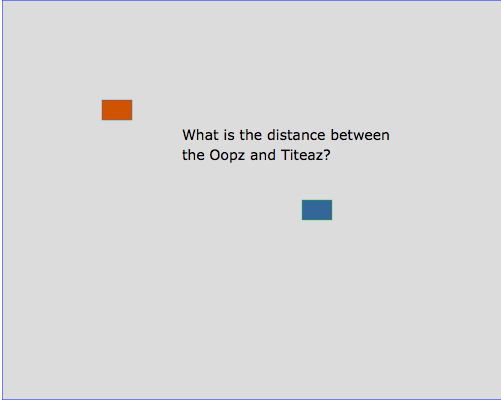
For a number of years I’ve had David Bourg’s book, Physics for Game Developers (2002, O’Reilly), and I’ve been meaning to translate a set of formulas into OOP classes that could be used as part of a PHP game development library. After spending time on (simple) game development last summer using Python, I decided it was time to get busy with a similar project using more OOP and PHP. I wanted something that was small enough to run on Raspberry Pi computers, but still an animated video game.

On previous posts on this blog I’ve used SVG graphics with PHP, but the examples I used were fairly static. Here I’d like to try them in a more dynamic role to see if PHP could generate code to make them dance. For starters I thought that a simple 2D space game would be appropriate — more on the order of Astroids than Space Aliens.

2D Outer Space on a Grid: Plane Geometry

In order to get anywhere, I decided that the universe (galaxy, solar system, whatever; you choose) would live on a 500 x 400 grid. It can be adjusted for different screens, but the first step is to set up a common grid for clear discussion. Further, I thought that starting with rectangles as ‘space ships’ would make everything else easier. (You can build something more elaborate later in the series.) The two space crafts are Oopz and Titeaz. Oopz is crewed by OOP developers, and Titeaz has a crew of sequential and procedural programmers who keep getting in trouble because of spaghetti knots and tight bindings. The Oopz goes on rescue missions to send them PHP code packages of classes and design patterns. Figure 1 shows the initial positions of the two ships:

Figure 1: Grid with Oopz and Titeaz

Figure 1: Grid with Oopz and Titeaz


Each of the grid squares in Figure 1 is 50 x 50 pixels, and the space ships use conventional a x|y position denotation.

Determining Distance and Collision Detection

The first thing we’ll tackle in Rocket Science 101 is determining the distance between two objects.

Raspberry Pi Users: You will need the Chromium browser for the graphics in this series. You can download it using the following code:
sudo apt-get install chromium

The distance between objects can be used for everything from determining when two objects have collided (distance = 0 + fudge-factor) to when another ship is in rescue range to receive project-saving OOP code. The SVG objects on your screen (without the grid) can be seen in Figure 2:

Figure 2: Determining Distance

Figure 2: Determining Distance

The code for this starting screen is based on the SVG W3 standards and saved as an XML file:

< ?xml version="1.0" standalone="no"?>
< !DOCTYPE svg PUBLIC "-//W3C//DTD SVG 1.1//EN" "http://www.w3.org/Graphics/SVG/1.1/DTD/svg11.dtd"> 
 width="500" height="400" viewBox="0 0 500 400"
     xmlns="http://www.w3.org/2000/svg" version="1.1">
>Oopz and Titaz>

 x="0" y="0" width="500" height="400"
        fill="#DCDCDC" stroke="blue" stroke-width="1">>

 x="100" y="100" width="30" height="20"
        fill="#cf5300" stroke="#369" stroke-width=".4">>

 x="300" y="200" width="30" height="20"
        fill="#369" stroke="#00cc00" stroke-width=".4">>
>

To see the distance calculation, click the Play button. See if you can figure out what formula is used before you look at the code:

PlayDownload

The calculations are based on one of the most fundamental theorems in plane geometry. Before continuing, see if you can figure it out and resolve the solution.
Continue reading ‘PHP OOP Game Coding: Collision Detection’

Get MySql and PHP to Work Together in Raspberry Pi

lampSetting Up

I’ve installed PHP and Mysql on dozens of different systems ranging from a MS PC running Windows, to a Linux box to a Mac with OS X. However, I’ve never quite run into the problems I did with Raspberry Pi. It’s not that it is more difficult—in fact it is quite simple—I just got off on the wrong foot. In this short post, I want to provide a clear and simple set of steps for installing LAMP. The one caveat is that you should install everything at once. The installation includes Apache Server, PHP and MySql. The whole kit and caboodle should be installed together on top of a Debian Linux system. (If you have most other Linux systems, everything discussed generally applies to your system. If you have a Mac or Windows PC, when you connect up with the MySql administration module, you will find the MySql commands pretty much the same as those discussed here; so don’t feel left out.)

L.A.M.P.: Presto! You’re a Web Server

LAMP is an acronym for

  • Linux (OS)
  • Apache (Web server)
  • MySql (Database server)
  • PHP (Server-side Language)

By placing LAMP on your Raspberry Pi, you can do far more than without it. Not only do you get a Web server, but you get a database system and a programming language. In a previous post on this blog, you have seen how to set up the Raspberry Pi with PHP and work it in your file system. In this post I hope to show how to add MySql and use it as a database with PHP on a Raspi.

This process is for Raspberry Pi users who have the Debian distribution already installed. (That’s the ‘L’ in LAMP).

Assuming that you have not yet installed Apache server or PHP or MySql enter the following code in the Root Terminal:

sudo apt-get update
sudo apt-get install apache2 php5 php5-mysql mysql-server

Wait patiently until you are asked for a password for your ‘root’ user. Enter a password you can remember (and write it down somewhere you won’t lose it).

Testing MySql

To see is your MySql is working correctly, you will need to log in from your LXTerminal. So open your LXTerminal and enter:

mysql -u root -p

You should see the following screen after entering your password:

Figure 1: Log into MySql

Figure 1: Log into MySql

If you get an error try again and make sure you have entered your password correctly.

Once you’ve successfully logged into MySql, the cursor and prompt change to:

mysql>

When you want to log out of MySql just type:

mysql>quit
Continue reading ‘Get MySql and PHP to Work Together in Raspberry Pi’