 In 2012, I posted a little piece on a PHP-MySql connection utility. Since the time of the original posting, I’ve used that utility again and again. It’s been used in my own applications (many of which have appeared on this blog), with my clients, and with others who I was able to help. Other than minor tweaking with the replacement of a conditional if statement with the try/catch exception, it has remained largely unchanged.
Recently, from Belgium provided some thoughtful comments for refactoring the little utility. (Being a big Salamander fan [Netflix], I listen to what the PHP folks from Belgium have to say!) His comments inspired some re-thinking, and while I made some changes, they were minor and along different lines. Download the revised version and take a look at it:
![]()
Object Thinking
In developing software, I think in terms of objects and object structures. That is, rather than thinking in lines of code and statements, I find it easier to think in terms of what an object does and how it fits into a larger object structure rather than how statements are used. So, in using PHP with MySql, I tend to view connections to the database as something an object handles and I don’t need to worry about otherwise. Recently I was working on an Observer design patter using the built-in SplSubject and SplObserver. It occurred to me that the concrete subject might pull data out of a MySql database, and so I just popped a copy of the universal connect utility in the folder and it’s all set. Figure 1 illustrates it use:
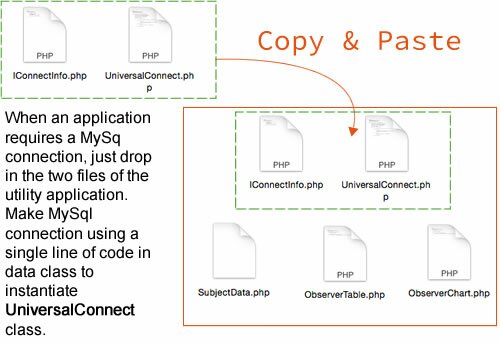
Figure 1: Adding connection utility to small observer
The utility is very small—a single interface and class—but it’s very useful.
The Code
First of all, an interface stores connection information in constants, and as long as you’re using the same database, you can re-use the values. The single method is defined as public and static so that a single line of code can launch the method that uses the constants for connection. It is largely unchanged from the original.
//Filename: IConnectInfo.php
interface IConnectInfo
{
        const HOST ="localhost";
        const UNAME ="bart";
        const PW ="itchy";
        const DBNAME = "scratchy";

        public static function doConnect();
}
?>
|
The UniversalConnect class does all of the work for making a connection using the constants in the interface. Again, static declarations mean that the class need not be instantiated to use the method:
ini_set("display_errors","1");
ERROR_REPORTING( E_ALL | E_STRICT );
include_once('IConnectInfo.php');
class UniversalConnect implements IConnectInfo
{
private static $server=IConnectInfo::HOST;
private static $currentDB= IConnectInfo::DBNAME;
private static $user= IConnectInfo::UNAME;
private static $pass= IConnectInfo::PW;
private static $hookup;
public static function doConnect()
{
self::$hookup=mysqli_connect(self::$server, self::$user, self::$pass, self::$currentDB);
try
{
self::$hookup;
//Comment out / Uncomment following line for develop/debug
echo "Successful MySql connection:
|
The try/catch exception stops everything cold if the connection is not made, and the Exception provides the information you need to correct it. If the try is successful, it returns the connection to the client.
That’s pretty much it. During development, I like to see the Successful MySql connection message, but once everything is ready to go, I just comment it out. The following little class tests the connection and should not be included in a development folder:
include_once('UniversalConnect.php');
class UseMySQLConnect
{
        private $doConn;

        public function __construct()
        {
                try
                {
                        $this->doConn=UniversalConnect::doConnect();
                        echo "Succesful connection";
                        $this->doConn->close();
                }
                catch (Exception $e)
                {
                        echo "There is a problem: " . $e->getMessage();
                        exit();
                }
        }
}
$worker=new UseMySQLConnect();
?>
|
The line,
$this->doConn=UniversalConnect::doConnect();
takes care of all connection steps for you, and instead of having your code piled up with the same code block required by mysqli() (PHP’s improved MySql function), you just make sure the include_once makes the UniversalConnect class available, and you can use it wherever you need MySql.
 After going through single and double dispatch, it’s time to shift gears to the next major feature of the Visitor pattern; the Traverser. One of the most important (and often omitted) components of the Visitor design pattern is the Object Structure. In
Recent Comments