 On this blog, the Protective Proxy pattern has several different implementations, and if you’d like to refresh your memory, this post has the foundation upon which the others are built. The design pattern for the Proxy is relatively simple: the user logs into a site, and instead of going directly to the subject page, users are sent to a Proxy subject where their credential are checked. If the Proxy page determines valid credentials (typically a username and password), the user is sent to the subject page where the content resides.
With an administrative login, the work to be done (in this case) is to add and edit dynamic content for a page. The upper right portion of the main page is made up of materials that come from a database so that adding and changing content is relatively simple. However, before even getting to the administrative editing portion of the CMS, you want to be sure that only those with permission have access to the dynamic editor. So this post deals only with the login portion of the CMS. Go ahead and test it and download the source files:
![]()
![]()
Rats! I forgot to tell you the username and password. You can find them in the source code in the download or in this post; so go ahead and dig them up and try again. It will help you understand how this proxy implementation works.
The Functional Protective Proxy
As noted above, other examples of the Proxy design pattern have been used and explained elsewhere on this blog. In this (protective) Proxy implementation, only one feature has changed: the methods are all written using functional programming protocols. Figure 1 shows the design pattern diagram for this implementation of the Proxy.
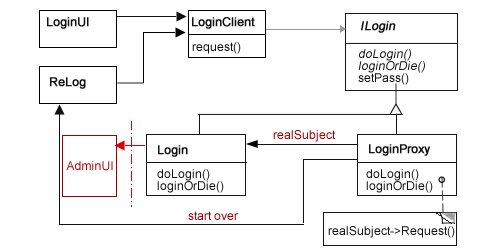
Figure 1: Class diagram for Protective Proxy
As far as protective Proxys go, this one is not unusual. The ReLog could have been handled by sending the user back to the LoginUI, but by having a different looking UI, it helps the user pay attention a bit more prior to re-entering the username and password. The path it follows is pretty simple:
- LoginUI: User enters username and password.
- LoginClient: Sends login request to LoginProxy.
- ILogin: Sets up two abstract methods and a concrete method along with encoded usernames and passwords. It also provides several protected properties. Both the LoginProxy and Login classes implement (extend) this abstract class interface
- LoginProxy: Evaluates username and password and sends it to Login if correct and ReLog if not.
- Login: Calls AdminUI (to be developed).
- ReLog: Re-start process requesting user name and password.
You can obscure the password and username better than I did for this example of the Proxy implementation. When used in an actual environment, you can store the codes in a special MySql table, a Json file, a text file or even a hidden element in an HTML5 document. Since users are not going to be logging in, other than the site administrator, you should be sure that they cannot even find where to log in! It’s a lot easier than trying to protect a site where users are expected to login.
When you look at the different classes, you won’t see much functional programming except in LoginProxy class. That’s because, there’s not a lot of code in any of the classes. The UI (LoginUI and ReLog) classes create and display HTML pages, the client class calls the proxy class (LoginProxy) but it’s the LoginProxy that has to do all of the thinking. Using functional operations, primarily lambda functions (PHP anonymous functions), the class methods determines what to do next: send on the request to the Login object or reroute it to the start-over class, ReLog. That’s pretty much it. In looking at the LoginProxy class code, you can see the functional operations at work:
< ?php class LoginProxy extends ILogin { //Proxy Subject public function doLogin() { $this->sun=$_GET['username']; unset($_GET['username']); $this->spw=$_GET['password']; unset($_GET['password']); try { $this->security=$this->setPass(); $this->igor=$this->sun==base64_decode($this->security[0]) && $this->spw==base64_decode($this->security[1]); $lambda=function($x) {$alpha=$this->igor ? $this->passSecurity=true : NULL; return $alpha;}; $lambda($this->igor); $this->loginOrDie(); } catch(Exception $e) { echo "Here's what went wrong: " . $e->getMessage(); } } protected function loginOrDie() { $badPass=function($x) {$delta= $x ? ($this->goodLog=new Login()) : ($this->badLog=new ReLog());}; $badPass($this->passSecurity); $goodPass=function($x) {$tau= $x ? ($this->goodLog->doLogin()) : NULL;}; $goodPass($this->passSecurity); } } ?> |
Using the two methods implemented from the ILogin interface (abstract class), doLogin() and loginOrDie(), the functions work to determine whether 1) the password and username are correct and 2) send the request to the correct object: Login or ReLog.
What functional programming seems to do, among other things, is to create a series of binary queries with Booleans. For example, the protected variable $igor ($this->igor) has a double boolean assigned to it whereby two (2) comparative statements must resolve to true. By doing so, $igor becomes a Boolean value. (Who’s the Boolean now?! Snap!) Next, $igor, is a Boolean, as an argument in a lambda function ($lambda) determines whether the $passSecurity variable is to be changed from false to true—yet another Boolean!
In the loginOrDie() method, the $passSecurity variable is used again—this time as an argument—in the the $badPass() and $goodPass() lambda functions. That’s how this implementation of the protective Proxy determines whether the password and username are valid. The same determination could have been done using imperative conditional statements (e.g., if, switch), but in moving towards more functional programming within design pattern structures, the functional statements accomplish the same task with non-imperative programming.
In looking at the Login class, what is referenced as the “Real Subject” in design patterns, it does little more than pass the request to a user interface where the actual administration work can be done.
< ?php class Login extends ILogin { //Real Subject public function doLogin() { $this->loginOrDie(); } protected function loginOrDie() { $admin=new AdminUI(); $admin->dataStrat(); } } ?> |
A tighter implementation would have us place the UI for the Administration module in the Login itself, but we’re not striving for “tightness.” Rather, this code moves a loosely bound module in a Proxy pattern to the next module using a Strategy pattern. As you will see in the interface used by both the LoginProxy and Login classes, the Login class only implements the two abstract methods and uses none of the other other protected properties or method. Continue reading ‘Sandlight CMS V: Functional Protective Proxy Login’
 At this point in the Sandlight CMS development process, two design patterns have been employed: 1) Chain of Responsibility as a device checker, and 2) Abstract Factory for making different parts for different devices. As usual, I’ve been posting the results so far on the
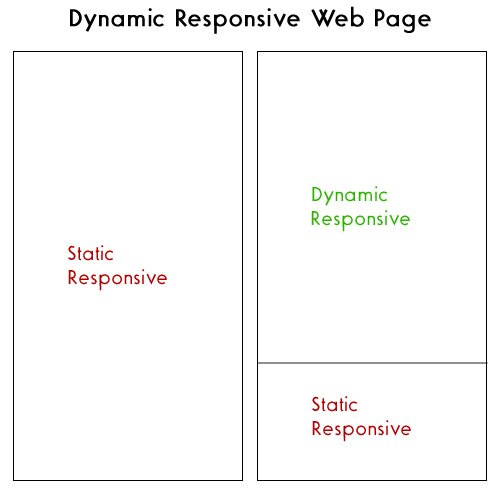
 I’m pretty certain that other smart phones have QR readers; so if you have something other than an iOS or Android operating system on your mobile device, an Internet search for “QR Scanner” will probably be able to locate one for you.
 Once you have a QR scanner, you need a coded image, such as the one to your right. Go ahead and scan it to see what happens. It should take you to the Sandlight Productions, LLC home page build on this CMS (updated.) On it you will find several more QR codes for links to sites related to Sandlight. You can get the coded images online at different sites. One site allows you to include your logo and choice of colors is
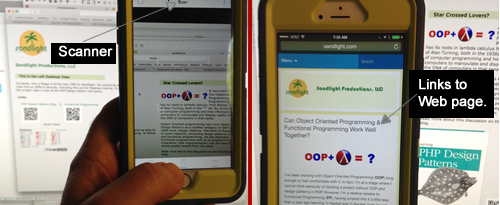
Recent Comments