 If you do a Google search for “Factory Design Pattern,” thankfully, the first hits are “Factory Method….,” the correct name of the pattern that Gamma and his associates developed as a fundamental design pattern. I am not at all impressed by nit-pickers, and lest you think me petty by touching upon the notion of “Factory” vs. “Factory Method,” I hope this post will show you why including a factory method in a Factory Method design pattern is both important and necessary.
The Factory Method: Abstract with Concrete Operations
Some of the posts about the Factory Method are more about the idea of a factory than a method within the Creator (Factory) interface. What the key is, though, is to design an interface in the Factory with both abstract and concrete elements which return a concrete Product. The details of the factoryMethod() are left up to the concrete implementations to decide which one to implement. The factoryMethod() is abstract, but with PHP7, we can establish a return type. What is a return type? When stated, it is the type of data that a method must return. In earlier versions of PHP, using type hinting, only certain types of objects could be included in a method’s arguments. Now, though, you can add a return type to a method. For example, the factoryMethod() in this example includes an IProduct return type after the closing parenthesis in the function declaration:
abstract protected function factoryMethod():IProduct;
Like the scalar variables discussed in a pervious post that could be typed as code hints in parameters, a return value of a scalar variable such as a string means the that the method must return a string, as you can see in the IProduct implementations. However, the factoryMethod is designed to return an instance of an IProduct (the object) implementation. While common in other languages, return types are newly added feature in PHP7.
The Elegance of the Factory Method
Every time I go over the original Design Patterns in the GoF book, I find something new. One of my favorite patterns is the Template Method. The method itself is concrete but the operations within the method are abstract. The Factory Method is the opposite. The factory method is abstract, but it is called by a concrete operation defined in the interface. (I use the term interface to reference both PHP interface type classes as well as abstract class types.) To be sure, The Gang of Four, have more than a single implementation suggested for the Factory Method pattern, but in the class diagram, the method is set up in the interface (Creator) as an abstract method along with a concrete method as shown in Figure 1:

Figure 1: Factory Method class diagram
Before continuing, run the program (Play) and download the source code (Download.) The program is one I’m using to build a path from Lambda Calculus to PHP. (To run the downloaded source files, you’ll need PHP 7.)


Once you have the source code downloaded and a sense of what the program produces, you’ll better understand how the Factory Method pattern makes it easy to update the “products” showing the lambda calculus and the PHP program using functional methods. The Creator participant in this pattern (IFactory) includes two methods; one abstract and one concrete as shown in the following listing:
< ?php
abstract class IFactory
{
    //This class is the 'Creator' interface in the class diagram.

    protected $productNow;

    /*
     * Factory Method--returns concrete Product--reutrns any
     * implementation of IProduct--it programs to the Interface
    */

    abstract protected function factoryMethod():IProduct;

    /*
     * The createProduct() is identified as 'anOperation()' in the class digram
     * While it is a concrete method, it returns the factoryMethod()
     * an abstract method.
    */

    public function createProduct():IProduct
    {
        return $this->factoryMethod();
    }
}
?>
|
The IFactory abstract class may appear to be both strange and broken. How can a concrete method (createProduct) return an abstract method (factoryMethod)? Far from being broken, it’s brilliant. It means that while the createProduct() must return a factoryMethod(), the factoryMethod() can be implemented any way the developer needs following the structure of the interface.
Thoughtful Structure and Easy Update
As a Creational type of design pattern, the Factory Method may have what some consider an unnecessarily fussy (and complex) structure to get a simple product. In this example, the product returns nothing but strings with some HTML embedded to display text messages. Wouldn’t it be just as effective and a lot easier to have a single object for each product using a single interface? Or even simpler, have a single class and just add a set of properties for each string? The answer to all of those questions is, Yes, of course. However, there’s a caveat: if your product is simple; so is the solution. In the examples on this blog, I’ve tried to clarify how to build different design patterns correctly and clearly. We were stuck with the following paradox:
The clearer a design pattern example, the less useful it appears to be.
So, while generating output from strings is no great shakes, the important point is to see how simple it is to make changes using the Factory Method pattern. For example, instead of generating strings, suppose each product requires calls to a MySql database, a jQuery-based mobile UI, and a JavaScript graphic handler (not jQuery). If you look at Figure 2, you can see how this implementation follows the class diagram in Figure 1. The HTML UI and CSS file call the Client:
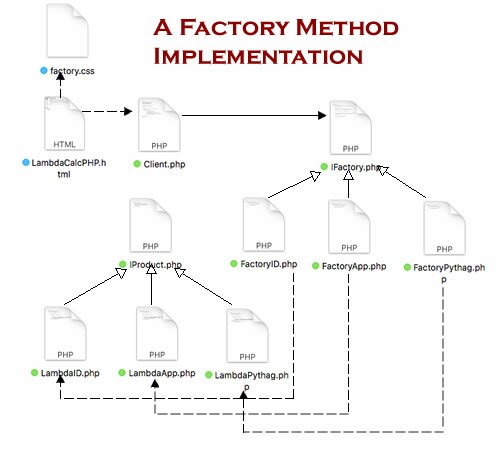
Figure 1: Implementation of the Factory Method pattern
Okay, that’s a bit more complex, but the real issue is how to have several such products generated by the same program, each needing regular (e.g., daily) update and changes for several such products. By having a Factory Method take care of all of the new creations (additions and changes), you can rest assured that as the program gets bigger,as long as you follow the rules in the design pattern (attend to the rules laid down in the interfaces), not only will it be easier to maintain, but it will be less prone to bugs.
The Factory: The Method Returns Help the Developer
In creating the examples using PHP7 and the new function return types, I kept running into errors as I attempted to return product instances. The errors indicated that I was returning strings instead of objects (product instances). Because of the return typing, I was able to find the errors and return the objects, which in turn returned the strings from the products. First, look at the IFactory implementations:
< ?php
class FactoryID extends IFactory
{
    protected function factoryMethod():IProduct
    {
        $this->productNow = new LambdaID();
        return $this->productNow;
    }
}
?>

< ?php
class FactoryApp extends IFactory
{
    protected function factoryMethod():IProduct
    {
        $this->productNow = new LambdaApp();
        return $this->productNow;
    }
}
?>

< ?php
class FactoryPythag extends IFactory
{
    protected function factoryMethod():IProduct
    {
        $this->productNow = new LambdaPythag();
        return $this->productNow;
    }
}
?>
|
As you can see each implementation of the factory interface differs only slightly. Each calls a different product implementation. Because the createProduct() method is concrete, it does not need further implementation—even though the method calls an abstract method. (Note: Please remember that each class is saved as the class name with the “.php” extension.)
Continue reading ‘Factory Method with Return Typing’
 Introduction to Design Patterns. On Saturday, February 13 from 4:30-??? EST (New York time and 10:00-13:00 EET UTC 9:00-12:00) I will be making a presentation to the Bulgarian PHP Group via Google Hangouts. If you are unfamiliar with PHP 7, click on the picture of Vasil Levski, and download the special Bulgarian Edition! of PHP 7 & MySQL: An Object Oriented Introduction that I’ve been writing. (Only the first 6 chapters have been converted to PHP 7, and once the rest of the book is finished, all of it will be PHP 7 content and examples.) I only copied a few phrases from English to Bulgarian; so the book is written in English. (About 200+ pages currently.)
 A CMS is only as good as the administrative module, and the one provided here is fully functional based on a simple work flow. You can change the UI and work flow to best fit your own, but you have the flexibility design patterns offer; so making changes to fit your needs (or those of your customers) should not be difficult.
 On this blog, the Protective Proxy pattern has several different implementations, and if you’d like to refresh your memory, this
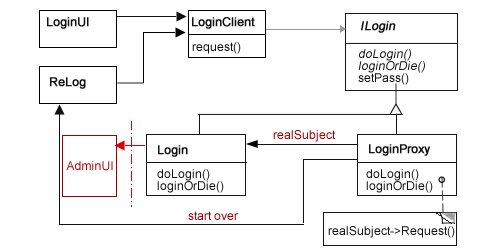
 At this point in the Sandlight CMS development process, two design patterns have been employed: 1) Chain of Responsibility as a device checker, and 2) Abstract Factory for making different parts for different devices. As usual, I’ve been posting the results so far on the
 I’m pretty certain that other smart phones have QR readers; so if you have something other than an iOS or Android operating system on your mobile device, an Internet search for “QR Scanner” will probably be able to locate one for you.
 Once you have a QR scanner, you need a coded image, such as the one to your right. Go ahead and scan it to see what happens. It should take you to the Sandlight Productions, LLC home page build on this CMS (updated.) On it you will find several more QR codes for links to sites related to Sandlight. You can get the coded images online at different sites. One site allows you to include your logo and choice of colors is
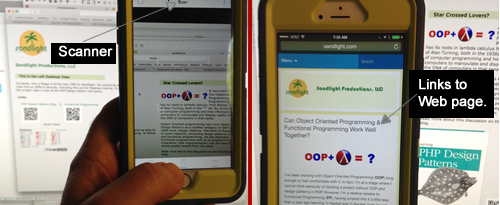
Recent Comments