 Adding Modules
In Part I of this series, you saw how to set up a registration form for a unique user name and password. In Part II, I’d like to expand on the registration to add more information, create Administration and Login modules and (naturellement) use design patterns.
If you’re designing for a customer, you will want a full set of operations to allow her to best serve those who registered on her site for products, services or information. At the same time, you want to design your administrative module so that if your client has new requests, you can add on more functionality without blowing up the program or starting over from scratch. Circumstances change for your clients as demands from their customers change.
Finally, you will need a login module. This module should be both safe and secure, and it should give the user an opportunity to re-try their login or, if need be, register. For the example used here, the security is minimal to focus on the structure. However, using the Strategy object (detailed in Part I), you could add more security.
Overview
To clarify this Registration-Administration-Login system, it helps stand back and look at the larger modules run by the different classes. Figure 1 shows one perspective. All of the operational modules have their own UI; so Figure 1 shows the three main modules with a UI block. As you will see in the file diagrams (Figure 2-4) each has its own UI class. Further, the Helper block works with all modules used for operations.

Figure 1: Overview of Primary Modules and Blocks
Figure 1 is meant as an orientation. In Part I of this series, the Registration module was completed, and while no design patterns were used, the programs adhered to OOP principles. More materials are added to this updated version, but the classes and operations are pretty much the same. The Administration module uses a Strategy design pattern. You will find plenty of examples and explanations of the Strategy pattern on this blog and in Chapter 12 of Learning PHP Design Patterns. Likewise, you will find a Proxy design pattern used for logging on in this blog and in Chapter 11 in Learning PHP Design Patterns. The focus in this post is on pattern implementation and how they work together and with other objects in the program. To get started try out each one and download the files.


After trying the different modules, find out how the main code is structured for each. Since only minor (but important!) modifications have been made to the Registration module, I’d like to start with the Administration module; then look at the changed Registration module and finally the Login module.
Administration: Strategy Design Pattern
The heart of a good registration package is the administrative module. The modules that make up administration are used to communicate with and better serve those registered on the site. However, as is often the case with software, especially in the dynamic marketplace that is the Internet, you need to,
…plan for change.
None of your customers for whom you develop Web sites are going to know everything they need to know until users start using their site. You need to create an administration tool that allows developers to add on new functionality in a relatively complex program. However, you want to be sure that new features are easy to add and will not gum up the rest of the program. Obviously, you will need a PHP Design Pattern; but which one? In this case you’re going to be adding operations that will do something the current ones do not, and a good candidate is the Strategy pattern. Each of the functions require a slightly different algorithm, and the Strategy pattern allows algorithms to vary independently from the clients that use them. Even better, the pattern makes it easy to add new encapsulated algorithms in the form of classes that implement the same interface—IAdminStrategy. Figure 2 shows the files used in the implementation of the Strategy pattern:
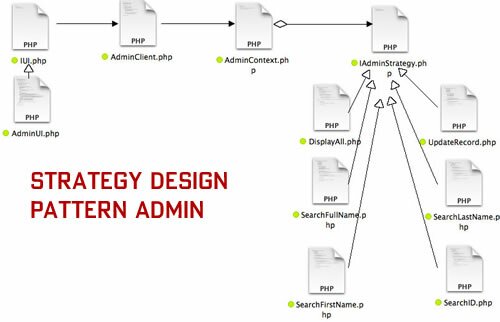
Figure 2: Administrative Strategy file diagram
The UI for the administrative module reflects the information in the updated table. (See the CreateTable class below in the Registration section.) For the most part, the UI is nothing more than an encapsulated HTML document. In other words, it’s pretty simple to create and understand.
< ?php
error_reporting(E_ALL | E_STRICT);
ini_set("display_errors", 1);
function __autoload($class_name)
{
include $class_name . '.php';
}
class AdminUI
{
//Get the table name from constant in interface
public function __construct()
{
//Use the Security object to encode table
$this->adminUI=< <<ADMIN
DOCTYPE html>
<html>
<head>
<link rel="stylesheet" type="text/css" href="login.css"/>
<meta charset="UTF-8"/>
<title>Logged Administrationtitle>
head>
<body>
<h2>Administrationh2>
<h5>Choose an operation.h5>
<form action="AdminClient.php" method="post" target="datadisplay">
<input type="radio" name="task" checked="true" value="DisplayAll"/> Display All<br />
<input type="radio" name="task" value="UpdateRecord"/> Update Record by ID#
<fieldset class="fset"><legend>Search Optionslegend>
<input type="radio" name="task" value="SearchFullName"/> Search Email by full name<br />
<input type="radio" name="task" value="SearchLastName"/> Search Email by Last name<br />
<input type="radio" name="task" value="SearchFirstName"/> Search Email by First name<br />
<input type="radio" name="task" value="SearchID"/> Search Email by ID#
fieldset><br />
<input type="text" name="id" size="8"/> Record ID#
<input type="text" name="fname"/> First name
<input type="text" name="lname"/> Last Name<br />
<input type="text" name="email" size="30" /> Email<br />
<input type="submit" name ="admin" value ="Do Operation"/>
form>
<br />
<iframe name="datadisplay" width="500" height="700">Displayiframe>
body>
html>
ADMIN;
echo $this->adminUI;
}
}
$worker=new AdminUI();
?>
|
Note that the “DisplayAll” radio button checked attribute is been set to “true.” If nothing is selected, the program throws an error. Having a default checked button is a simple way to make sure that something is selected.
The UI calls the AdminClient class and passes the name of the concrete strategy to be launched.
< ?php
error_reporting(E_ALL | E_STRICT);
ini_set("display_errors", 1);
function __autoload($class_name)
{
    include $class_name . '.php';
}
class AdminClient
{
    private static $adminStrategy;
    private static $adminContext;
    //client request
    public static function request()
    {
      //Passes class name from UI & creates new class instance
      self::$adminStrategy=$_POST['task'];
      $strat=new self::$adminStrategy();
      self::useStrat($strat);
    }

    private static function useStrat(IAdminStrategy $doTask)
    {
        self::$adminContext=new AdminContext();
        self::$adminContext->adminInterface($doTask);
    }
}
AdminClient::request();
?>
|
The radio buttons in the AdminUI class are all named “task” and since only one radio button from the same group can be selected, whatever value is in “task” ($_POST[‘task’]) is the name of the concrete strategy to be invoked. Easy-peasy; lemon-squeezy. Broken down it looks like the following:
- String is passed through superglobal variable ($_POST[‘task’]) with name of concrete class.(e.g., “UpdateRecord”).
- String stored in private static variable ($adminStrategy).
- Instance of class created and stored in local variable, $strat. ($strat=new self::$adminStrategy())
- Private static method (useStrat()) creates new context instance and passes specific strategy through Context adminInterface().
Up to this point you can see that the program has no conditional statements. One of the advantages of the Strategy design pattern is that it has no conditional statements to give you a headache when it’s time to update. A request goes straight from the client to the concrete stately—no if’s about it.
Next we look at the AdminContext class and IAdminStrategy interface. In the Strategy design pattern, the context participant is the most subtle. Using the code hint, IAdminStrategy it maintains a reference to the strategy object (via the interface). No matter how many different strategies you add or currently use, they all can pass through the context if they are correctly formed. Given the simplicity of the interface, this gives the developer a wide range of strategy implementations.
< ?php
//AdminContext.php
class AdminContext
{
    private $adminStrat;

    public function adminInterface(IAdminStrategy $strategy)
    {
        $this->adminStrat=$strategy;
    }
}
?>

< ?php
//IAdminStrategy.php
interface IAdminStrategy
{
    public function adminAlgorithm();
    const BLETCHLEY ="registered";
}
?>
|
You you can see from Figure 2, the pattern includes lots of concrete implementations (all available in the download package), and here, we’ll look at just one; UpdateRecord.
< ?php
class UpdateRecord implements IAdminStrategy
{
        private $hookup, $sql,$tablemaster;
        private $recordID,$fname,$lname,$email;

        public function __construct()
        {
            $this->recordID=$_POST['id'];
            $this->fname=$_POST['fname'];
            $this->lname=$_POST['lname'];
            $this->email=$_POST['email'];
            $this->adminAlgorithm();
        }

        public function adminAlgorithm()
        {
            $this->tableMaster=IAdminStrategy::BLETCHLEY;
            $this->hookup=UniversalConnect::doConnect();
            $this->sql ="UPDATE $this->tableMaster SET fname='$this->fname', lname='$this->lname', email='$this->email' WHERE id='$this->recordID'";
            try
            {
                $result = $this->hookup->query($this->sql);
                echo "Client update complete.
";
            }
            catch(Exception $e)
            {
                    echo "Here's what went wrong: " . $e->getMessage();
            }
            $this->hookup->close();
        }
}
?>
|
As all good classes, the UpdateRecord class has a single responsibility. It updates records based on the user’s ID number. It’s encapsulated and implements the IAdminStrategy interface. Because besides abstract methods, the only thing stored in interfaces is constants, each IAdminStrategy implementation must declare and use its own private variables; even though some are reused by all of the strategy implementations. In this example, they were collapsed into two groups of private variables at the beginning of the class.
One of the possible useful strategies a customer may want is one that will delete a record. See if you can implement a strategy that does nothing but drop a record based on the ID number. You’ll have to add a radio button choice to the AdminUI, but that’s about it other than creating a DropRecord class. The other strategy implementations will give you the necessary clues to do the implementation.
Continue reading ‘OOP Registration-Login Part II: PHP Strategy & Proxy’
 A CMS is only as good as the administrative module, and the one provided here is fully functional based on a simple work flow. You can change the UI and work flow to best fit your own, but you have the flexibility design patterns offer; so making changes to fit your needs (or those of your customers) should not be difficult.
 What Are the Guidelines?

 Adding a Context
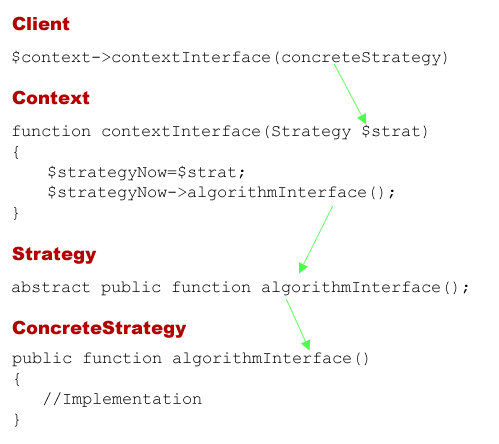
 Why ‘Near’ Strategy?
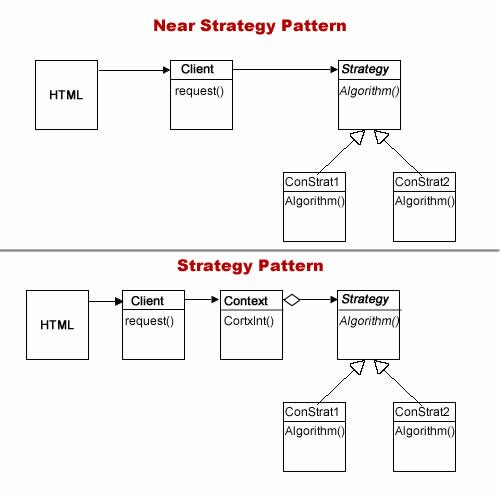
Recent Comments