Introduction to Design Patterns. On Saturday, February 13 from 4:30-??? EST (New York time and 10:00-13:00 EET UTC 9:00-12:00) I will be making a presentation to the Bulgarian PHP Group via Google Hangouts. If you are unfamiliar with PHP 7, click on the picture of Vasil Levski, and download the special Bulgarian Edition! of PHP 7 & MySQL: An Object Oriented Introduction that I’ve been writing. (Only the first 6 chapters have been converted to PHP 7, and once the rest of the book is finished, all of it will be PHP 7 content and examples.) I only copied a few phrases from English to Bulgarian; so the book is written in English. (About 200+ pages currently.)
In case there’s a problem with Google Hangouts, I’ll have a streaming video of the talk available and communicate with the group via Twitter and/or email during the time of the talk. If you are not familiar with OOP, take a look at the first two chapters of PHP 7 & MySQL: An Object Oriented Introduction. Page 14 has a simple, clear and accurate definition of OOP that differentiates it from sequential and procedural programming.
Hope to see you via Google Hangouts on Saturday, February 13 at the Bulgaria PHP Meeting!
I was invited to speak at on April 22 at Microsoft’s NERD Center in Boston for Month 4 of Boston PHP’s 200 Days of Code. The Advanced track of 200 Days of Coding is going through Larry Ullman’s book, PHP Advanced & OO Programming (3rd ed), and I’ll be talking about materials from Chapters 8-10. However, with a little over an hour, I am using Occam’s razor to keep things focused, pertinent and related to the relevant chapters. Chapter 10 is about Networking with PHP, and by way of preview, I thought I’d take the material that Larry has on geolocation, and put it into an OOP structure using the Template Method design pattern. I also made a number of other modifications for which Larry cannot be blamed! Go ahead and Play the program to see what it does and Download the code. (The text window defaults to sandlight.com but you can add any URL you want.)
The Magical Template Method
The first thing I did was to set up the geolocation app with a Template Method. You can see previous discussions and examples of the Template Method on this blog, but I wanted to include the class diagram the Gang of Four used to see how simple but elegant this pattern actually is. Figure 1 shows this subtle but powerful method:
Figure 1: Template Method class diagram
The nice thing about this design pattern is that it has lots of uses as you may have already seen on this blog. However, the same simple principle is used: Abstract methods from an abstract class are implemented in a concrete method from the same abstract class. What the Template Method does is to provide a blueprint for the order of the methods to be used with the exact content dependent on the intended use.
So, starting with the abstract class, you can see how this implementation works:
< ?php
abstract class ILocatorTemplate
{protected$url,$info,$data,$ip,$loc;protected$package=array();protected abstract function getLocation();protected abstract function bundle();//The Template Methodprotectedfunction templateMethod(){$this->getLocation();$this->bundle();}}?>
A number of protected properties are first declared, including an array object, $package. Next the two primitive operations are declared, getLocation() and bundle(). The former is for getting the geolocation of a URL and the second for placing that information into the $package object. That’s it! All that’s left to do is to implement the abstract class.
The Locator class
The concrete implementation of the ILocatorTemplate adds content to the properties and concrete operations to the two abstract methods.
< ?php
class Locator extends ILocatorTemplate
{publicfunction doLocate($place){$this->loc=$place;$this->templateMethod();return$this->package;}protectedfunction getLocation(){$this->ip=gethostbyname($this->loc);$this->url='http://freegeoip.net/csv/'.$this->ip;$this->info=fopen($this->url,'r');$this->data=fgetcsv($this->info);fclose($this->info);}protectedfunction bundle(){$this->package['IP']=$this->data[0];$this->package['CountryID']=$this->data[1];$this->package['Country']=$this->data[2];$this->package['StateID']=$this->data[3];$this->package['State']=$this->data[4];$this->package['City']=$this->data[5];$this->package['Zip']=$this->data[6];$this->package['latitude']=$this->data[7];$this->package['longitude']=$this->data[8];}}?>
The doLocate() method holds the URL passed by the user. That is placed into one of the properties declared in the abstract class, $loc. Next, the $templateMethod() fires and it, in turn, launches first the getLocation() method and then the bundle() method. It doesn’t matter what is in those methods because they were defined abstractly. Therefore, any abstract method defined as part of template method will launch regardless of its implementation, as long as it adheres to the signature form in the abstract class. The getLocation() method pretty much follows the steps Larry lays out in Chapter 10. It uses the freegeoip.net Web service which returns CSV data with the location information.
The bundle() method transfers the data from the $data array send by the Web service into an associative array, $package. The keys in the associative array will serve as labels for the data once processed in the Client class.
The last step in the process is to return the $package containing an associative array with descriptive keys and location information. That’s it….but there is one more thing before we turn to the UI and client.
The Hollywood Principle
The Template Method exemplifies a larger design pattern principle called the Hollywood Principle, simply stated,
Don’t call us. We’ll call you.
It refers to how a parent class (ILocatorTemplate) call the operations of a subclass (Locator) and not the other way around. The templateMethod() function is a concrete method from the parent class, and both the getLocation() and bundle() methods are implementations of the child class, Locator. So, the parent class method calls the child class implementations; not vice versa. This fundamental principle will help keep your PHP OOP from getting tangled up. Continue reading ‘PHP Template Method Pattern: Geolocation Encapsulated’
The other day I was working on an app to automatically update a site to a mobile device on a daily basis. The prototype uses a MySql table with three fields and only seven records, one for each day of the week. Each week, using an HTML UI, the administrator adds new headers, graphic urls and write-ups for each day of the week. These are stored in the MySql database, and the graphics are placed into an “images” folder.
For each day of the week, I needed to update three fields in the MySql table. In looking at the MySql docs I found that updates are carried out one field at a time even though I found some workarounds, none seemed too reliable, and the docs suggested as much. So I’d have to make three separate operations. That should be easy enough—a single update class with methods for each of the three fields I needed to update. Before we get started, you can see the update process and download the code using the two buttons below:
One Class to Handle Multiple Updates
What makes SQL updates easy is that the SQL statements usually only involve a single field and table. So one way to look at multiple updates is to take three simple statements and provide each one its own method. There is a sequence to follow; so why not put them into a Template Method? (See previous posts on the Template Method design pattern in PHP for more details on its purpose. An overview can be found in the Design Pattern Table).
To start off, we’ll see what the skeleton of the operations look like:
update header
update picture url
update write-up
Next, we’ll create an abstract class to reflect that order but not providing any content. Also, we’ll add properties likely to be needed:
With the template method in place (updateAll()), build a class to implement the abstract methods. The data for the methods is contained in the HTML variables passed from the UI; and we’ll need a day-day-of-the week object to plant the date in the correct location. First, look at the Update class and then the HTML UI that passed on the data:(Click the link to see the rest of the post and how the template method is implemented.) Continue reading ‘Easy PHP Multiple MySql Update: Template Method to the Rescue’
In Part IV of the Content Management System (CMS) series, I noted that I wanted to have a separate post on uploading graphics to a web server. This post addresses the issues involved in getting graphics in place on a web server that will be included in a Web page, whether you’re using a CMS or not. In the case of selecting a graphic from your desktop and uploading it to a server, most of the important work is done by HTML. So, we’ll start with the HTML assuming that HTML5 is in use. Be advised at the outset that you will need to do a little system administration to set your file privileges in the folders where you will store the graphic files. In the development process, I used a local host, a different computer on my LAN, and two different web servers at remote locations.
Choosing a File to Upload
HTML5 (and possibly earlier versions) has some very nice built-in form attributes that make selecting a graphic file from your computer to place in an “uploadable” state quite easy. All you need are a couple of lines of HTML. Within a form container, the line:
generates the following button when you load the code into a browser:
In the tag, you will need to include an enctype assignment:
That’s about it, and you’re all set to select a file that can be accessed through the PHP superglobal variable $_FILES.
The following HTML code generates the CSS first the then HTML portion of the little graphic CMS:
I added separation between the Choose File button and Load Graphic File submit button so that the HTML and PHP portions are more clearly defined. Figure 1 shows the initial web page for the upload:
Figure 1: Selecting and calling PHP Script
Since the goal of having a CMS is to make updates simple, this initial example does not have any whistles and bells (e.g., folder selection), and it does nothing more than to prepare a selected file for upload to a server.
A Little PHP
On the PHP side of the equation, you have only two code elements:
$_FILES: Superglobal array with selected file information in elements
move_uploaded_file(): Stores uploaded file (in $_FILES) to in specified server location.
Creating a class, using the minimum code and no error, type or size checking, is quite simple. To keep it even simpler, the following trigger script instantiates the Upload class:
< ?php
//Upload.phpclass Upload
{private$fileNow;publicfunction __construct(){if($_FILES){$this->fileNow=$_FILES["file"]["name"];//The following line does all the workmove_uploaded_file($_FILES["file"]["tmp_name"],"images/$this->fileNow");echo$this->fileNow." has been uploaded to the images folder:";}}}?>
That simple class does everything you need to upload and store a file in a folder named “images” in the directory where the script is launched. It’s pretty basic, but you should be able to see exactly what is required to upload a file to a web server without having to use an FTP client.
Template Method for Details
Note: Before you get started on this section, download all of the files that are involved:
As you saw, the Upload class is quite easy. However, you will want to make sure that not just any file type is loaded and you’ll want to make sure that you don’t have giant files loaded that may fill up your disk space. (You also want to protect against maliciously uploaded files.) The $_FILES array has information to use for checking type and size. Using the $_FILES array information we can boil the process down to three steps:
checkSize(); See how big it is and compare to a maximum allowable size.
checkType(); Add a set of acceptable file types used with a Web page and check to see if the file type is acceptable.
uploadFile(); If the file type and size are okay, upload the file.
I’ve been working with a student doing experiments based on Gestalt psychology and User Experience (UX) and Human Computer Interaction (HCI). She wanted to find out whether the Gestalt concepts of similarity and proximity could be applied to a user interface (UI). So she set up an experiment to see what happened.
In summary, she tested using UIs with similarity/no similarity and proximity/no proximity. The subjects were given a task that would test each condition and their times were compared. After each test, the times were saved in a MySQL database and then retrieved to compare the mean times (average amount of time) that each task took. As predicted, the raw data showed that when the Gestalt principles were observed, the task took less time than when they were not.
While just looking at the data showed a difference, she did not know whether the differences were significant. The most appropriate way to find whether the differences are significant is to conduct a statistical test called a “means test” or “t-test” that compares two means. The t-test would tell us with a precise degree of probability whether the differences were random or not. Use the following buttons to view the outcome and download the files:
The T-Test
Figure 1: The t-test
Figure 1 shows the statistic used for the t-test. Let’s break down the t-test:
t: This is the value generated by the t-test. Using it, we use a statistical look-up table to see to what degree this is significant or not. (Because the sample size is 50, the degrees of freedom is 49, and so the t value must be 3.2651 or greater for the difference to be significant at the .001 level of significance. That means there’s about 1 chance in 1000 that these differences would be random.)
x1, x2: The x1 and x2 values are the means. This value is easy to calculate. You just divide the total of the values in the array using the function array_sum($array) by the number of cases–count($array). (In the diagram you see the x’es with a line over them and the numbers are subscripted.)
Triangle: The triangle (or delta) is the symbol used for difference in the samples. The null hypothesis is that there will be no differences, and so the value of delta is zero.
s1,s2: The s values are standard deviations. These are the amount of differences between the observed value and the mean. In the formula, the s values are squared–s^2.The standard deviation algorithm can be found in your PHP Manual.
n1, n2: The n values are the total number of values in the samples. In PHP, those values can easily be determined by the count($array) function.
Square root symbol: We need to divide the top part of the formula by the square root of the standard deviations divided by the total number of cases in each sample. Again, that’s easy using the sqrt($calc) function built into PHP.
By breaking down the problem in this manner, you can quickly see that you need only three values and two arrays:
Mean
Standard Deviation
Number of cases
The arrays need to be numeric, and the delta value in this case is zero; so that could be left out of the formula if we wanted. However, just to keep it in mind, it will be represented by the literal 0.
Making Simple
The purpose of this post is to illustrate the OOP principle,
A class should only have a single responsibility.
The principle is both to modularize problem solving and create reusable parts. Most PHP programmers don’t want to “waste time” creating additional code, and OOP programming that modularizes problem solving certainly requires more code than one that does not. However, the more code in a file or class, the more particularized it is and the more difficult it is to reuse. So, rather than “wasting time,” in the long run you save time by having reusable code. Keep in mind that businesses that hired coders encouraged OOP programming because over time, they spend less effort starting all over every time they wanted to change a program or write a new one. Modularized coding allowed many parts to be reused and changes could be made to even the most complex programs.
Keeping this in mind, we can modularize the t-test into parts that not only solve the problem at hand and make it simpler to understand but is flexible enough to be reusable.
Figure 2 shows the class diagram for the t-test. As with the Chi Square example a while back, this example also uses the Template Method design pattern. However, it breaks the solution down into more parts.
Figure 2: Class diagram for means test.
The MeansTest class implements the IMeansTest interface (an abstract class) that includes a templateMethod() function to order the steps in the means test. The steps in the algorithm are cast as abstract functions to be implemented in the child class. First, it gets the means from the Mean class, then, using the mean value, it gets the standard deviation from the StandardDeviation class, and finally the MeansTest object puts them together for the t-test value. Continue reading ‘Breaking Down Large PHP Problems into Classes: A Class Should Only have a Single Responsibility’
 Introduction to Design Patterns. On Saturday, February 13 from 4:30-??? EST (New York time and 10:00-13:00 EET UTC 9:00-12:00) I will be making a presentation to the Bulgarian PHP Group via Google Hangouts. If you are unfamiliar with PHP 7, click on the picture of Vasil Levski, and download the special Bulgarian Edition! of PHP 7 & MySQL: An Object Oriented Introduction that I’ve been writing. (Only the first 6 chapters have been converted to PHP 7, and once the rest of the book is finished, all of it will be PHP 7 content and examples.) I only copied a few phrases from English to Bulgarian; so the book is written in English. (About 200+ pages currently.)
 I was invited to speak at on April 22 at Microsoft’s NERD Center in Boston for Month 4 of Boston PHP’s 200 Days of Code. The Advanced track of 200 Days of Coding is going through Larry Ullman’s book, PHP Advanced & OO Programming (3rd ed), and I’ll be talking about materials from Chapters 8-10. However, with a little over an hour, I am using Occam’s razor to keep things focused, pertinent and related to the relevant chapters. Chapter 10 is about Networking with PHP, and by way of preview, I thought I’d take the material that Larry has on geolocation, and put it into an OOP structure using the Template Method design pattern. I also made a number of other modifications for which Larry cannot be blamed! Go ahead and Play the program to see what it does and Download the code. (The text window defaults to sandlight.com but you can add any URL you want.)
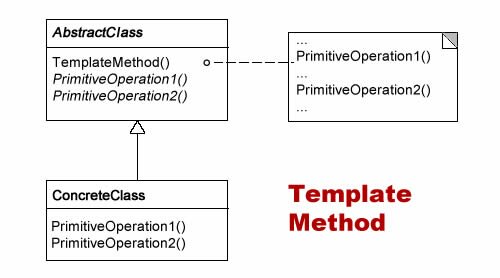
 Think Object Solutions
 Load Up the Graphic Files
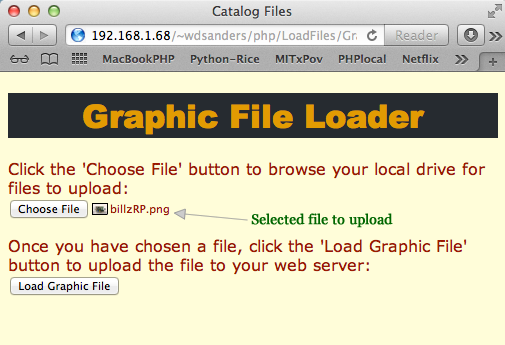
 A Little UX and HCI


Recent Comments