 Encapsulate a Request
On occasion when developing an application, you may want to issue a request, but you may not know about the requested operation or its receiver. Imagine that you’re developing a game, and you’re working on a “Commander” (like Captain Kirk of Star Trek). The commander will issue commands, but during development or execution, you’re not sure who’s going to carry out the command or exactly how it’s going to be done. For instance, suppose that a Weapons Officer on the bridge simply pushes a button when the Captain issues a command to fire a photon torpedo. However, suppose that the bridge is damaged and the Weapons Officer wounded and cannot carry out the command. Any decent game designer would allow for someone else to launch the torpedoes; a crew member working in the torpedo bay, for example. Therefore, you would not want to tightly couple the action of firing a photon torpedo with the Weapons Officer. Something like;
weapons_officer->firePhotons()
would not be a good idea. Instead, you’d want the request to be handled by anyone who could get to the torpedoes triggering mechanism—no matter who it was or what triggering device was employed.
The Command design pattern encapsulates the request as an object, and allows you to add parameters to the clients with different requests. You can also support undoable operations—like firing off a photon torpedo! In this particular example, the participants and implementation is quite simple. I employed a helper class (Move) to add a little flair to the example, but otherwise, it’s a very simple implementation of the Command design pattern. Fire off the torpedo and download the files to get started:
![]()
![]()
The movement operations were taken from an earlier post on this blog of working with SVG files—once again illustrating the re-use functionality of OOP design. The helper class, Move is almost wholly a re-use of the earlier implementation. The sound was added to the class for this example.
The Wholly Involved Client
The requesting client is fully involved in the Command pattern. It is associated directly with both the Receiver and the ConcreteCommand classes. Figure 1 shows the pattern’s class diagram:
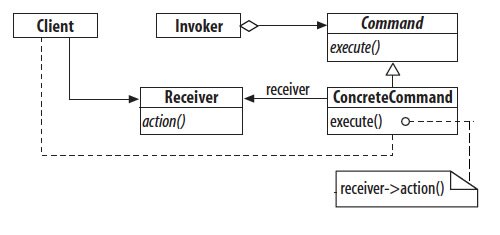
Figure 1: Command class diagram
In this example, I employed a single Client, Receiver, Invoker and ConcreteCommand. Largely, I re-purposed an abstract example that Chandima Cumaranatunge had used in ActionScript 3.0 Design Patterns that we had co-authored in 2007—the main difference being that the example is written in PHP and I added an action that involved sound and animation. However, it is largely the same. In looking at the code in the Client, you can see that it creates instances of a ConcreteCommand, Receiver and Invoker.
error_reporting(E_ALL | E_STRICT);
ini_set("display_errors", 1);
// Autoload given function name.
function includeAll($className)
{
    include_once($className . '.php');
}
//Register
spl_autoload_register('includeAll');

/* Client */
class Client
{
    public static function request()
    {
        $rec = new Receiver();
        $concom = new ConcreteCommand($rec);
        $invoker = new Invoker();
        $invoker->setCommand($concom);
        $concom->execute();
    }
}
$worker=Client::request();
?>
|
As you can see, the Client, chooses the concrete command and the invoker. Figure 2 shows the file diagram for this Command implementation:
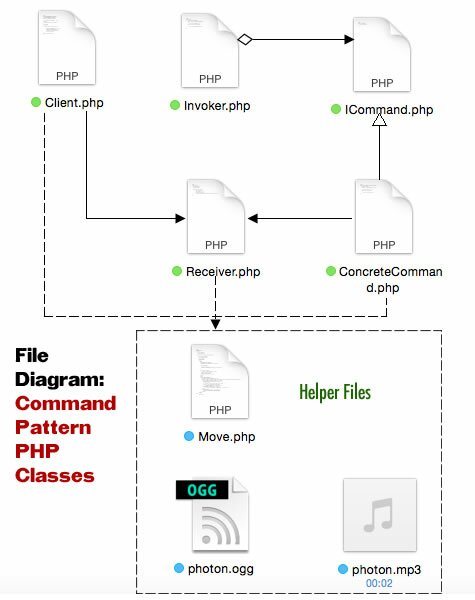
Figure 2: Command file diagram
This pattern can have different commands and different invokers, but the key lies in the Command interface (ICommand) that includes an execute() method that invokes the command. It doesn’t concern itself with what other object does the invocation; it just provides the interface for some object to carry out the command.Using the bare minimum, the interface has a single abstract method:
interface ICommand
{
   function execute( );
}
?>
|
The design allows for a number of different ConcreteCommand classes, especially flexible because of the simplicity of the interface. However, in this example, only a single concrete command implements the interface.
class ConcreteCommand implements ICommand
{
    private $receiver;
    function __construct(Receiver $rec)
    {
        $this->receiver = $rec;
    }
    public function execute()
    {
        $this->receiver->action();
    }
}
?>
|
The receiver has been identified by the Client and passed to the parameterized ConcreteCommand by the Client. The Client acts very much like a conductor in this pattern. It pulls a the pieces together and determines how they will interact together. All of the work is to carry out the command realized in the Receiver class.
The Invoker Makes it Happen
Returning to the Star Trek example where the Captain commands the Weapons Officer to “fire a photon torpedo,” the Weapons Officer is the invoker. That is, by pressing the Fire button, she executes the command. However, as we noted, maybe the Weapons Officer is unable to carry out the order because she has been knocked out in a battle, and so someone else has to do it. Because the command and the invocation of the command are loosely coupled, any available invoker could carry out the command. First, take a look at the Invoker class:
class Invoker
{
    private $currentCommand;
    public function setCommand(ICommand $c)
    {
        $this->currentCommand = $c;
    }
    public function executeCommand()
    {
        $this->currentCommand->execute();
    }
}
?>
|
Note that both a method for setting the command and one for executing the command are part of the Invoker class. The Client sets the command, but how is it executed? Again, it is the Client, but the execute() method is through the ConcreteCommand instance; also called by the Client.
The Receiver Knows What to Do
In order for the command to be carried out, at least one object needs to do what the command requires. In this case, it’s the Receiver. Following the path so far:
- The Command tells what to do.
- The Invoker tells an object to carry out the command
- The Receiver carries out the requirements of the command.
Keep in mind that all of this is done with loosely coupled objects, and different participants can carry out the different roles.
class Receiver
{
   private $speed;
   private $photon;

   public function action()
   {
         $this->speed= 20;
         $this->photon = 16;
         $launcher=new Move();
         echo $launcher->setVelocity($this->speed,$this->photon);
   }
}
?>
|
I suppose this is a bit elaborate for an abstract example, but it seemed a little more illustrative with something other than an echo statement that the Receiver object announced. Besides, it illustrates re-use of a class as a helper class for the Receiver to do a bit more. As you can see from Move helper class, a the property IDs from the original use have been retained—e.g., ‘ship’ and ‘torpedo’ used for the same purpose.
//Helper class
class Move
{
private $velocity;
private $capacity;
public function setVelocity($speed,$ship)
{
$this->velocity=$speed;
$this->capacity=$ship;
$ship =<<
|
You can revise the actions of the Receiver to virtually anything you want. The important point with the Command class is that the original command (request) is encapsulated through the ICommand interface, and in the development process there can be any number of different requests fulfilled by different receivers and launched by different Invoker objects. Further with added commands, you can also add new invokers and ever receivers.
Beyond Abstract Command Structures
Even though this example has not been quite as abstract as originally planned, it is still pretty basic. What I’d like to do in subsequent examples is to build on this basic pattern where multiple commands, invokers and receivers work in concert through the Command design pattern. In the meantime, feel free to try out some of your own ideas and offer suggestions for further improvement and/or refinement.
 Re-inventing the Wheel

 A Flexible CMS
 Adding a Context
 Distance in 2D Space
Recent Comments