Archive for the 'MySql Operation' Category

Sandlight CMS VI: Strategy Administrative Module

admin A CMS is only as good as the administrative module, and the one provided here is fully functional based on a simple work flow. You can change the UI and work flow to best fit your own, but you have the flexibility design patterns offer; so making changes to fit your needs (or those of your customers) should not be difficult.

One of the key features of a dynamic Web page is that it can be updated easily, and by using a MySQL table and database, all of the update information can be stored in a single location (table.) Updating the page is simply a matter of updating the data in a record or by adding new records to the table. The administrative module for this CMS has the capacity to update data in an existing record, but the page presented is always the newest record. The CMS has certain drawbacks because you cannot delete records without throwing the system out of whack, but that was done for the purposes of ease of use. (Remember, you’re a programmer and can change whatever you want!)

Set the Table

Setting up the MySQL table involves three files: 1) an interface with the MySQL connection information; 2. a connection class; and a table-creation class. The following three classes: (Use your own MySQL connection information in the IConnectInfo interface.)

< ?php
//Filename: IConnectInfo.php
interface IConnectInfo
{
        const HOST ="your_host";
        const UNAME ="your_username";
        const PW ="your_pw";
        const DBNAME = "your_dbname";
        public static function doConnect();
}
?>
 
< ?php
//Filename: UniversalConnect.php
ini_set("display_errors","1");
ERROR_REPORTING( E_ALL | E_STRICT );
include_once('IConnectInfo.php');
 
class UniversalConnect implements IConnectInfo
{
        private static $server=IConnectInfo::HOST;
        private static $currentDB= IConnectInfo::DBNAME;
        private static $user= IConnectInfo::UNAME;
        private static $pass= IConnectInfo::PW;
        private static $hookup;
 
        public static function doConnect()
        {
                self::$hookup=mysqli_connect(self::$server, self::$user, self::$pass, self::$currentDB);
                try
                {     
                        self::$hookup;
                        //Uncomment following line for develop/debug
                        echo "Successful MySql connection:
"
; } catch (Exception $e) { echo "There is a problem: " . $e->getMessage(); exit(); } return self::$hookup; } } ?>   < ?php include_once('IConnectInfo.php'); include_once('UniversalConnect.php'); class CreateTable { private $drop;   public function __construct() { $this->hookup=UniversalConnect::doConnect(); $this->tableMaster="your_table_name"; $this->dropTable(); $this->makeTable(); $this->hookup->close(); }   private function dropTable() { $this->drop = "DROP TABLE IF EXISTS $this->tableMaster";   try { $this->hookup->query($this->drop) === true; printf("Old table %s has been dropped.
"
,$this->tableMaster); } catch (Exception $e) { echo "Here is why it did not work: $e->getMessage()
"
; } }   protected function makeTable() { $this->sql = "CREATE TABLE $this->tableMaster ( id SERIAL, topic NVARCHAR(24), header NVARCHAR(120), graphic NVARCHAR(60), story BLOB, PRIMARY KEY (id))"; try { $this->hookup->query($this->sql);   } catch (Exception $e) { echo 'Here is why it did not work: ', $e->getMessage(), "
"
; } echo "Table $this->tableMaster has been created successfully.
"
; } }   $worker=new CreateTable(); ?>

The connection routines have been improved upon over time, and you can find out more about it in the original post on the subject on this blog. For now, Play the application and Download the source files. (When you click the Play button, you enter the Login UI. Use the same un/pw combination from the Functional Protective Proxy post on this blog. (Hint, you can find it in the ILogin abstract class.)
PlayDownload

In creating the table at first I used the TEXT data type for a large block of text, but then decided that a BLOB type may have a slight advantage. The BLOB is a VARBINARY and TEXT is VARCHAR, and BLOB seemed to have a slight advantage. However, the advantage may be smaller than I originally thought. Check out the MySQL docs on these two data types and you can see the differences for yourself. Figure 1 shows what the editor in the administration module looks like:

Figure 1: Administrative Module Editor

Figure 1: Administrative Module Editor

From Proxy to Strategy

The login module of this CMS is based on the Proxy pattern. Now, as in previous CMS examples, the administrative module is based on a Strategy pattern. Each object in the Strategy pattern represents an algorithm to accomplish a different task. In this case, the tasks include:

  • Entering data
  • Editing data
  • Displaying data
  • Displaying a page based on stored data.

All requests go through a context relying on a Strategy interface. In this case, I used an abstract class which allowed the addition of several protected properties and a constant with the name of the table. This is all in addition to the main method in an abstract public function, the algorithm method, executeStrategy(). Following the Strategy design pattern, begin with the Context. Continue reading ‘Sandlight CMS VI: Strategy Administrative Module’

PHP Strategy Design Pattern Part II: Add a Context

pulp Adding a Context

A few years back, a post on this blog looked at examples of PHP design patterns that had missing parts. In 2006, an IBM sponsored post introduced PHPers to design patterns in “Five common PHP design patterns.” This was an important post because it demonstrated that far from being the exclusive domain of languages like Java, design patterns were applicable to PHP as well. However, of the five patterns, (Factory [Factory Method], Singleton, Chain-of-Command [Chain-of-Responsibility] , Observer, and Strategy) two (Factory and Chain-of-Command) were misnamed and misrepresented, one (Singleton) has since been more-or-less deprecated as a pattern (by no less than Erich Gamma) and the other two were iffy in their implementation.

Like lemmings following each other over a cliff, PHPers often followed each wrong example, further perpetuating the ill-formed pattern. So, when we look at patterns, lest PHP programmers be considered rank amateurs, we need to get patterns right. One of the most common mistakes with the Strategy pattern is either ignoring or leaving out the Context class altogether. In Part I of this two-part series, we saw what a Near-Strategy pattern looks like without a Context class. In Figure 1 of that same post, you can see the class diagrams of the Near-Strategy and Strategy patterns. The example in this post is of a correctly formed Strategy pattern. Play the Strategy example and Download the files with the following two buttons:
PlayDownload

The Context Participant

To get the Context right, we need to go to the original source, Design Patterns: Elements of Reusable Object-Oriented Software. The Context participant has the following characteristics:

  • Configured with a ConcreteStrategy object
  • Maintains to reference to a Strategy object
  • May define an interface that lets Strategy access its data

At the heart of the Strategy design pattern, the Context and Strategy interact to implement the selected algorithm in the form of a concrete strategy. The key here is,

The Strategy lets the algorithm vary independly from clients that use it.

In order to do this,

A context forwards requests from its clients to its strategy. Clients usually create and pass a ConcreteStrategy object to the context; thereafter, clients interact with the context exclusively.

Figure 1 shows the path used in this implementation:

Figure 1: The path through the context to request an algorithm (concrete strategy)

Figure 1: The path through the context to request an algorithm (concrete strategy)

The path begins with the Client creating an instance of a specific concrete strategy (received from the HTML UI) and using that instance as a parameter to make the request through the context. From this point on, the client no longer is in contact with the strategy but instead the context. The context takes the instance passed from the client and makes the request through the strategy interface [algorithmInterface()]. Any client can make similar requests through the context by passing the concrete strategy through its context interface. That can be very handy when your program has more than a single client requiring a strategy.
Continue reading ‘PHP Strategy Design Pattern Part II: Add a Context’

PHP Near Strategy Design Pattern Part I: No Conditionals, Please

nearStratWhy ‘Near’ Strategy?

The Strategy design pattern is important because it is so useful, and two different posts on this blog have covered it in the past. What I would like to do with this implementation of the pattern is to do two things: 1) First, show how to create operations that require no conditional statements, and 2) Second, (in Part II) show the role of the Context participant. In this first part, I’d like to look at the HTML->PHP operations where specific objects (classes) can be called through HTML forms.

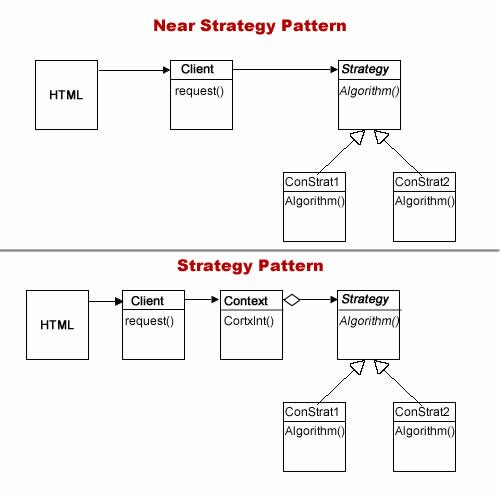
One of the nice things about the Strategy pattern is that the logic of it is very easy to understand; albeit on a foundational level. You have different tasks, and each task requires a different algorithm; so why not separate the algorithm operations into distinct objects (classes) and loosely bind them to the client? Each class will only do one thing, and that is to carry out an algorithmic operation. To do this, start off with a “Near Strategy”–a pseudo-patten: the Strategy design pattern missing the Context. Figure 1 shows the difference between a Near Strategy and true Strategy design pattern:

Figure 1: The Near Strategy design and the Strategy Design pattern

Figure 1: The Near Strategy design and the Strategy Design pattern

The HTML UI and the Client are not a part of the Strategy design pattern, but in this example, both are required for making requests. Before going on, try out the program by clicking the Play button and download all of the files.

PlayDownload

You can use the files “as-is” but you will need to change the IConnectInfo.php file so that the hostname (HOST), user name (UNAME), database name (DBNAME) and password (PW) is your actual MySql database. Also, once you create a table with a name of your choosing, be careful not to create it again if you want to keep your data entered into the table!

Using Form Names for Concrete Strategy Names

One of the coolest features of PHP is the ability to use strings to create instances of classes (aka: objects). For example,

$myVar = “MyClass”;
$myObject = new $myVar();

creates an instance of the class, MyClass. Knowing this, we can create the class names in HTML as form values. For instance:


The selected radio button value can be passed in a super-global to PHP:


$myVar = $_POST[‘callme’];
$myObject = new $myVar();

Using this, the Client doe not have to work through conditional statements to decide which request to fulfill. Like the Strategy design pattern, even the Client is free from using conditional statements as can be seen in the following listing:

< ?php
function __autoload($class_name) 
{
    include $class_name . '.php';
}
Class Client
{
    private $chooser;
    private $instance;
 
    public function __construct()
    {
        $this->chooser=$_POST['sql'];
        $object=$this->chooser;
        $this->instance=new $object();
    } 
}
$worker=new Client();
?>

As you can see the Client class is pretty simple with no conditional statements. It takes the value of the radio button send with a Post method. The radio button group is named “sql”; so whatever button is clicked is translated into an object.
Continue reading ‘PHP Near Strategy Design Pattern Part I: No Conditionals, Please’

Get MySql and PHP to Work Together in Raspberry Pi

lampSetting Up

I’ve installed PHP and Mysql on dozens of different systems ranging from a MS PC running Windows, to a Linux box to a Mac with OS X. However, I’ve never quite run into the problems I did with Raspberry Pi. It’s not that it is more difficult—in fact it is quite simple—I just got off on the wrong foot. In this short post, I want to provide a clear and simple set of steps for installing LAMP. The one caveat is that you should install everything at once. The installation includes Apache Server, PHP and MySql. The whole kit and caboodle should be installed together on top of a Debian Linux system. (If you have most other Linux systems, everything discussed generally applies to your system. If you have a Mac or Windows PC, when you connect up with the MySql administration module, you will find the MySql commands pretty much the same as those discussed here; so don’t feel left out.)

L.A.M.P.: Presto! You’re a Web Server

LAMP is an acronym for

  • Linux (OS)
  • Apache (Web server)
  • MySql (Database server)
  • PHP (Server-side Language)

By placing LAMP on your Raspberry Pi, you can do far more than without it. Not only do you get a Web server, but you get a database system and a programming language. In a previous post on this blog, you have seen how to set up the Raspberry Pi with PHP and work it in your file system. In this post I hope to show how to add MySql and use it as a database with PHP on a Raspi.

This process is for Raspberry Pi users who have the Debian distribution already installed. (That’s the ‘L’ in LAMP).

Assuming that you have not yet installed Apache server or PHP or MySql enter the following code in the Root Terminal:

sudo apt-get update
sudo apt-get install apache2 php5 php5-mysql mysql-server

Wait patiently until you are asked for a password for your ‘root’ user. Enter a password you can remember (and write it down somewhere you won’t lose it).

Testing MySql

To see is your MySql is working correctly, you will need to log in from your LXTerminal. So open your LXTerminal and enter:

mysql -u root -p

You should see the following screen after entering your password:

Figure 1: Log into MySql

Figure 1: Log into MySql

If you get an error try again and make sure you have entered your password correctly.

Once you’ve successfully logged into MySql, the cursor and prompt change to:

mysql>

When you want to log out of MySql just type:

mysql>quit
Continue reading ‘Get MySql and PHP to Work Together in Raspberry Pi’

Basic PHP-MySql OOP

basicMySQLGetting the Basic with PHP-MySql

Design Patterns are general OOP solutions for any computer language, and yet each language has different typical uses. One of the most important uses of PHP is to communicate with MySql. As the “middleman” between HTML and MySql, developers need to juggle three languages well in the HTML< ->PHP< ->MySql sequence and shuffle. All of the OOP work, though, belongs to PHP since neither HTML nor MySql is object oriented. This post is dedicated to the fundamental OOP questions surrounding HTML< ->PHP connections, instantiating class instances and creating re-usable MySql classes. I’d also like to touch on using comments in code and perhaps stir up a little controversy with comments about certain “standards” for comments in PHP.

The first thing to do is to take the program for test drive and look at the code. Run the program by clicking the Play button and click the Download button to get the files.
PlayDownload

The HTML Communication

Object oriented programming is all about objects communicating with one another. The first communication is between HTML and the PHP object it first calls. As the user interface (UI), the HTML document must get data from the user and pass it to PHP for processing. In PHP object communication, each object can call the object as a whole or specify a method or property in the other object to perform a specific task. With HTML, we pretty much have to be satisfied with a call to an object (or object trigger) and depend on PHP to carry the ball from that point on. However, if an HTML document has several forms, each form can call a different object, or each form submit button can have a different name. By using the unique name for each submit button a single Client class can determine which operation the user requests. The following HTML is set up for that purpose:

?View Code HTML
< !doctype html>


Basics of PHP OOP


snap

Basic Classes for Basic Tasks I

Keeping objects clear and focused on a single task

Entering Data into a Table and Retrieving it

Data are entered into a table through a UI, but automatically generated data also may be entered.

Developer Info:

Programming Language Used Most


Display All Data in Table with a new Form


The PHP class uses 4 MySql fields to store and retrieve the information:
  • id
  • name
  • email
  • lang

You may also want to take a quick look at the CSS file that goes with the HTML.

@charset "UTF-8";
/* CSS Document */
/*66635D (gray)  E54140 (red) F7EBD5 (cream) 6CC5C1 (aqua) 000000 (black)   */
body
{
    background-color: #F7EBD5;
    font-family: sans-serif;
    color: #66635D;
}
a
{
    color: #E54140;
    text-decoration: none;
    font-weight: bold;
}
 
.warning
{
    color: #E54140;
    font-weight: bold;
}
 
h1
{
    font-family: "Arial Black", Verdana, Helvetical,sans-serif;
     background-color: #6CC5C1 ;
     color: #E54140;
     text-align: center;
}
header
{
    background-color: #E54140;
     color: #E54140;
     padding:1em;
     color: #F7EBD5;
     text-align: center;
}
 
.fl
{
    float: left;
}
 
div
{
    padding-left: 1em;
}
h2
{
    color: #000000;
}
 
li
{
    font-weight: bold;
}
iframe
{
    background-color:#6CC5C1;
}

One thing that may stir the pot (among developers) found in the HTML document is the use of iframe tags. HTML5 retained iframes, and in the jQuery Mobile documentation, you will find the use of iframes. They no longer present a hazard to SEOs; and so I don’t see the harm using them to display PHP output. Besides, I could not find a suitable replacement. (I’m not about to mix PHP and HTML to create a workable hack straight out of the 9th circle of Hell.) So see if you can live with iframes for now, and we’ll get smelling salts for the fainters.

The Client Sorts it Out

When the UI has many options that must be handled by a client object to make the appropriate request from a collection of objects, each with a single responsibility, there’s going to be some kind of conditional statement to sort out which object to use. For lots of good reasons that I won’t go into here, switch/case and if/ifelse statements are to be used sparingly and judiciously in OOP and design pattern programming. An alternative approach would be to add several methods to the Client class and then have individual trigger files launched from the different forms in the HTML document call the appropriate Client method. That’s messy, but because HTML cannot address a class method, that may actually be a more orthodox approach. (Keep those smelling salts handy.)

The basic logic of the approach used is this:

  • When a submit button is pressed it can be trapped by the isset() method
  • Provide a name for each submit button
  • Test for variable being set and not NULL
  • Once tested use unset() to remove set state
  • Call object of set variable

Now take a look at the Client class to see how that reasoning has been implemented:

< ?php
ERROR_REPORTING( E_ALL | E_STRICT );
ini_set("display_errors", 1);
function __autoload($class_name) 
{
    include $class_name . '.php';
}
class Client
{
        //Variable to select the correct class
        private $task;
 
        //Which submit button used?
        public function __construct()
        {
            if(isset($_POST['insert']))
            {
                unset($_POST['insert']);
                $this->task= new DataEntry();   
            }
            elseif(isset($_POST['all']))
            {
                unset($_POST['all']);
                $this->task= new DataDisplay();
            } 
            elseif(isset($_POST['update']))
            {
                unset($_POST['update']);
                $this->task= new DataUpdate();
            }
            elseif(isset($_POST['kill']))
            {
                unset($_POST['kill']);
                $this->task= new DeleteRecord();
            } 
        }     
}
$worker = new Client();
?>

The Client has four operations reflecting the four classes:

  1. DataEntry()
  2. DataDisplay()
  3. DataUpdate()
  4. DeleteRecord()

That’s all there is to the communication between HTML and the PHP Client class. The Client works (as do all client classes) to make requests. The origin of the request is the user through the HTML UI.
Continue reading ‘Basic PHP-MySql OOP’