Archive for the 'Raspberry PI' Category

Sandlight CMS VI: Strategy Administrative Module

admin A CMS is only as good as the administrative module, and the one provided here is fully functional based on a simple work flow. You can change the UI and work flow to best fit your own, but you have the flexibility design patterns offer; so making changes to fit your needs (or those of your customers) should not be difficult.

One of the key features of a dynamic Web page is that it can be updated easily, and by using a MySQL table and database, all of the update information can be stored in a single location (table.) Updating the page is simply a matter of updating the data in a record or by adding new records to the table. The administrative module for this CMS has the capacity to update data in an existing record, but the page presented is always the newest record. The CMS has certain drawbacks because you cannot delete records without throwing the system out of whack, but that was done for the purposes of ease of use. (Remember, you’re a programmer and can change whatever you want!)

Set the Table

Setting up the MySQL table involves three files: 1) an interface with the MySQL connection information; 2. a connection class; and a table-creation class. The following three classes: (Use your own MySQL connection information in the IConnectInfo interface.)

< ?php
//Filename: IConnectInfo.php
interface IConnectInfo
{
        const HOST ="your_host";
        const UNAME ="your_username";
        const PW ="your_pw";
        const DBNAME = "your_dbname";
        public static function doConnect();
}
?>
 
< ?php
//Filename: UniversalConnect.php
ini_set("display_errors","1");
ERROR_REPORTING( E_ALL | E_STRICT );
include_once('IConnectInfo.php');
 
class UniversalConnect implements IConnectInfo
{
        private static $server=IConnectInfo::HOST;
        private static $currentDB= IConnectInfo::DBNAME;
        private static $user= IConnectInfo::UNAME;
        private static $pass= IConnectInfo::PW;
        private static $hookup;
 
        public static function doConnect()
        {
                self::$hookup=mysqli_connect(self::$server, self::$user, self::$pass, self::$currentDB);
                try
                {     
                        self::$hookup;
                        //Uncomment following line for develop/debug
                        echo "Successful MySql connection:
"
; } catch (Exception $e) { echo "There is a problem: " . $e->getMessage(); exit(); } return self::$hookup; } } ?>   < ?php include_once('IConnectInfo.php'); include_once('UniversalConnect.php'); class CreateTable { private $drop;   public function __construct() { $this->hookup=UniversalConnect::doConnect(); $this->tableMaster="your_table_name"; $this->dropTable(); $this->makeTable(); $this->hookup->close(); }   private function dropTable() { $this->drop = "DROP TABLE IF EXISTS $this->tableMaster";   try { $this->hookup->query($this->drop) === true; printf("Old table %s has been dropped.
"
,$this->tableMaster); } catch (Exception $e) { echo "Here is why it did not work: $e->getMessage()
"
; } }   protected function makeTable() { $this->sql = "CREATE TABLE $this->tableMaster ( id SERIAL, topic NVARCHAR(24), header NVARCHAR(120), graphic NVARCHAR(60), story BLOB, PRIMARY KEY (id))"; try { $this->hookup->query($this->sql);   } catch (Exception $e) { echo 'Here is why it did not work: ', $e->getMessage(), "
"
; } echo "Table $this->tableMaster has been created successfully.
"
; } }   $worker=new CreateTable(); ?>

The connection routines have been improved upon over time, and you can find out more about it in the original post on the subject on this blog. For now, Play the application and Download the source files. (When you click the Play button, you enter the Login UI. Use the same un/pw combination from the Functional Protective Proxy post on this blog. (Hint, you can find it in the ILogin abstract class.)
PlayDownload

In creating the table at first I used the TEXT data type for a large block of text, but then decided that a BLOB type may have a slight advantage. The BLOB is a VARBINARY and TEXT is VARCHAR, and BLOB seemed to have a slight advantage. However, the advantage may be smaller than I originally thought. Check out the MySQL docs on these two data types and you can see the differences for yourself. Figure 1 shows what the editor in the administration module looks like:

Figure 1: Administrative Module Editor

Figure 1: Administrative Module Editor

From Proxy to Strategy

The login module of this CMS is based on the Proxy pattern. Now, as in previous CMS examples, the administrative module is based on a Strategy pattern. Each object in the Strategy pattern represents an algorithm to accomplish a different task. In this case, the tasks include:

  • Entering data
  • Editing data
  • Displaying data
  • Displaying a page based on stored data.

All requests go through a context relying on a Strategy interface. In this case, I used an abstract class which allowed the addition of several protected properties and a constant with the name of the table. This is all in addition to the main method in an abstract public function, the algorithm method, executeStrategy(). Following the Strategy design pattern, begin with the Context. Continue reading ‘Sandlight CMS VI: Strategy Administrative Module’

Sandlight CMS V: Functional Protective Proxy Login

loginOn this blog, the Protective Proxy pattern has several different implementations, and if you’d like to refresh your memory, this post has the foundation upon which the others are built. The design pattern for the Proxy is relatively simple: the user logs into a site, and instead of going directly to the subject page, users are sent to a Proxy subject where their credential are checked. If the Proxy page determines valid credentials (typically a username and password), the user is sent to the subject page where the content resides.
With an administrative login, the work to be done (in this case) is to add and edit dynamic content for a page. The upper right portion of the main page is made up of materials that come from a database so that adding and changing content is relatively simple. However, before even getting to the administrative editing portion of the CMS, you want to be sure that only those with permission have access to the dynamic editor. So this post deals only with the login portion of the CMS. Go ahead and test it and download the source files:
PlayDownload

Rats! I forgot to tell you the username and password. You can find them in the source code in the download or in this post; so go ahead and dig them up and try again. It will help you understand how this proxy implementation works.

The Functional Protective Proxy

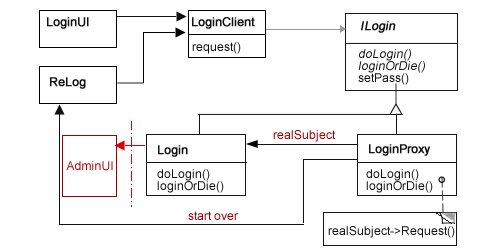
As noted above, other examples of the Proxy design pattern have been used and explained elsewhere on this blog. In this (protective) Proxy implementation, only one feature has changed: the methods are all written using functional programming protocols. Figure 1 shows the design pattern diagram for this implementation of the Proxy.

Figure 1: Class diagram for Protective Proxy

Figure 1: Class diagram for Protective Proxy

As far as protective Proxys go, this one is not unusual. The ReLog could have been handled by sending the user back to the LoginUI, but by having a different looking UI, it helps the user pay attention a bit more prior to re-entering the username and password. The path it follows is pretty simple:

  1. LoginUI: User enters username and password.
  2. LoginClient: Sends login request to LoginProxy.
  3. ILogin: Sets up two abstract methods and a concrete method along with encoded usernames and passwords. It also provides several protected properties. Both the LoginProxy and Login classes implement (extend) this abstract class interface
  4. LoginProxy: Evaluates username and password and sends it to Login if correct and ReLog if not.
  5. Login: Calls AdminUI (to be developed).
  6. ReLog: Re-start process requesting user name and password.

You can obscure the password and username better than I did for this example of the Proxy implementation. When used in an actual environment, you can store the codes in a special MySql table, a Json file, a text file or even a hidden element in an HTML5 document. Since users are not going to be logging in, other than the site administrator, you should be sure that they cannot even find where to log in! It’s a lot easier than trying to protect a site where users are expected to login.

When you look at the different classes, you won’t see much functional programming except in LoginProxy class. That’s because, there’s not a lot of code in any of the classes. The UI (LoginUI and ReLog) classes create and display HTML pages, the client class calls the proxy class (LoginProxy) but it’s the LoginProxy that has to do all of the thinking. Using functional operations, primarily lambda functions (PHP anonymous functions), the class methods determines what to do next: send on the request to the Login object or reroute it to the start-over class, ReLog. That’s pretty much it. In looking at the LoginProxy class code, you can see the functional operations at work:

< ?php
class LoginProxy extends ILogin
{
        //Proxy Subject
        public function doLogin()
        {     
                $this->sun=$_GET['username'];
                unset($_GET['username']);
                $this->spw=$_GET['password'];
                unset($_GET['password']);
 
                try
                {
                        $this->security=$this->setPass();
                        $this->igor=$this->sun==base64_decode($this->security[0]) && $this->spw==base64_decode($this->security[1]);
                        $lambda=function($x) {$alpha=$this->igor ? $this->passSecurity=true : NULL; return $alpha;};
                        $lambda($this->igor);
                        $this->loginOrDie();
                }
 
                catch(Exception $e)
                {
                        echo "Here's what went wrong: " . $e->getMessage();
                }
        }
 
        protected function loginOrDie()
        {
                $badPass=function($x) {$delta= $x ? ($this->goodLog=new Login()) : ($this->badLog=new ReLog());};
                $badPass($this->passSecurity);
                $goodPass=function($x) {$tau= $x ? ($this->goodLog->doLogin()) : NULL;};
                $goodPass($this->passSecurity);
        }
}
?>

Using the two methods implemented from the ILogin interface (abstract class), doLogin() and loginOrDie(), the functions work to determine whether 1) the password and username are correct and 2) send the request to the correct object: Login or ReLog.

What functional programming seems to do, among other things, is to create a series of binary queries with Booleans. For example, the protected variable $igor ($this->igor) has a double boolean assigned to it whereby two (2) comparative statements must resolve to true. By doing so, $igor becomes a Boolean value. (Who’s the Boolean now?! Snap!) Next, $igor, is a Boolean, as an argument in a lambda function ($lambda) determines whether the $passSecurity variable is to be changed from false to true—yet another Boolean!

In the loginOrDie() method, the $passSecurity variable is used again—this time as an argument—in the the $badPass() and $goodPass() lambda functions. That’s how this implementation of the protective Proxy determines whether the password and username are valid. The same determination could have been done using imperative conditional statements (e.g., if, switch), but in moving towards more functional programming within design pattern structures, the functional statements accomplish the same task with non-imperative programming.

In looking at the Login class, what is referenced as the “Real Subject” in design patterns, it does little more than pass the request to a user interface where the actual administration work can be done.

< ?php
class Login extends ILogin
{
        //Real Subject
        public function doLogin()
        { 
                $this->loginOrDie();
        }
 
        protected function loginOrDie()
        {
                $admin=new AdminUI();
                $admin->dataStrat();
        }
}
?>

A tighter implementation would have us place the UI for the Administration module in the Login itself, but we’re not striving for “tightness.” Rather, this code moves a loosely bound module in a Proxy pattern to the next module using a Strategy pattern. As you will see in the interface used by both the LoginProxy and Login classes, the Login class only implements the two abstract methods and uses none of the other other protected properties or method. Continue reading ‘Sandlight CMS V: Functional Protective Proxy Login’

Sandlight CMS IV: Dynamic Responsive Web PHPages

responsiveAt this point in the Sandlight CMS development process, two design patterns have been employed: 1) Chain of Responsibility as a device checker, and 2) Abstract Factory for making different parts for different devices. As usual, I’ve been posting the results so far on the Sandlight Productions, LLC website. The site itself is the example used in this series. This post is Part IV of the Sandlight CMS series, and if you have not been following the series you can review what has been done so far beginning with Part I.
At this stage, the project is ready to use the Abstract Factory to produce the needed parts and put them together into a page. However, before going ahead and have the factory build the parts I’d like to take an intermediate step and just build a dynamic responsive Web page.

The Dynamic Responsive Web PHPage

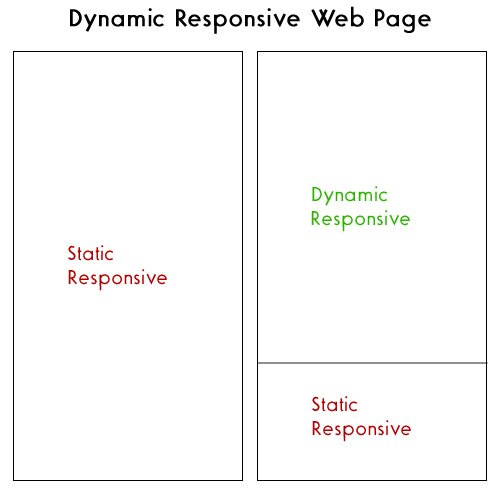
The easiest way to proceed is to begin with an HTML5 page, encapsulate the page into a PHP object (class) and add methods. The reason for this step is that the Web site, in addition to being responsive, needs to be dynamic. This means that it needs a way for the administrator to add changes, and in order for this to transpire, the dynamic portion of the page has to include variables in the place of static text, graphics and/or video. Figure 1 shows the general layout envisioned for the page:

Figure 1: Dynamic Responsive Web Page

Figure 1: Dynamic Responsive Web Page

Everything about the page must be responsive, but some parts are static and some are dynamic. In the two-column outline in Figure 1, the entire left column is static yet it must be responsive to different devices. In Parts I to III of this series, the pages have been responsive. The next step in making them both responsive and dynamic is to create parts of the page that will be dynamic since they are already set up to be responsive. Before continuing, click the Play button to see the progress so far and the Download button for all of the source code and accompanying files:
PlayDownload

Using PHP alone, creating a dynamic page is simple. Just place PHP variables where content goes. This is true for both the pages formatted by CSS3 and jQuery. Importantly, though, all of the Web pages should be encapsulated into PHP classes, using heredoc string variables as has been shown in previous installment of this series.

QR Code: The New Responsive Component

Quick Response Code (QR) is a new necessity for Web sites doing business on the Web and for just about every other kind of site that wants to increase its exposure. Basically, using a QR Code reader in a mobile device (phone or tablet) automatically brings up the link coded in the QR image (a square with some squiggly block images.) That beats trying to to thumb in a URL on a tiny phone keyboard. The following two can be downloaded free (at the time of this writing.):

sandlightqrcodeI’m pretty certain that other smart phones have QR readers; so if you have something other than an iOS or Android operating system on your mobile device, an Internet search for “QR Scanner” will probably be able to locate one for you.

sandlightOnce you have a QR scanner, you need a coded image, such as the one to your right. Go ahead and scan it to see what happens. It should take you to the Sandlight Productions, LLC home page build on this CMS (updated.) On it you will find several more QR codes for links to sites related to Sandlight. You can get the coded images online at different sites. One site allows you to include your logo and choice of colors is QRCode Monkey. The QR code image in green to your left with the Sandlight logo in the middle does exactly the same thing as the black one. So, if you’d like your QR Code images to keep your graphic designer happy, consider the visual options beyond the default. Figure 2 shows a page being scanned with an iPhone (left) and the linked page in the iPhone (right).

Figure 2: Scanned QR URL uploaded in mobile phone.

Figure 2: Scanned QR URL uploaded in mobile phone.

Adding QR codes to your site (or your client’s site) is very easy, and you should definitely include it in your dynamic responsive CMS. Let’s now see how the dynamic responsive two-column page is created:
Continue reading ‘Sandlight CMS IV: Dynamic Responsive Web PHPages’

Sandlight CMS II : Mobile First!

mobileFirstI’m not a graphic designer, and so I depend on others for the graphic elements and arrangement of my Web pages. However, I strive to make a site that is clear, easy to understand and useful. My focus is on good user experience (UX) and information design—clear communication with the user. In order to have good UX, you need to know something about , and if you don’t, check out the RWD link. Further, if you are unfamiliar with the approaches to RWD, I’m sold on the Mobile First approach, but possibly for different reasons than designers. Let me explain.
In designing my own site, my focus is on content categories, ease of maintenance, which includes updates and changes, and device flexibility. So I have to keep all of those in mind. I want PHP to handle regular updates by using content from a MySql database (the Content Management of CMS), and I need it to work on different devices. By tackling mobile first, I have to create a diamond-tipped focus on exactly what I want the user to view because even with the new “Phablets,” I’m not dealing with a lot of screen real estate. Currently, my old working mobile phone has a CSS resolution of 320 x 480, and my Phablet is 414 x 736. That’s less that 100 units different. (By CSS resolution, I’m referring to what CSS reads as far as screen width is concerned. See this table.)

Choosing the Devices

In an another sniffer program using a Chain of Responsibility (CoR) design pattern and a PHP user agent ($_SERVER['HTTP_USER_AGENT']) posted on this blog, the sniffer detected the user agent and then found the handler responsible for that agent. Now that user agents have been replaced by CSS screen width (as determined by a JavaScript function) for determining the device, we can use the same CoR pattern making the necessary changes. However, instead of getting real pages, we can use stand-ins that only have the roughest page content. All of the content will be encapsulated into PHP classes using heredoc strings. Near-future posts cover the mechanics of working out the MySql to provide dynamic content for the pages, along with other details necessary for the CMS. For now, though, the dummy pages will only contain enough material to demonstrate that each is appropriate for the selected device. Use the buttons below to see the current state of the CMS and download the files for this portion:
PlayDownload

Note that all devices can now access the Flag Counter. Where is your country on the Flag Counter? (See the note about the Flag Counter at the end of this post.)

Back to the Chain of Responsibility Pattern (CoR)

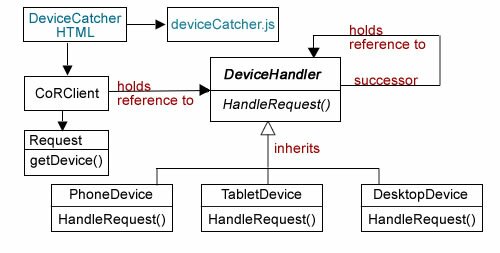
The CoR pattern is handy because it’s easy to update and change. For example, suppose that having three device categories (e.g., phone, tablets and desktops) proves to be inadequate and you want to add two more; one for laptops and another for phablets. It’s a simple matter to add to the chain and add device classes to handle the new devices. Figure 1 shows the first design pattern to be used in the CMS:

Figure 1: Chain of Responsibility Implementation

Figure 1: Chain of Responsibility Implementation

In Part I of this series, you can see how the device width and height is determined using a JavaScript closure (object) to pass the information to HTML and on to PHP. Since we only need to find the width, the JavaScript code has been slightly altered and placed in a separate file (deviceCatcher.js) in case it needs to be reused.

?View Code JAVASCRIPT
//deviceCatcher.js
function getWide()
{
        var wide = screen.width;
        return function()
        {
                return wide;
        }
}
var w = getWide();
//Send data to PHP class, CoRClient.php       
var lambdaPass= function() {window.location.href = "CoRClient.php?hor=" + w();};

The HTML file simply calls the closure function which passes the values to PHP:

?View Code HTML

        
                Device Catcher


The HTML file is a trigger to get the ball rolling with the client class (CoRClient).

Starting the Chain

The client pulls the viewing device’s width from the superglobal, and passes it to a PHP variable. Given the variability in the width of device screens, I made the decision to work with three sizes to get started: 1) phone, 2) tablet, and 3) desktop. So, depending on the width, the request would be handled by one of those three device groups. I used the following cutoff sizes:

  1. Phone: >= 480
  2. Tablet: >=481 and < 900
  3. Desktop: >= 900

I used this table as a guide, but cutoff points can be anything you want.

Getting the width from the superglobal is easy enough using a static variable:

self::$wide=$_GET['hor'];

The, using the cutoffs, the program needs to generate three strings, phone, tablet, and desktop to send to the Request class that stores the appropriate string. The most obvious way is to use conditional statements (if or switch) to generate the correct string for Request. For example an imperative algorithm such as the following would do the trick:

if(self::$wide < = 480)
{
        return "phone";
}
elseif (self::$wide >= 900)
{
        return "desktop";
}
else
{
        return "tablet";
}

However, a functional program would be more compact, and like the JavaScript closure used in Part I, it would be an “object.” Transformed into a functional closure, the operation would look like the following:

$beta = self::$wide >= 900 ? 'desktop' : 'tablet';
$lambda = function($x) use ($beta) {
        $alpha =  $x < = 480 ? 'phone' : $beta;
        return $alpha;};

Using ternary operations ?: , $alpha and $beta both have function-like qualities. for example, $beta could have been written as a function beta() as shown in Figure 2:

Figure 2: "Functional" variables

Figure 2: “Functional” variables

As you can see in Figure 2, $beta provides the same functionality as beta(), and $beta can be used as a reference in the $lambda function along with $alpha in a PHP closure. (For some reason, when $beta is assigned an anonymous function, I was unable to get it to be added as a closure in the $lambda anonymous function.)
Continue reading ‘Sandlight CMS II : Mobile First!’

PHP Class Origins: An OOP Job for the HTML UI

couchPotatoPutting HTML to Work

At some point in OOP development with PHP, I quit putting little PHP code snippets in HTML. I either left all PHP out of HTML or encapsulated HTML in a PHP heredoc string inside a class. In that way, all PHP would be part of an OOP order without any loose ends. That may seem overly fussy, but it avoids the slippery slope of degenerating back into sequential programming——patchwork quilt programming.

However, such a practice should not disallow HTML from helping out in an OOP project. A lot of times, I found myself sifting through class and method options using more conditional statements than I wanted in the Client. I realized that I could just pass the class name directly to the Client from a superglobal with origins in an HTML input form. Likewise, I could do the same for methods, and this has become a useful standard operating procedure.

To better illustrate using the HTML UI in launching a selected class object, the following application uses the color and number input elements with both class and method information stored in HTML element values. Both are trivial, but help illustrate the point: (Use Firefox, Chrome or Opera–neither Safari nor Internet Explorer implemented the HTML5 standard color input element.)
PlayDownload

It’s odd in a way that PHP developers (myself included) are so used to using HTML UIs for data input into MySql databases or making other choices, but few use the UI for calling classes and methods. However, it’s both easy and practical.

Where to Put the OOP in HTML?

You can place class and method names as values anywhere in form inputs that you’d put any data passed to PHP as superglobals. One input form I found useful is the hidden one. It’s out of the way, and you can build forms around the class with other superglobal inputs as methods. Using radio button inputs is another nice option because you can use them either for calling classes or methods with the mutual exclusivity assurance of knowing that not more than one will be called from a given group. To get started, take a look at the HTML:

?View Code HTML
< !DOCTYPE html>


    Unsetting Superglobals with Classes and Methods


Classes and Methods

Choose color from the color window:

Divide or modulo the following two numbers:
First:    Second:   
 Divide the second by the first
 Modulo the second by the first

The code has two forms, alpha and beta, and you can think of them as I/O for two different classes. The feedback is returned to the iframe named feedback. Both forms have the action calls to Client.php. So the general plan is:

Client → Class->method()

In the alpha form, the class is ColorClass and the method is doColor()—both in hidden input elements. The name for the class element is “class” and the name for the method element is “method.” All the user does is to choose a color that is passed through the superglobal associated with the color input element.

In the beta form, the class is MathClass placed in a hidden input element. The user chooses either a division or modulo operation from the two radio input elements where the names of the appropriate methods are stored. Once again, the name for the class element is “class” and with mutually exclusive choices the radio button elements for selecting the method, the name is “method.” In this way, whatever superglobal named “class” will fire the correct class and call the correct method with the superglobal named “method.”

The Client

As usual, the Client is the launching pad for the operations. If your application uses different client classes depending on user choices, it’s an easy matter to have unique client names for different forms. In this particular case, the Client class doesn’t care about the form of origin for the request. It just takes the class superglobal and method superglobal names and generates a call to the appropriate class and method.

As an aside, the Client in OOP should not be as rare as some perceive it to be. In one way or another, users (or non-human request mechanisms) employ some way to request that the software do something. The Client, as a participant in a structure, is in virtually every design pattern in one way or another. Even when the Client is not directly or implicitly in a design pattern, The Gang of Four reference it as related to one of the participants in the pattern. So while this example does not use a design pattern, the Client works perfectly well in any OOP program.

< ?php
/*
 * Set up error reporting and
 * class auto-loading
*/
error_reporting(E_ALL | E_STRICT);
ini_set("display_errors", 1);
// Autoload given function name.
function includeAll($className)
{
    include_once($className . '.php');
}
//Register
spl_autoload_register('includeAll');
 
//Class definition
class Client
{
    private static $object, $method;
    //client request
    public static function request()
    {  
        self::doSuper();
        $operation = new self::$object();
        echo $operation->{self::$method}();
    }
 
    private static function doSuper()
    {
        self::$object = $_POST['class'];
        self::$method=$_POST['method'];
        unset($_POST['class']);
        unset($_POST['method']);
    }
}
Client::request();
?>

The Client file first takes care of error reporting and automatically calling classes. One experienced developer told me that adding an error-reporting function was unnecessary because it could be automatically turned on in the php.ini file. That’s true, but since I work with many different PHP environments where I have no control over the php.ini file, I’ve found it to be a good practice. You only have to put it in once place, and it takes care of error reporting for the entire program. Besides, I found that one safeguard against easy hacking is to turn off error reporting so that hackers cannot see the names of the classes involved in the application. For this blog, though, I leave the error reporting on because there’s nothing on this blog I want to hide. (Change the init_set from “1” to “0” to turn off all error-reporting.)

No Returns from Constructor Functions

The first incarnation of this application used the same two forms, but the alpha form only had the class name with the results planned to be sent back for output using a return statement. I kept getting errors, and then I learned that constructor functions (those using the __construct() method) have no returns. All they do is to instantiate the class. If you do not use the __construct() method, there’s an invisible automatic constructor function that does that for your as soon as you call new ClassName().
Continue reading ‘PHP Class Origins: An OOP Job for the HTML UI’