 A CMS is only as good as the administrative module, and the one provided here is fully functional based on a simple work flow. You can change the UI and work flow to best fit your own, but you have the flexibility design patterns offer; so making changes to fit your needs (or those of your customers) should not be difficult.
One of the key features of a dynamic Web page is that it can be updated easily, and by using a MySQL table and database, all of the update information can be stored in a single location (table.) Updating the page is simply a matter of updating the data in a record or by adding new records to the table. The administrative module for this CMS has the capacity to update data in an existing record, but the page presented is always the newest record. The CMS has certain drawbacks because you cannot delete records without throwing the system out of whack, but that was done for the purposes of ease of use. (Remember, you’re a programmer and can change whatever you want!)
Set the Table
Setting up the MySQL table involves three files: 1) an interface with the MySQL connection information; 2. a connection class; and a table-creation class. The following three classes: (Use your own MySQL connection information in the IConnectInfo interface.)
< ?php //Filename: IConnectInfo.php interface IConnectInfo { const HOST ="your_host"; const UNAME ="your_username"; const PW ="your_pw"; const DBNAME = "your_dbname"; public static function doConnect(); } ?> < ?php //Filename: UniversalConnect.php ini_set("display_errors","1"); ERROR_REPORTING( E_ALL | E_STRICT ); include_once('IConnectInfo.php'); class UniversalConnect implements IConnectInfo { private static $server=IConnectInfo::HOST; private static $currentDB= IConnectInfo::DBNAME; private static $user= IConnectInfo::UNAME; private static $pass= IConnectInfo::PW; private static $hookup; public static function doConnect() { self::$hookup=mysqli_connect(self::$server, self::$user, self::$pass, self::$currentDB); try { self::$hookup; //Uncomment following line for develop/debug echo "Successful MySql connection: |
The connection routines have been improved upon over time, and you can find out more about it in the original post on the subject on this blog. For now, Play the application and Download the source files. (When you click the Play button, you enter the Login UI. Use the same un/pw combination from the Functional Protective Proxy post on this blog. (Hint, you can find it in the ILogin abstract class.)
![]()
![]()
In creating the table at first I used the TEXT data type for a large block of text, but then decided that a BLOB type may have a slight advantage. The BLOB is a VARBINARY and TEXT is VARCHAR, and BLOB seemed to have a slight advantage. However, the advantage may be smaller than I originally thought. Check out the MySQL docs on these two data types and you can see the differences for yourself. Figure 1 shows what the editor in the administration module looks like:
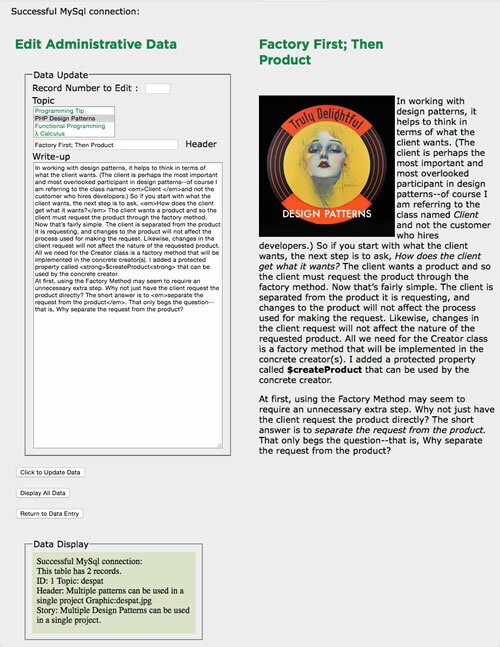
Figure 1: Administrative Module Editor
From Proxy to Strategy
The login module of this CMS is based on the Proxy pattern. Now, as in previous CMS examples, the administrative module is based on a Strategy pattern. Each object in the Strategy pattern represents an algorithm to accomplish a different task. In this case, the tasks include:
- Entering data
- Editing data
- Displaying data
- Displaying a page based on stored data.
All requests go through a context relying on a Strategy interface. In this case, I used an abstract class which allowed the addition of several protected properties and a constant with the name of the table. This is all in addition to the main method in an abstract public function, the algorithm method, executeStrategy(). Following the Strategy design pattern, begin with the Context. Continue reading ‘Sandlight CMS VI: Strategy Administrative Module’
 On this blog, the Protective Proxy pattern has several different implementations, and if you’d like to refresh your memory, this
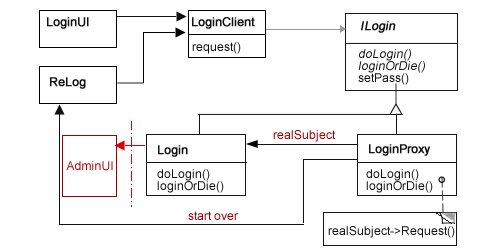
 Putting HTML to Work
 An Easy Start
Recent Comments