 Setting Up
I’ve installed PHP and Mysql on dozens of different systems ranging from a MS PC running Windows, to a Linux box to a Mac with OS X. However, I’ve never quite run into the problems I did with Raspberry Pi. It’s not that it is more difficult—in fact it is quite simple—I just got off on the wrong foot. In this short post, I want to provide a clear and simple set of steps for installing LAMP. The one caveat is that you should install everything at once. The installation includes Apache Server, PHP and MySql. The whole kit and caboodle should be installed together on top of a Debian Linux system. (If you have most other Linux systems, everything discussed generally applies to your system. If you have a Mac or Windows PC, when you connect up with the MySql administration module, you will find the MySql commands pretty much the same as those discussed here; so don’t feel left out.)
L.A.M.P.: Presto! You’re a Web Server
LAMP is an acronym for
- Linux (OS)
- Apache (Web server)
- MySql (Database server)
- PHP (Server-side Language)
By placing LAMP on your Raspberry Pi, you can do far more than without it. Not only do you get a Web server, but you get a database system and a programming language. In a previous post on this blog, you have seen how to set up the Raspberry Pi with PHP and work it in your file system. In this post I hope to show how to add MySql and use it as a database with PHP on a Raspi.
This process is for Raspberry Pi users who have the Debian distribution already installed. (That’s the ‘L’ in LAMP).
Assuming that you have not yet installed Apache server or PHP or MySql enter the following code in the Root Terminal:
sudo apt-get update

                sudo apt-get install apache2 php5 php5-mysql mysql-server
Wait patiently until you are asked for a password for your ‘root’ user. Enter a password you can remember (and write it down somewhere you won’t lose it).
Testing MySql
To see is your MySql is working correctly, you will need to log in from your LXTerminal. So open your LXTerminal and enter:
mysql -u root -p
You should see the following screen after entering your password:
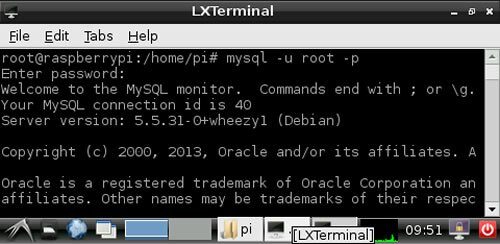
Figure 1: Log into MySql
If you get an error try again and make sure you have entered your password correctly.
Once you’ve successfully logged into MySql, the cursor and prompt change to:
mysql>
When you want to log out of MySql just type:
mysql>quit
Viewing and Creating Databases
The first MySql command to try out is:
mysql>SHOW DATABASES;
Placing MySql commands in All Caps helps to differentiate them from PHP commands. You will see something like the table in Figure 2:

Figure 2: Showing current databases
One thing, you will not see is the database named billz. That’s because I added it after the initial creation of the MySql on Raspi. One of the default databases is ‘test.’ However, you probably want to have at least one database beyond the default ones. While still in the mysql mode, type in,
mysql>CREATE DATABASE develop;
In this case the name of the new database is “develop.”
One important detail is getting the MySql version right. Documentation on MySql is organized along version lines. So if you have MySql 5.5 and the manual is MySql 5.1, you need to get the right one. Enter the following for both the version and current date:
mysql>SELECT VERSION(), CURRENT_DATE;
Figure 3 shows the version and the current date in a Raspberry Pi window:

Figure 3: MySql version and Date
As you can see in Figure 3, the MySql version used in my Raspberry Pi is 5.5.31-0+wheezy1. In the MySql documentation, I will click on the MySQL 5.5 Manual in the Documentation Library to get the right version. Usually, there’s not a lot of differences in the basic commands over the versions, but you might as well get the right one for your system.
Creating Users in MySql and Employing them with PHP
The next step is creating users (in addition to “root”) and using them in a PHP program to connect PHP with MySql. First create a new user with the command:
mysql>CREATE USER 'willie'@'localhost' IDENTIFIED BY 'begoode';
Next grant privileges to the new user:
mysql>GRANT ALL PRIVILEGES ON *.* TO 'willie'@'localhost'

                -> WITH GRANT OPTION;
Figure 4 shows this process in a Raspberry Pi LXTerminal:
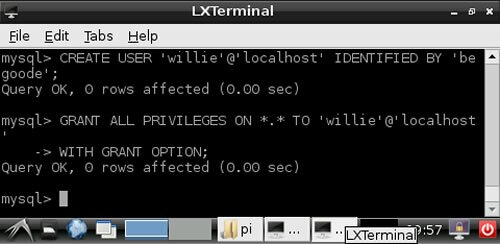
Figure 4: Creating new user and granting privileges
At this point you have enough material that you can do the rest using PHP. However, first there’s one more MySql command to use that shows MySql tables. In the last part of this post, you’ll see how to create a table using PHP, but for now type in the following except rather than “bills” choose a database of your own:(The notice that you’ve changed databases appears automatically.)
mysql>USE billz;

                Database changed

                mysql>SHOW TABLES;
On my Raspberry Pi I will see the table I created using PHP as shown in Figure 5:

Figure 5: Displaying tables in billz database
The PHP-MySql Connection
At this point you want to make sure your Apache server and PHP are working correctly and you have a workable environment for your Raspberry Pi computer (Actually, it’s now a computer, server and database system!). So check out Easy Writer: Setup for Raspberry Pi on this blog. Test the PHP sample programs on your system.
Once everything is set up on your system, take a look at Static Connection Objects: Classes, Properties and Methods. You can download the object oriented connection tools here (click the Download button.)
![]()
Once you place the downloaded files in the PHP folder on your Raspi, you will need to configure only one file, IConnectInfo.php. The following listing shows a typical set up for Raspi:
//Filename: IConnectInfo.php
interface IConnectInfo
{
        const HOST ="localhost";
        const UNAME ="root";
        const PW ="yourPassword";
        const DBNAME = "test";

        public static function doConnect();
}
?>
|
The username “root” is built-in and so is the “test” database. The host on your Raspi will be “localhost” by default as well. So the only thing you need to remember is the password you used when you initially loaded the LAMP package into your Raspi. Be sure that the three files that you downloaded for the connection test (they were unzipped in a folder named “NoSurprises”) are in the PHP folder in the path /var/www/php in your Raspi File Manager. Then from your browser run,
http://localhost/php/NoSurprises/ConnectTest.php
If everything is correctly set up (and your remembered your password!), you’ll see:
Successful connection to MySQL:
You’re hooked up, Ace!
From this point on, you should be able to use your Raspberry Pi as a Web server and database and write PHP programs that use the MySQL database. You can get started writing database programs in PHP with the basics on this blog found here.
Copyright © 2013 William Sanders. All Rights Reserved.
Hey Bill,
I know this series is a bit dated, but let me ask a question on performance: Can you point out some example test programs that will measure (in some standard manner) the performance throughput of the LAMP stack on a pi?
Thanks for any insights.
Jason
Hi Jason,
That’s a great question, and the closest answer I could find is at the Raspi site with responses by engineers http://www.raspberrypi.org/forums/viewtopic.php?f=36&t=60691
As you can probably tell, I’m pretty much of a software guy and a programmer more than an IT Tech or engineer. If I can find the hooks to build a PHP program to measure LAMP throughput on a Raspi (or any other system) putting together such a program would be an ideal Raspi project.
I’d be very interested in what you discover as well.
Kindest regards,
Bill
Sir I’m trying to hookup one of the tft monitors to my B+ RBP and having no luck with it.
I seen your discussions on Amazon
Thanks for any help
Hi Larry,
Did you see the video on how to wire up the monitor to your Raspberry Pi? If not, you can see it here:
If you’ve seen the video of how to connect to your Raspberry Pi, be sure to see this comment–keep in mind that I’m a software guy; not a hardware guy, and the following comments come from someone who is experienced in hardware:
“I’ve been buying new style light weight 12VDC power supplies for this kind of app.
Design is similar to new 5VDC cell phone changers. Very light and compact.
They don’t have a heavy transformer inside, and many have over-current and over-voltage protection.
Most are made in China and will work off 50 or 60 Hz at 100 to 250 volts AC..
They come in 5, 8, 9 etc and 12 volts at difference currents. Most are 1 to 1.5 amps.
So, I always look for more amps, if I have the need. 2A cost a little more.
I would NOT recommend that people use their old 12Volt DC wall-warts.
You can tell they are old, because they have a heavy transformer inside.
When you plug them into the AC outlet, they start wasting power right away,
Heating up the transformer..
Here’s the kicker, most of the 12VDC wall-warts have outputs of 15 to 18 volts..
That high voltage might not be good for some 12v devices.
The older WWs don’t have voltage regulator ICs.. And, they don’t have any over-current protection.
If your cable shorts out, the wall-wart will try to melt down..
They have very poor filtering and allow AC ripple out on the DC line.
That can put a 60hz buzz in audio and video.
Oh yeah, sometimes the transformer lamination over-heats (glue melts) and the transformer buzzes all the time..
There’s millions of these old WWs plugged in all over the USA.. Wasting millions of watts, heating up black plastic.
They sell them right here on Amazon. Try finding this:
“HiMart New DC 12V 3A Switching Power Supply Adapter For 110V- 240V AC 50/60Hz 2.1mm With HiMart Robbin”
If that doesn’t help, let me know.
Kindest regards,
Bill
Ok Bill Thank you. I seen that video once before and I found one of those DC adapters, Did a fine job lighting the monitor up.
Although I’m running the B+ and from what I gather the 3.5 mm port has all the works in it. I have come to the conclusion that this monitor is defective.
All I have got it to do is show me a blue Screen with a “NO SIGNAL”.
So back to the drawing broad.
Thanks Bill I will be checking out your site for pointers. You’re doing a fine job.
Hi Larry,
I’ll see if I can put in more posts that include some specifics for the Raspberry Pi group of PHP programmers. Since I’m pretty much of a software guy and not a hardware one, I have to be extra careful when I venture into the hardware sphere, but with the Raspberry Pi, it’s very easy and tempting. I want to do some things with the experimental hobby boards for the Raspi and programmed control.
Cheers,
Bill
Thanks for taking the time to post these blog entries! It has helped get me up the curve.
You’re welcome Pete. If there’s anything else you’d like to see that would be helpful, let me know.
Kindest regards,
Bill
Brilliant! A full LAMP stack installation with two commands and it worked like a charm. Cheers!
I don’t get the whole Raspberry Pi ruckus, let us say that in the end you install everything which you need on that device, what can you then, after the whole process, do with it? Build your own computer, yea, I know, but for what? What use do you have?
Hi Jane,
Raspberry Pis are more about getting back to the basics of computing than anything else, and doing so at the affordable price of $25-$35. Macs and MS PCs come with giant operating systems so that the users can get to work on many types of software available for them. The Raspis come with a minimal OS, and most run on Linux (of one flavor or another.) They come with Python built in, and so PHP represents a path to having an open source server-side language and access to MySql and the world of online databases. As for “making one’s own computer,” about the only thing I ever did hardware-wise with a Raspi was to wire up a small video screen used for rear-vision on mini-vans for my Raspi monitor. However, they are wide open to software-hardware experiments as well. My purpose in the occasional Raspberry-Pi posts is to encourage software experimentation and development with my favorite server-side language: PHP.
Kindest regards,
Bill
In reply to Jane, I have three Raspberry pi’s going at the moment, the first is setup to control point motors/lights and anything else that moves on a model railway.
The other two I use at work to control a series of coloured lights above machines to indicate their state (ie: working, faulty, down).
They are all controlled via the web interface setup above and php software. The pi is brilliant for getting into programming and hardware interfacing although it is a huge learning curve and tricky to find a starting point sometimes. People forget the step between beginner and knowing everything which means there is a lot of time spent trying to find the correct question to ask google.
My php is all self taught and very basic but it works and I’ve had fun getting it there (along with a lot of headaches)
Hi Trev,
Thanks for your comments. One of the most incredible (not to mention practical and profitable) implementations of PHP with Raspberry PIs has been one that linked an office with both. Now, no matter which office someone enters, there’s a Raspi with PHP that communicates to the others who’s in the office, how it’s being used and other information used in creating “smart” office space.
The only limitation on using Raspis with PHP is one’s imagination. (Model train controller–brilliant!)
Cheers,
Bill
If this thread is still monitored…
I’ve implemented all this and get the msg:
Fatal error: Call to undefined function mysqli_connect() in /var/www/phptest/UniversalConnect.php on line 16
Any idea why? Cannot find any helpful info regarding this error msg. Any help appreciated.
Hi JN,
It’s most likely to be the version of the MySql you’re using. If you have an up-to-date MySql and PHP; then you should have no problem. Another possible problem may be with your connection information in your interface file, IConnectInfo.php.
If you followed the install instructions in the post above, everything should work ok. Let me know if you still have problems, and I’ll see if I can find other causes.
Kindest regards,
Bill
I found the error, I had missed:
install php5-mysql
Once I installed that, I got it working.
Thanks for the reply, and the scripts are very helpful, thanks for posting this.
JN,
I’m very glad to hear it worked out. It’s always the little things that get you.
Kindest regards,
Bill