 Adding Modules
In Part I of this series, you saw how to set up a registration form for a unique user name and password. In Part II, I’d like to expand on the registration to add more information, create Administration and Login modules and (naturellement) use design patterns.
If you’re designing for a customer, you will want a full set of operations to allow her to best serve those who registered on her site for products, services or information. At the same time, you want to design your administrative module so that if your client has new requests, you can add on more functionality without blowing up the program or starting over from scratch. Circumstances change for your clients as demands from their customers change.
Finally, you will need a login module. This module should be both safe and secure, and it should give the user an opportunity to re-try their login or, if need be, register. For the example used here, the security is minimal to focus on the structure. However, using the Strategy object (detailed in Part I), you could add more security.
Overview
To clarify this Registration-Administration-Login system, it helps stand back and look at the larger modules run by the different classes. Figure 1 shows one perspective. All of the operational modules have their own UI; so Figure 1 shows the three main modules with a UI block. As you will see in the file diagrams (Figure 2-4) each has its own UI class. Further, the Helper block works with all modules used for operations.

Figure 1: Overview of Primary Modules and Blocks
Figure 1 is meant as an orientation. In Part I of this series, the Registration module was completed, and while no design patterns were used, the programs adhered to OOP principles. More materials are added to this updated version, but the classes and operations are pretty much the same. The Administration module uses a Strategy design pattern. You will find plenty of examples and explanations of the Strategy pattern on this blog and in Chapter 12 of Learning PHP Design Patterns. Likewise, you will find a Proxy design pattern used for logging on in this blog and in Chapter 11 in Learning PHP Design Patterns. The focus in this post is on pattern implementation and how they work together and with other objects in the program. To get started try out each one and download the files.
![]()
![]()
![]()
![]()
After trying the different modules, find out how the main code is structured for each. Since only minor (but important!) modifications have been made to the Registration module, I’d like to start with the Administration module; then look at the changed Registration module and finally the Login module.
Administration: Strategy Design Pattern
The heart of a good registration package is the administrative module. The modules that make up administration are used to communicate with and better serve those registered on the site. However, as is often the case with software, especially in the dynamic marketplace that is the Internet, you need to,
…plan for change.
None of your customers for whom you develop Web sites are going to know everything they need to know until users start using their site. You need to create an administration tool that allows developers to add on new functionality in a relatively complex program. However, you want to be sure that new features are easy to add and will not gum up the rest of the program. Obviously, you will need a PHP Design Pattern; but which one? In this case you’re going to be adding operations that will do something the current ones do not, and a good candidate is the Strategy pattern. Each of the functions require a slightly different algorithm, and the Strategy pattern allows algorithms to vary independently from the clients that use them. Even better, the pattern makes it easy to add new encapsulated algorithms in the form of classes that implement the same interface—IAdminStrategy. Figure 2 shows the files used in the implementation of the Strategy pattern:
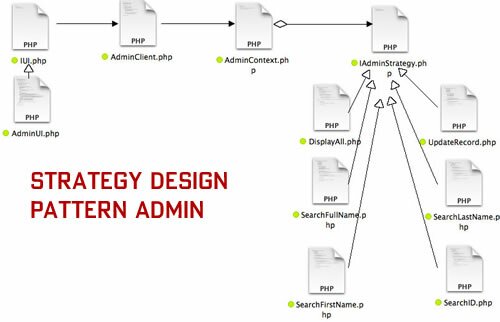
Figure 2: Administrative Strategy file diagram
The UI for the administrative module reflects the information in the updated table. (See the CreateTable class below in the Registration section.) For the most part, the UI is nothing more than an encapsulated HTML document. In other words, it’s pretty simple to create and understand.
error_reporting(E_ALL | E_STRICT);
ini_set("display_errors", 1);
function __autoload($class_name)
{
include $class_name . '.php';
}
class AdminUI
{
//Get the table name from constant in interface
public function __construct()
{
//Use the Security object to encode table
$this->adminUI=<<
|
Note that the “DisplayAll” radio button checked attribute is been set to “true.” If nothing is selected, the program throws an error. Having a default checked button is a simple way to make sure that something is selected.
The UI calls the AdminClient class and passes the name of the concrete strategy to be launched.
error_reporting(E_ALL | E_STRICT);
ini_set("display_errors", 1);
function __autoload($class_name)
{
    include $class_name . '.php';
}
class AdminClient
{
    private static $adminStrategy;
    private static $adminContext;
    //client request
    public static function request()
    {
      //Passes class name from UI & creates new class instance
      self::$adminStrategy=$_POST['task'];
      $strat=new self::$adminStrategy();
      self::useStrat($strat);
    }

    private static function useStrat(IAdminStrategy $doTask)
    {
        self::$adminContext=new AdminContext();
        self::$adminContext->adminInterface($doTask);
    }
}
AdminClient::request();
?>
|
The radio buttons in the AdminUI class are all named “task” and since only one radio button from the same group can be selected, whatever value is in “task” ($_POST[‘task’]) is the name of the concrete strategy to be invoked. Easy-peasy; lemon-squeezy. Broken down it looks like the following:
- String is passed through superglobal variable ($_POST[‘task’]) with name of concrete class.(e.g., “UpdateRecord”).
- String stored in private static variable ($adminStrategy).
- Instance of class created and stored in local variable, $strat. ($strat=new self::$adminStrategy())
- Private static method (useStrat()) creates new context instance and passes specific strategy through Context adminInterface().
Up to this point you can see that the program has no conditional statements. One of the advantages of the Strategy design pattern is that it has no conditional statements to give you a headache when it’s time to update. A request goes straight from the client to the concrete stately—no if’s about it.
Next we look at the AdminContext class and IAdminStrategy interface. In the Strategy design pattern, the context participant is the most subtle. Using the code hint, IAdminStrategy it maintains a reference to the strategy object (via the interface). No matter how many different strategies you add or currently use, they all can pass through the context if they are correctly formed. Given the simplicity of the interface, this gives the developer a wide range of strategy implementations.
//AdminContext.php
class AdminContext
{
    private $adminStrat;

    public function adminInterface(IAdminStrategy $strategy)
    {
        $this->adminStrat=$strategy;
    }
}
?>


//IAdminStrategy.php
interface IAdminStrategy
{
    public function adminAlgorithm();
    const BLETCHLEY ="registered";
}
?>
|
You you can see from Figure 2, the pattern includes lots of concrete implementations (all available in the download package), and here, we’ll look at just one; UpdateRecord.
class UpdateRecord implements IAdminStrategy
{
private $hookup, $sql,$tablemaster;
private $recordID,$fname,$lname,$email;
public function __construct()
{
$this->recordID=$_POST['id'];
$this->fname=$_POST['fname'];
$this->lname=$_POST['lname'];
$this->email=$_POST['email'];
$this->adminAlgorithm();
}
public function adminAlgorithm()
{
$this->tableMaster=IAdminStrategy::BLETCHLEY;
$this->hookup=UniversalConnect::doConnect();
$this->sql ="UPDATE $this->tableMaster SET fname='$this->fname', lname='$this->lname', email='$this->email' WHERE id='$this->recordID'";
try
{
$result = $this->hookup->query($this->sql);
echo "Client update complete.
|
As all good classes, the UpdateRecord class has a single responsibility. It updates records based on the user’s ID number. It’s encapsulated and implements the IAdminStrategy interface. Because besides abstract methods, the only thing stored in interfaces is constants, each IAdminStrategy implementation must declare and use its own private variables; even though some are reused by all of the strategy implementations. In this example, they were collapsed into two groups of private variables at the beginning of the class.
One of the possible useful strategies a customer may want is one that will delete a record. See if you can implement a strategy that does nothing but drop a record based on the ID number. You’ll have to add a radio button choice to the AdminUI, but that’s about it other than creating a DropRecord class. The other strategy implementations will give you the necessary clues to do the implementation.
Registration
Before you have customers to log in or examine their records administratively, you need to set up a database to register them. In Part I you saw how security was set up and how passwords and user names were checked and stored. Figure 3 provides and overview in a file diagram:

Figure 3: Registration file diagram
A few things have been added, but most are the same as the table used in Part I. A new table adds three more fields: Last Name, First Name and Email address. The following table creation class handles all of the updates and drops the old table:
ini_set("display_errors","1");
ERROR_REPORTING( E_ALL | E_STRICT );
include_once('UniversalConnect.php');
class CreateTable
{
private $tableMaster;
private $hookup;
private $drop;
private $sql;
public function __construct()
{
$this->tableMaster="registered";
$this->hookup=UniversalConnect::doConnect();
$this->dropTable();
$this->makeTable();
$this->hookup->close();
}
private function dropTable()
{
$this->drop = "DROP TABLE IF EXISTS $this->tableMaster";
try
{
$this->hookup->query($this->drop) === true;
printf("Old table %s has been dropped.
|
There’s nothing fancy about the table; just three additional nvarchar(n) text fields.
Likewise, adding the input forms for the new fields to the RegisterUI is equally simple:
include_once('IUI.php');
include_once('Security.php');
include_once('ISecurity.php');
class RegisterUI implements IUI
{
//Get the table name from constant in interface
private $bletchley=IUI::BLETCHLEY;
private $regUI;
public function __construct()
{
//Use the Security object to encode table
$sec=new Security();
$this->bletchley=$sec->doEncode($this->bletchley);
$this->regUI=<<
|
Compare it with the same file used in Part I and you’ll see that other than adding a couple of fieldset elements and three new text input forms, it’s essentially the same. There is one important difference, and that is in the reference to using classes and interfaces outside of the class. Instead of using the “__autoload” technique employed in most of the clients, it includes three separate include_once() methods. The reason for this is that the “__autoload” can only be used once in PHP when classes (objects) communicate with one another. If you attempt to re-fire the same “__autoload” code, it throws an error. However, if include_once() is used instead, the same class can be re-called without a problem.
The Register class now inserts data into the new fields, but the feedback message is the same since indicating that the user is registered using the supplied user name and password is the main purpose of the feedback.
class Register
{
private $hookup;
private $sql;
private $sun;
private $spw;
private $sfname;
private $slname;
private $semail;
private $tablemaster;
public function doRegistration($stab,$un,$pw,$fname,$lname,$email)
{
$this->tableMaster=$stab;
$this->sun=$un;
$this->spw=$pw;
$this->sfname=$fname;
$this->slname=$lname;
$this->semail=$email;
$this->hookup=UniversalConnect::doConnect();
$this->sql="INSERT INTO $this->tableMaster(un,pw,fname,lname,email) VALUES ('$this->sun','$this->spw','$this->sfname','$this->slname','$this->semail')";
try
{
$this->hookup->query($this->sql);
printf("You are now registered with the
|
Use of the Security class is the same and so is the class itself. So, you may want to review Part I to refresh your memory of how the Security objects communicate with the registration objects.
Login: The Proxy Design Pattern Goes to Work
Login is the last module to build. For this (as in a previous post on this blog), the module uses the Proxy design pattern. Figure 4 shows a file diagram of a Proxy implementation for the Login module.

Figure 4: File diagram of the Proxy Login
The Proxy design uses a Subject interface (abstract class ILogin), a Proxy (LoginProxy) and a RealSubject (Login). With the Protection Proxy, the user attempts to log in and is immediately sent to the Proxy where her credentials (username and password) are checked. If she passes inspection, the RealSubject is called where the request is met. In this case the request is to log in is set up with two login UIs. The first UI is where the user goes to login normally. If she forgets her username and / or password, she is sent to a second login called, ReLog, (see ReLog.php in Figure 4). The ReLog class includes a link to Register and a message that the password and username did not match. Basically, the Proxy kicks the user back to the login point but does so with an opportunity to register or try logging in again. If the user successfully logs in, she is sent to the desired page. (A dummy page, HomeUI.php is a generic home page to be replaced by the actual target page.) All of these operations are hidden from the user.
In looking at the three participants, you can see how simple it is to build a protective Proxy design pattern for Login security:
//Subject Participant
//ILogin.php
abstract class ILogin
{
        protected abstract function loginOrDie();
        public abstract function doLogin();
        protected static $hookup;
        const LOGTABLE="registered";
        protected $tableMaster;
        protected $sun;
        protected $spw;
        protected $passSecurity=false;
        protected $sql;
}
?>


//Proxy Participant
//LoginProxy.php
class LoginProxy extends ILogin
{
        public function doLogin()
        {
                self::$hookup=UniversalConnect::doConnect();
                $this->tableMaster=ILogin::LOGTABLE;
                $this->sun=self::$hookup->real_escape_string($_POST['username']);
                $this->spw=self::$hookup->real_escape_string($_POST['password']);

                $this->sql ="SELECT * FROM $this->tableMaster";
                try
                {
                        $result = self::$hookup->query($this->sql);
                        while ($row = $result->fetch_assoc())
                        {
                                if($row['un']==$this->sun && $row['pw']==$this->spw)
                                {
                                        $this->passSecurity=true;
                                        $this->loginOrDie();
                                }
                        }
                        if(!$this->passSecurity)
                        {
                                $this->loginOrDie();
                        }

                $result->close();
                }
                catch(Exception $e)
                {
                        echo "Here's what went wrong: " . $e->getMessage();
                }
                self::$hookup->close();
        }

        protected function loginOrDie()
        {
                if($this->passSecurity)
                {
                        $goodLog=new Login();
                        $goodLog->doLogin();
                }
                else
                {
                        $badLog=new ReLog();
                }
        }
}
?>


//RealSubject Participant
//Login.php
class Login extends ILogin
{
        public function doLogin()
        {
                $this->loginOrDie();
        }

        protected function loginOrDie()
        {
                $goHome=new HomeUI();
        }
}
?>
|
The main difference between this Proxy implementation and the other Proxy on this blog is that this one uses a second UI object (ReLog) to handle failed logins and offers the user a chance to register.
The Helpers
“Helper” classes assist in providing some functionality, though that functionality is not the main goal of the program. I’ve also included the CSS file in this “Helper” group, and in cases where an external JavaScript file is included, it too would go here. Figure 5 shows the helpers included in this application:

Figure 5: The Helper files
On this blog, I’ve used the same interface and class for MySql connections again and again. This time I made slight changes and so let me quickly show and explain what they do. First, the IConnectInfo interface is used to store MySql connection information in the form of constants and declare a static method, doConnect(). Secondly, the UniversalConnect class includes implementation of the doConnect() method. This allows user to make their MySql connection with a single line:
$connection=UniversalConnect::doConnect();
That makes life very easy. Importantly, UniversalConnect uses the built-in PHP method, mysqli(), not the older (and soon to be deprecated) mysql()–without the “i”. It also includes error checking for a proper connection routine using the try/catch combination rather than conditional statements.
interface IConnectInfo
{
//Enter your MySql connection information here
//Uses PHP mysqli() method (NOT mysql())
const HOST ="localhost";
const UNAME ="username";
const DBNAME = "databasename";
const PW ="yourpassword";
public static function doConnect();
}
?>
////Uncomment following 2 lines for develop/debug
//ini_set("display_errors","1");
//ERROR_REPORTING( E_ALL | E_STRICT );
include_once('IConnectInfo.php');
class UniversalConnect implements IConnectInfo
{
private static $server=IConnectInfo::HOST;
private static $currentDB= IConnectInfo::DBNAME;
private static $user= IConnectInfo::UNAME;
private static $pass= IConnectInfo::PW;
private static $hookup;
public static function doConnect()
{
self::$hookup=mysqli_connect(self::$server, self::$user, self::$pass, self::$currentDB);
try
{
self::$hookup;
//Uncomment following line for develop/debug
//echo "Successful MySql connection:
|
If you use a different server, user name, password or database, you just change the information in the interface, and you’re good to go.
Above in the Registration section, you will see the class used for creating the table for registration, administration and login. Finally, all the UIs employ the same CSS, and having it in one place makes universal changes very easy. That’s it for the Helpers, and they play a crucial role in creating most applications.
Copyright © 2014 William Sanders. All Rights Reserved.

A Captcha probably goes in the security class. However, it is not clear where sanitization and validation of user input goes? Where we display the validation errors? Shouldn’t be a validation class in the mix? Thanks.
Hi George,
The Proxy (security) design pattern is simply to get from an insecure to a secure location via a proxy class. You could add a second (or third or fourth, etc.) Proxy for validation as well on “the other side” of the login proxy.
Kindest regards,
Bill
Pretty much everybody is used to have login and register as methods of a class, not as separate classes interacting. I can understand the theory as it is simple and very well explained, but it differs significantly from a real life production example and the way most PHP programmers are accustomed (MVC frameworks). To the point, for authentication, usually anybody would like to have at least validation to input forms and will have to have something to control the session (and nobody would put the name of a database table in a form element). Probably will be something as a Session class, with methods to create, delete and check sessions. The validation will be some kind of strategy structure (validation algorithms) that will return an error array on validation error(s) that has to be displayed on the page. I mention I have your book on PHP patterns as well, which I enjoyed reading it, so you can direct me to its content if needed. I would love to understand how the issues mention will fit in the design presented. For me, this will probably mean passing the point of no return and become a true believer. I understand you may have limited time, but it may be well possible to already have a production-ready working example that I may research on my own, as most projects will require authentication. In this regards, I may be contacted by email as well. Eager to learn, really appreciate your teaching skills. Thank you.
Hi Greg,
In Eugène Ionesco ‘s play Rhinoceros, a small French town is beset by rhinoceros. People are horrified by the beasts at first, but gradually, over time they come to accept them and even become rhinoceros themselves. Ionesco ‘s rhinoceros are symbols for the Nazis, who at first are detested and then embraced. The sad results of such “everyone is doing it” mentality is well-known, and so when I hear “everyone is using MVC,” I cringe.
There’s nothing wrong with MVC, and in PHP, it seems to be a portal for design patterns. That’s fine, and in 1979 when MVC was introduced it was revolutionary. When the Gang of Four published “Design Patterns” in 1995, another revolution occurred and instead of a single design pattern, we now had 23, each one for a different kind of typical programming problem. The MVC was replaced by the Observer pattern (or mimicked by it) and the 22 other patterns focused on typical programming tasks such as “login”. The Proxy pattern is actually three different types of Proxy: remote, virtual and protection. In this case the protection Proxy is employed because it is designed for the typical kinds of issues involving logins: security and ease of use. Granted, the example is quite simple, but the whole issue is providing an example that is transparent enough to see the process while actually accomplishing the task it was designed to do.
The Proxy is coupled with the Strategy pattern to illustrate two patterns doing two different things well. I suppose that if I wanted, I could use the MVC for both, but that’s like using a single tool for building a house. You need hammers for nailing, saws for cutting and sanders for smoothing. (Of course you could use a Swiss Army knife…)
In any event, thank you for your thoughtful comment. I appreciate comments like yours because it is clear that you had thought about it, and I hope I have responded in kind.
Kindest regards,
Bill