 Bring in the MySql
At this stage there is still no design pattern in the project. You will see that re-use is starting to creep in, and we’re getting to the point where some decisions can be made about what design pattern would best fit this project. In Part V, you will see how a design pattern pulls everything together and why one is helpful to PHP programming.
In Part III of this series, you saw how external data from text files can be placed into an array and used by the DocHere class to populate a web page. In this installment, the same process shows how this can be done using data from a MySql database.
From Data Input to Web Page Display
The whole point of a CMS is to make updating a web site or blog easy. For the time being, I’m going to treat the web page example as a little blog–La Petite Blog. Figures 1 and 2 show how the data are to be entered and the end result pulled out of a database and displayed in the web page.
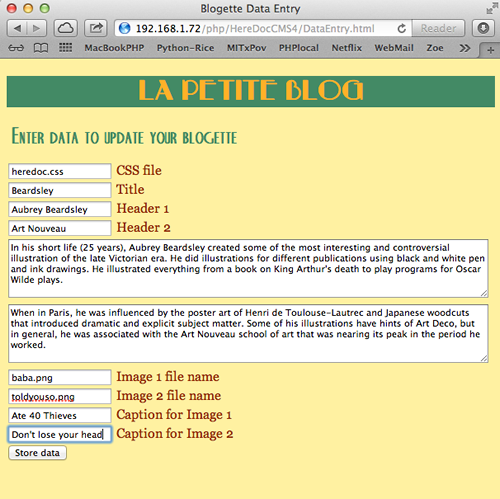
Figure 1: HTML form to send data to MySql database
Figure 1 shows that the same categories of data used throughout the project are still in use. Even the CSS file is the same. The form is a simple HTML5 one. (Click View Code to see listing.)
|
The “entry” for the system is the class RetrieveBlog. It is almost identical to the Content class in Part III, and it generates the required results as shown in Figure 2.
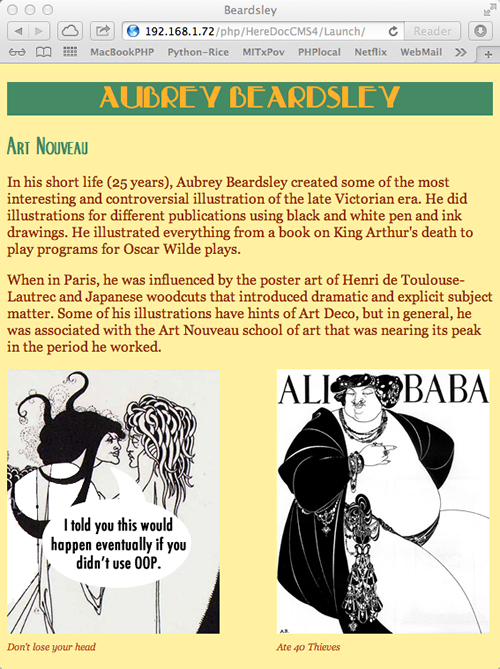
Figure 2: Page content from database.
Getting from the HTML5 data input to the PHP-generated web page takes a bit of doing, and so to get started, download the necessary files:
![]()
From Data Input to Web View
The whole point of a CMS is to regularly update a web page easily. By the end of this stage, the only thing you’ll need with an FTP client for is to upload graphics. (Uploading graphic files from a web page using PHP is handled up an upcoming post apart from this series.) For now, though, you will be able to update all text in a web page as well as graphics are have already been placed in an image folder. Here’s what we’ll need:
- An HTML form for data entry (see above)
- A PHP class to create a MySQL Table to store data
- A PHP class to take the data from the HTML form and store it in the MySQL table
- A PHP class to retrieve the data from the and make it available to the web page
We’ll start with the table.
Sur La Table
Creating a table is quite easy, and note that the same categories used in the previous posts of this series are represented. In the development process I add ini_set() and ERROR-REPORTING() statements that are probably already in your php.ini file. You can leave those out if your php.ini file has them set already. Also, in development, when I create a table I always drop an existing table. So, once you have your final table, you might want to tuck the file into a separate folder so that you don’t accidentally delete a table with stored data.(Click the arrow in the upper right corner to show the listing.)
ini_set("display_errors","1");
ERROR_REPORTING( E_ALL | E_STRICT );
include_once('UniversalConnect.php');
class CreateTable
{
private $tableMaster;
private $hookup;
public function __construct()
{
$this->tableMaster="blogette";
$this->hookup=UniversalConnect::doConnect();
$drop = "DROP TABLE IF EXISTS $this->tableMaster";
if($this->hookup->query($drop) === true)
{
printf("Old table %s has been dropped.
|
In addition to the properties used up to this point in the CMS, you will see “id” and “webdate” fields in the table. These fields are added to be used in CMS administration and are not passed to the DocHere class.
Two MySQL connection helper files are also included. One is a connection interface (IConnectInfo.php) and the other is a connection utility (UniversalConnect.php). All you have to do is to add your MySQL connection information to the IConnectInfo.php file and replace any duplicates of the file.
//Filename: IConnectInfo.php
interface IConnectInfo
{
const HOST ="yourHost";
const UNAME ="yourUN";
const PW ="yourPW";
const DBNAME = "yourDB";
public static function doConnect();
}
?>
?php
ini_set("display_errors","1");
ERROR_REPORTING( E_ALL | E_STRICT );
include_once('IConnectInfo.php');
class UniversalConnect implements IConnectInfo
{
private static $server=IConnectInfo::HOST;
private static $currentDB= IConnectInfo::DBNAME;
private static $user= IConnectInfo::UNAME;
private static $pass= IConnectInfo::PW;
private static $hookup;
public static function doConnect()
{
self::$hookup=mysqli_connect(self::$server, self::$user, self::$pass, self::$currentDB);
if(self::$hookup)
{
//Comment out the following line after development
echo "Successful connection to MySQL:
|
The advantage of using these two files is that you entire connection can be made with a single line, such as:
$this->hookup=UniversalConnect::doConnect();
It saves time and clutter in development.
Entering Data into the Table
Entering data into the table used the InsertBlog class. It takes the data sent from the HTML file and stores it in the table. (It uses real_escape_string() to help curb injection attacks, but you can use any injection blocker you want.) The two methods, getData() and insertData() can be considered getter/setter methods; one to get values from the HTML document, and the other to set them as values in the table. (Click on the upper right arrow to view listing.)
ini_set("display_errors","1");
ERROR_REPORTING( E_ALL | E_STRICT );
include_once('UniversalConnect.php');
class InsertBlog
{
    private $css;
    private $title;
    private $header1;
    private $header2;
    private $body1;
    private $body2;
    private $image1;
    private $image2;
    private $caption1;
    private $caption2;
    private $sql;
    private $tableMaster;
    private $hookup;

    public function __construct()
    {
        $this->tableMaster="blogette";
        $this->hookup=UniversalConnect::doConnect();
        $this->getData();
        $this->insertData();
        $this->hookup->close();
    }

    private function getData()
    {
        $this->css = $this->hookup->real_escape_string($_POST['css']);
        $this->title = $this->hookup->real_escape_string($_POST['title']);
        $this->header1 = $this->hookup->real_escape_string($_POST['header1']);
        $this->header2 = $this->hookup->real_escape_string($_POST['header2']);
        $this->body1 = $this->hookup->real_escape_string($_POST['body1']);
        $this->body2 = $this->hookup->real_escape_string($_POST['body2']);
        $this->image1 = $this->hookup->real_escape_string($_POST['image1']);
        $this->image2 = $this->hookup->real_escape_string($_POST['image2']);
        $this->caption1 = $this->hookup->real_escape_string($_POST['caption1']);
        $this->caption2 = $this->hookup->real_escape_string($_POST['caption2']);
    }

    private function insertData()
    {
        $this->sql="INSERT INTO blogette (
                                            webdate,
                                            css,
                                            title,
                                            header1,
                                            header2,
                                            body1,
                                            body2,
                                            image1,
                                            image2,
                                            caption1,
                                            caption2
                                            )
                                            VALUES
                                            (
                                            NOW(),
                                            '$this->css',
                                            '$this->title',
                                            '$this->header1',
                                            '$this->header2',
                                            '$this->body1',
                                            '$this->body2',
                                            '$this->image1',
                                            '$this->image2',
                                            '$this->caption1',
                                            '$this->caption2'
                                            )";
        $this->hookup->query($this->sql);
        if ($result = $this->hookup->query($this->sql))
        {
            printf("Data has been inserted into %s", $this->tableMaster);
        }
        else
        {
            printf("Here's what went wrong: %s\n", $this->hookup->error);
        }
    }
}
$worker=new InsertBlog();
?>
|
As you can see, the class used for inserting data into a table is fairly standard. As the methods indicate, one operation gets the data and the other inserts it into the table.
From the Table to the Web Page
The final step is to take the data from the table, place it into an array and send it to the web page. The class, named RetrieveBlog, has two methods, getContent() and loadContent(), and it has no constructor function or self-launching statement. It is launched by a request from the DocHere class.
ini_set("display_errors","1");
ERROR_REPORTING( E_ALL | E_STRICT );
include_once('UniversalConnect.php');
include_once('PageMaster.php');
class RetrieveBlog extends PageMaster
{
    private $css;
    private $title;
    private $header1;
    private $header2;
    private $body1;
    private $body2;
    private $image1;
    private $image2;
    private $caption1;
    private $caption2;
    private $sql;
    private $tableMaster;
    private $hookup;

    public function getContent()
    {
        $this->tableMaster="blogette";
        $this->hookup=UniversalConnect::doConnect();
        $this->loadContent();
        $this->content = array("css" => $this->css,
                         "title" => $this->title,
                         "header1" => $this->header1,
                         "header2" => $this->header2,
                         "body1" => $this->body1,
                         "body2" => $this->body2,
                         "image1" => $this->image1,
                         "image2" => $this->image2,
                         "caption1" => $this->caption1,
                         "caption2" => $this->caption2
                         );
        return $this->content;
    }

    private function loadContent()
    {
        //Create Query Statement
        $this->sql ="SELECT * FROM $this->tableMaster WHERE id = 1";

        if ($result = $this->hookup->query($this->sql))
        {
            while ($row = $result->fetch_assoc())
            {
                $this->css = $row['css'];
                $this->title = $row['title'];
                $this->header1 = $row['header1'];
                $this->header2 = $row['header2'];
                $this->body1 = $row['body1'] . "";
                $this->body2 = $row['body2'] . "";
                $this->image1 = "images/" . $row['image1'];
                $this->image2 = "images/" . $row['image2'];
                $this->caption1 = $row['caption1'];
                $this->caption2 = $row['caption2'];
            }
            $result->close();
        }
        $this->hookup->close();
    }
}
?>
|
If the RetrieveBlog class looks very similar to the Content class in Part III of this series, that’s because they are very similar. The main difference is that the loadContent() methods differ in that the Content class loads the data from text files and RetrieveBlog from a database.
Back to the Web Page
In revisiting the DocHere class, little has changed. The $content variable instantiates an instance of the RetrieveBlog class, and then uses the getContent() method from that class to pull in the array containing the necessary data. (The array, $this->hd, is an abbreviation of “html data”). As you can see, the class is little changed from the DocHere class from Part III of this series. (Click on the arrow in the upper right corner to see the entire listing.)
ini_set("display_errors","1");
ERROR_REPORTING( E_ALL | E_STRICT );
include_once('PageMaster.php');
include_once('RetrieveBlog.php');
class DocHere extends PageMaster
{
function __construct()
{
$this->content=new RetrieveBlog();
$this->hd = $this->content->getContent();
$this->document = <<
|
From the beginning of this series up to this point, only small changes have been made to get to the point where we can update and/or change a web page. The little blog (blogette?) in this post is fairly robust. It’s easy to update, and while quite small, it has most of the ingredients for a workable CMS.
More Work to Do
At this point, there’s a working CMS, and while WordPress has nothing to worry about, La Petite Blog, can be used for a little blog or simple web page work. Updates are done through an HTML page.
To make this into a more robust CMS, we need to add a design pattern, do something about the pseudo abstract class, PageMaster, and deal with the fact that RetrieveBlog only loads data from the table where the id = 1. In the final installment of this series, we’ll discuss and implement a design pattern for the CMS and fix some of these niggling issues.
Between now and the final installment, a short post about using an OOP object to load graphic files sets the stage for added administrative tools for the final CMS.
Copyright © 2013 William Sanders. All Rights Reserved.
0 Responses to “PHP CMS Project Part IV: La Petite Blog”