 The Observer design pattern is one of those patterns that is easy to understand in terms of practical utility, and it’s pretty easy to implement. The idea behind the Observer pattern is to have one main object with other objects depending on the main one to notify them when changes occur. For PHP, the Observer utility is so fundamental, there’s a built-in SplObserver interface. (Using the SplObserver along with the SplSubject will be covered in a future post.)
For example, suppose you have a data source such as an inventory saved in a MySql database. You check on the database periodically to see when you need to purchase more inventory of different products. To make it practical, you want a graph that you can tell at a glance what items need replacement and which ones don’t. However, you also want a table to give you a precise breakdown of the exact numbers in inventory. This example may sound familiar because it’s similar to the one that the Gang of Four use in Design Patterns: Elements of Reusable Object-Oriented Software in illustrating the Observer pattern. What a lot of people don’t realize is that they use the same example at the beginning of their book (page 5) to examine the Model View Controller (MVC). For those of you still using the MVC, the data is supplied by the model, and the views are the displays in different formats (a table, a bar chart, and a pie chart). To get started Play the two examples and Download the source code:
![]()
![]()
![]()
The Observer Class Diagram
The Observer’s class diagram is a bit perplexing. Take a look at Figure 1, and you’ll see why:

Figure 1: Observer Class Diagram
The diagram itself is pretty simple, two interfaces (Subject and Observer) and two concrete implementations (ConcreteSubject and ConcreteObserver). What’s a little confusing is the Subject interface: all three methods indicate a concrete implementation because they are not italicized. Italicized method and class (interface) names indicate abstract classes and methods or interfaces. In PHP, the SplSubject is an interface (all methods are abstract), but the diagram clearly shows some concrete implementation in the notify() method—including the pseudo code for it. Neither the attach() nor the detach() are italicized, but the book (p. 295) indicates that the Subject provide attach/detach interfaces—abstract methods. In order to meet the intent of the Subject interface, I created an abstract class that has abstract methods for attaching and detaching Observer objects. However, I also included a concrete notify() method along the lines suggested.
abstract class Subject
{
    //Abstract attach/detach methods
    public abstract function attach(Observer $observer);
    public abstract function detach(Observer $observer);

    //Concrete protected arrays and  public method
    protected $observerSet=array();
    protected $dataSet=array();
    public function notify()
    {
        foreach($this->observerSet as $value)
        {
            $value->update($this);
        }
    }
}
?>
|
The idea of the Observer is to have a concrete Subject class (or classes), and have Observer objects subscribe to the data in the Subject. It’s something like a News Service used by Television, Radio, Newspapers and News Blogs. The News Service is the Subject and the news outlets are subscribers — concrete Observers. Notice in Figure 1 that the arrow from the Subject to the Observer ends with a solid ball. That means that the relationship is one (Subject) to many (Observers.) In the example provided, you can add data to a hypothetical “inventory” program that then forwards it to a Subject, and the Subject makes it available to different Observers. In this case there are only two: one that uses the Subject information to create a bar chart, and another that uses the data to display a data table.
Next, look at the ConcreteSubject named, HardwareSubject.
class HardwareSubject extends Subject
{
    public function attach(Observer $observer)
    {
        array_push($this->observerSet,$observer);
    }

    public function detach(Observer $observer)
    {
        $counter=0;
        foreach($this->observerSet as $value)
        {
            if($this->observerSet[$counter]==$observer)
            {
                unset($this->observerSet[$counter]);
            }
            $counter++;
        }
    }

    public function getState()
    {
        return $this->dataSet;
    }
    public function setState($data)
    {
        $this->dataSet=$data;
    }
}
?>
|
As an extension of the Subject abstract class, it must implement the attach/detach (think subscribe/unsubscribe) methods. The inherited notify() method is concrete; so it’s available for use with no modifications—not seen in the class. The getter/setter methods are used to make the data to the attached Observers (subscribers)— getState() and the setState($data) methods receives the data to be made available to subscribers. In this example, the data are made available through a UI directly, but the data could come from any source—especially a MySQL database. As you will see, the data for the dataSet array (inherited from Subject) gets it data from the array storing the data provided by the Client.
The Observers
The real work horses for this pattern are the concrete Observer objects. The concrete subject takes the data and tosses it out to the subscribed (attached) observers and they’re the ones who really do something with the data from the Subject. Take a look at the Observer interface:
interface Observer
{
    function update(Subject $subState);
}
?>
|
As you can see, it’s quite simple with a single method that expects a Subject object as an argument. However, this part can be a bit tricky since the notify() method of the Subject interface includes an update call that uses the current concrete subject as a parameter. That is, the update($sub) is called from a Subject object and includes itself in the form of a $this statement in the parameter.
The Bar Chart
The concrete Observers can be as simple or complex as you want. I went for medium complex. First, take a look at the BarChartObserver. It takes the Subject’s data and makes bar charts using SVG graphics.
class BarChartObserver implements Observer { private $obState=array(); private $barChart; private $bar; private $color; public function update(Subject $subState) { $this->obState=$subState->getState(); $this->makeChart(); } private function makeChart() { $this->color=array('#0D3257','#97A7B7','#B2C2B9','#BDD6E0','#65754D','#C7DBA9'); $spacer=0; $maxVal=max($this->obState); $mf = function($x){return 220/$x;}; foreach($this->obState as $value) { $adjSize=$mf($maxVal) * $value; $this->buildChart($spacer,$adjSize); $spacer+=36.6; } } private function buildChart($pos,$barSize) { $cc= array_pop($this->color); $base = 220-$barSize; $SVG ="; $this->bar =" |
Whenever making charts, you have to take in several considerations. I’ll touch on two here. First, the values have to be relative to the largest element in your numerical array. This can be used to set up relative sizes by using the max() method with your array, and the little lambda function stored in $mf. When iterating through the array with a foreach() loop each value is set to the size of the window (220). By using the lambda function with the maximum value as a parameter, the maximum value divided is by 220 is the factor, and that value is multiplied by the factor times the actual value of the data point. That gives you values that will fit in the 220 pixel window relative to the size of the maximum value. (If you have a spiked maximum value, the other value tend to flatten out on the chart.)
The Data Table
In order to get a better picture of this implementation of the Observer design pattern, Figure 2 shows the files used. A PHP helper class and and an additional CSS file aided in the TableObserver class. Figure 2 also helps to put the other files in context:
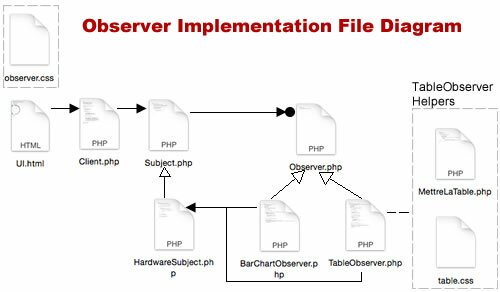
Figure 2: Observer and Helper Files
The TableObserver takes the same Subject data and instead of creating a bar chart, it creates a data table; but the data are identical to that of the bar chart. Unlike the bar chart, the data spread can be as much as you want because only the actual integers are displayed—not graphic representations. The rest is a matter of putting the data into tables, and so a second CSS file is employed to address issue specific to the table under construction.
class TableObserver implements Observer
{
    private $type=array('Mac  ','HP    ','RasPi');
    private $obState=array();
    private $barChart;
    private $bar;
    private $color;
    public function update(Subject $subState)
    {
        $this->obState=$subState->getState();
        $this->makeChart();
    }

    private function makeChart()
    {
        //create numeric array
        $load=array();
        foreach($this->obState as $value)
        {
            array_push($load, $value);
        }

        //get table top from helper class
        echo MettreLaTable::surLaTable();
        $rn=1;
        $c=count($load)-1;
        for($n=0; $n <= $c; $n+=2)
        {
            $ty=array_pop($this->type);
            $lc=$load[$n];
            $rc = $load[$n+1];
            $this->buildTable($rn,$lc,$rc,$ty);
            $rn++;
        }
echo" |