 A CMS is only as good as the administrative module, and the one provided here is fully functional based on a simple work flow. You can change the UI and work flow to best fit your own, but you have the flexibility design patterns offer; so making changes to fit your needs (or those of your customers) should not be difficult.
One of the key features of a dynamic Web page is that it can be updated easily, and by using a MySQL table and database, all of the update information can be stored in a single location (table.) Updating the page is simply a matter of updating the data in a record or by adding new records to the table. The administrative module for this CMS has the capacity to update data in an existing record, but the page presented is always the newest record. The CMS has certain drawbacks because you cannot delete records without throwing the system out of whack, but that was done for the purposes of ease of use. (Remember, you’re a programmer and can change whatever you want!)
Set the Table
Setting up the MySQL table involves three files: 1) an interface with the MySQL connection information; 2. a connection class; and a table-creation class. The following three classes: (Use your own MySQL connection information in the IConnectInfo interface.)
//Filename: IConnectInfo.php
interface IConnectInfo
{
const HOST ="your_host";
const UNAME ="your_username";
const PW ="your_pw";
const DBNAME = "your_dbname";
public static function doConnect();
}
?>
//Filename: UniversalConnect.php
ini_set("display_errors","1");
ERROR_REPORTING( E_ALL | E_STRICT );
include_once('IConnectInfo.php');
class UniversalConnect implements IConnectInfo
{
private static $server=IConnectInfo::HOST;
private static $currentDB= IConnectInfo::DBNAME;
private static $user= IConnectInfo::UNAME;
private static $pass= IConnectInfo::PW;
private static $hookup;
public static function doConnect()
{
self::$hookup=mysqli_connect(self::$server, self::$user, self::$pass, self::$currentDB);
try
{
self::$hookup;
//Uncomment following line for develop/debug
echo "Successful MySql connection:
|
The connection routines have been improved upon over time, and you can find out more about it in the original post on the subject on this blog. For now, Play the application and Download the source files. (When you click the Play button, you enter the Login UI. Use the same un/pw combination from the Functional Protective Proxy post on this blog. (Hint, you can find it in the ILogin abstract class.)
![]()
![]()
In creating the table at first I used the TEXT data type for a large block of text, but then decided that a BLOB type may have a slight advantage. The BLOB is a VARBINARY and TEXT is VARCHAR, and BLOB seemed to have a slight advantage. However, the advantage may be smaller than I originally thought. Check out the MySQL docs on these two data types and you can see the differences for yourself. Figure 1 shows what the editor in the administration module looks like:
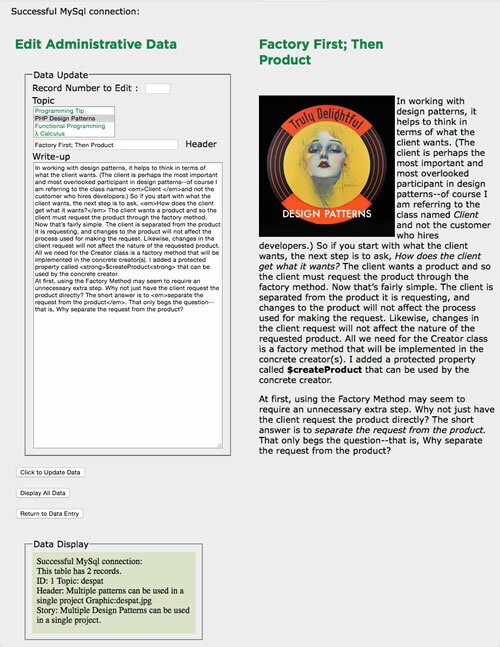
Figure 1: Administrative Module Editor
From Proxy to Strategy
The login module of this CMS is based on the Proxy pattern. Now, as in previous CMS examples, the administrative module is based on a Strategy pattern. Each object in the Strategy pattern represents an algorithm to accomplish a different task. In this case, the tasks include:
- Entering data
- Editing data
- Displaying data
- Displaying a page based on stored data.
All requests go through a context relying on a Strategy interface. In this case, I used an abstract class which allowed the addition of several protected properties and a constant with the name of the table. This is all in addition to the main method in an abstract public function, the algorithm method, executeStrategy(). Following the Strategy design pattern, begin with the Context.
The context exemplifies the oft-quoted design pattern principle,
Program to the interface; not the implementation.
All requests from the client go through the AdminContext class. The request must include a concrete strategy object that implements the IAdminStrat interface (an abstract class.)
class AdminContext
{
    private $adminStrat;

    public function adminInterface(IAdminStrat $strategy)
    {
        $this->adminStrat=$strategy;
        $this->adminStrat->executeStrategy();
    }
}
?>
|
The Strategy interface is an abstract class where the main algorithm (executeStrategy()) is set. However, this interface is busier than an interface per se. In includes several protected properties and a constant with the name of the table. By having the table name in the interface, all of the strategy implementations simply reference the constant, ULTRA. So, if the developer decides to re-use the program on a different table, only the name of the table in the interface need be changed.
abstract class IAdminStrat
{
        abstract public function executeStrategy();
        protected $hookup, $sql, $tableMaster,$topic,$header, $graphic,$story,$id,$package;
        const ULTRA = "your_table_name";
}
?>
|
The next step is to implement the different strategies note above as different tasks beginning with data entry:
class AdminDataEntry extends IAdminStrat
{
        //This is a Strategy implementation
        public function executeStrategy()
        {
                //Get data from HTML entry
                $this->topic=$_POST['topic'];
                unset ($_POST['topic']);
                $this->header=$_POST['header'];
                unset ($_POST['header']);
                $this->graphic=$this->topic . ".jpg";
                $this->story=$_POST['textNow'];
                unset ($_POST['textNow']);
                $this->enterData();
                $this->hookup->close();
        }
        private function enterData()
        {
                $this->tableMaster=IAdminStrat::ULTRA;
                $this->hookup=UniversalConnect::doConnect();
                $this->sql = "INSERT INTO $this->tableMaster (topic,header,graphic,story)
                                          VALUES ('$this->topic','$this->header', '$this->graphic','$this->story')";

                try
                {
                        $this->hookup->query($this->sql);
                        printf("Story with topic, %s and header %s and %s graphic has been entered into table, %s :",$this->topic,$this->header,$this->graphic,$this->tableMaster);
                }

                catch (Exception $e)
                {
                        echo "There is a problem: " . $e->getMessage();
                        exit();
                }
        }
}
?>
|
Once data have been entered, you want to have a way to see all of the entered records:
class AdminDisplayAll extends IAdminStrat
{
public function executeStrategy()
{
//Get table name and make connection
$this->tableMaster=IAdminStrat::ULTRA;
$this->hookup=UniversalConnect::doConnect();
$this->displayAll();
$this->hookup->close();
}
private function displayAll()
{
//Create Query Statement
$this->sql ="SELECT * FROM $this->tableMaster";
try
{
$result = $this->hookup->query($this->sql);
printf("This table has %s records.",mysqli_num_rows($result));
while ($row = $result->fetch_assoc())
{
printf("
|
Being a CMS, you also want some way to edit the contents of a story. Here you have two different approaches you can take to updating data. On the one hand, you can update any of the different files stored, and on the other hand you can create new stories by re-editing the last entry in the database. This simple CMS automatically uses the latest entry and by re-editing it, you can effectively, add a new story.
class AdminEdit extends IAdminStrat
{
        //This is a Strategy implementation
        public function executeStrategy()
        {
             //Get table name and make connection
             $this->tableMaster=IAdminStrat::ULTRA;
             $this->hookup=UniversalConnect::doConnect();
             //Get data from HTML entry
             $this->id=$_POST['record'];
             $this->topic=$_POST['topic'];
             unset ($_POST['topic']);
             $this->header=$_POST['header'];
             unset ($_POST['header']);
             $this->graphic=$this->topic . ".jpg";
             $this->story=$_POST['textNow'];
             unset ($_POST['textNow']);
             $this->updateData();
             $this->hookup->close();
        }


        private function updateData()
        {
                $this->hookup=UniversalConnect::doConnect();
                $this->sql = "UPDATE  $this->tableMaster
                                SET topic='$this->topic',
                                header='$this->header',
                                graphic='$this->graphic',
                                story='$this->story'
                                WHERE id='$this->id'";

                try
                {
                        $this->hookup->query($this->sql);
                        printf("Story with topic, %s and header %s and %s graphic has been updated in table, %s :",$this->topic,$this->header,$this->graphic,$this->tableMaster);
                }

                catch (Exception $e)
                {
                        echo "There is a problem: " . $e->getMessage();
                        exit();
                }
        }
}
?>
|
The preview module, in this context, shows the plan for gathering the data to be used on the page. In this case, the module gets the data for the editing module and displays a “preview” of what the user sees on the page. However, instead of seeing the whole page, the administrative module shows just the dynamic parts of that page.
include_once "UniversalConnect.php";
include_once "IAdminStrat.php";
class AdminPreview extends IAdminStrat
{
        //Variable for MySql connection
        private $page=array();
        public function executeStrategy()
        {
            //Get table name and make connection
            $this->tableMaster=IAdminStrat::ULTRA;
            $this->hookup=UniversalConnect::doConnect();
            $this->getLastRecord();
            $this->page=$this->getPage();
            $this->hookup->close();
            return $this->page;

        }

        private function getLastRecord()
        {
        //Create Query Statement
            $this->sql ="SELECT * FROM $this->tableMaster";
            try
            {
                $result = $this->hookup->query($this->sql);
                $this->id=mysqli_num_rows($result);
                $result->close();
            }
            catch(Exception $e)
            {
                echo "Here's what went wrong: " . $e->getMessage();
                exit();
            }
        }

        private function getPage()
        {
        //Create Query Statement
            $this->sql ="SELECT * FROM $this->tableMaster WHERE id='$this->id'";
            try
            {
                $result = $this->hookup->query($this->sql);
                while ($row = $result->fetch_assoc())
                {
                        $this->header=$row['header'];
                        $this->graphic=$row['graphic'];
                        $this->story=$row['story'];
                }
                $result->close();
                $this->package=array($this->header,$this->graphic,$this->story);
                return $this->package;
            }
            catch(Exception $e)
            {
                echo "Here's what went wrong: " . $e->getMessage();
                exit();
            }
        }
}
?>
|
The Client
Now that you have seen the different strategies, all the client (AdminClient) has to do is get the request from the user (through a UI) and call the context (AdminContext) using the selected strategy as an argument. A functional closure identifies the correct strategy using the UI superglobals.
error_reporting(E_ALL | E_STRICT);
ini_set("display_errors", 1);
// Autoload given function name.
function includeAll($className)
{
    include_once($className . '.php');
}
spl_autoload_register('includeAll');

class AdminClient
{
    private static $a,$b,$c,$d;
        //client request
    public static function request()
    {
        self::$a=isset($_POST["insert"]);
        self::$b=isset($_GET["display"]);
        self::$c=isset($_POST["edit"]);
        self::$d=isset($_GET["preview"]);

        //Use closures to determine course of action
        $kappa=function() {$gamma= self::$c ? 'AdminEdit' : 'AdminPreview'; return $gamma;};
        $iota = function() use($kappa) {$beta=self::$b ? 'AdminDisplayAll' : $kappa(); return $beta;};
        $lambda = function($x) use ($kappa, $iota) {
                $alpha =  $x  ? 'AdminDataEntry' : $iota();
                return $alpha;};
        self::clearSet();
        $clas=$lambda(self::$a);
        $job = new $clas();
        $context=new AdminContext();
        $context->adminInterface($job);
    }

    private static function clearSet()
    {
        unset($_POST["insert"]);
        unset($_GET["display"]);
        unset($_POST["edit"]);
        unset($_GET["preview"]);
    }
}
AdminClient::request();
?>
|
Walking through the closure operation is a bit involved, and rather than discussing it here, think of it as an alternative to a more imperative solution such as using a series of if statements or a switch statement. A separate post on the Sandlight blog, will go over it in detail and as a generic alternative to more traditional conditional statements.
The Administrative UIs and Transfer
This CMS has two administrative UIs. The first one is for entering data and looking at the records (all of them at once) and the second UI is for editing and previewing. The editing portion used the AdminEdit class and the preview portion uses the AdminPreview class. The second UI also includes a window for examining the entered data. A third “trigger” class works to run a two-way link between them.
The two UI classes build HTML documents where data can be entered and the superglobals they generate used to work the two administrative UIs.
class AdminUI
{
//Administration UI
private $adminUI;
public function dataStrat()
{
$this->dataWork();
}
protected function dataWork()
{
$this->adminUI=<<
|
While the two UIs are very close, the AdminUI2 class has an important feature: a little div near the bottom that displays the dynamic portion of the page:
<div class="col spanner"> <h2>$this->headerh2><br /> <img src="images/$this->graphic" alt="graphic" align="left"> $this->story<br /> div> |
As you can see, the little snippet includes all the PHP code–PHP within an HTML document generated by a PHP class. The following is the whole editing UI module:
class AdminUI2
{
//Administration UI
private $adminUI,$header,$graphic,$story;
private $pageData=array();
public function dataStrat()
{
//Elvis operator ?:
$tester=isset($_GET['preview']) ?: NULL;
if($tester)
{
unset($_GET['preview']);
$preview=new AdminPreview();
$this->pageData=$preview->executeStrategy();
$this->header=$this->pageData[0];
$this->graphic=$this->pageData[1];
$this->story=$this->pageData[2];
}
else
{
$this->header="Header";
$this->graphic="holder.jpg";
$this->story =" Story";
}
$this->dataWork();
}
private function dataWork()
{
$this->adminUI=<< |
Initially, I just used regular HTML links between the two administrative UIs. However, certain types of additional information needed to be processed; so I used buttons with different IDs to indicate the nature of the requests being made. The following little helper class (or trigger class) did the trick:
function includeAll($className)
{
    include_once($className . '.php');
}
spl_autoload_register('includeAll');

class AdminTrigger
{
    private static $transfer;
    public static function makeSwitch()
    {
        self::$transfer=(isset($_GET['edit']) || isset($_GET['preview'])) ? 'AdminUI2':'AdminUI';
        self::doUnset();
        $move=new self::$transfer();
        $move->dataStrat();
    }

    private static function doUnset()
    {
        unset($_GET['edit']);
        unset($_GET['entry']);
    }
}
AdminTrigger::makeSwitch();
?>
|
The class handles requests from both admin UI classes, each calling the other. In actual use, it turned out to be very handy because in order to display the updated page requires a page switch between the two UIs.
From Login to Admin
The final key in the process goes back to the “real” login class from the Proxy discussion. It simply calls the AdminUI class.
class Login extends ILogin
{
        //Real Subject
        public function doLogin()
        {
                $this->loginOrDie();
        }

        protected function loginOrDie()
        {
                $admin=new AdminUI();
                $admin->dataStrat();
        }
}
?>
|
In order to simplify things, I put all of the Proxy login files with the necessary change to the Login class to launch the administrative modules together in the Download folder (AdminAll.zip); so if you download everything, you won’t have to made any changes to the Login module.
All that’s left to do is to put the whole thing together with the initial materials at the beginning of this series on Sandlight CMS!
Copyright © 2015 William Sanders. All Rights Reserved.
0 Responses to “Sandlight CMS VI: Strategy Administrative Module”