 Note: This is the third in a series for developing a CMS for Sandlight Productions. Drop by the Sandlight site to see the progress so far, and be sure to check your country’s flag count!
Now that the CMS has a filter for different devices, it now needs a pattern to take care of those devices and different types of content that they will display. Previous posts on this blog used the Bridge pattern and the Factory Method pattern. However, another pattern might be more useful for all of the different things that a Content Management System (CMS) might do. A review of the series of posts on this blog for how to select a design pattern, shows the different criteria to consider. The CMS has to create different elements of a Web page for different devices and that fact must be the focal point of the consideration. The section head for Creational Patterns in Learning PHP Design Patterns, lists the Abstract Factory pattern as a creational one, but that pattern was not discussed in the book nor on this blog. It would appear to be just what this CMS needs.
The Abstract Factory Design Pattern
The Abstract Factory pattern has features for families of factories and products instead of individual factories as does the Factory Method pattern. In comparing the relatively simple Factory Method pattern with the Abstract Factory, the Abstract Factory has multiple abstract product interfaces with multiple concrete factories for the families of the products.
Figure 1 shows the the Abstract Factory class diagram, and when you look at it, try to focus on the fact that the pattern has two types of interfaces: Factory and Product. So, if you understand the Factory Method pattern, you have a starting point for appreciating the Abstract Factory:
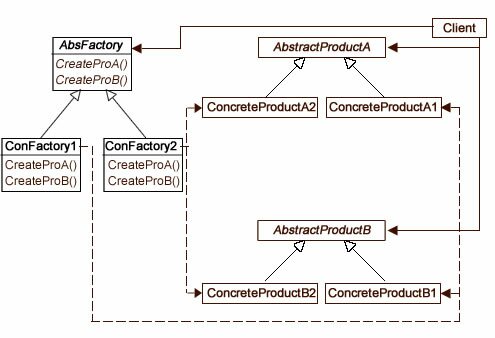
Figure 1: Abstract Factory class diagram
Unlike the Factory Method pattern, the Abstract Factory includes a Client class as an integral part of the pattern. Further, the Client holds an association between both the AbstractFactory (AbsFactory) and the two AbstractProduct classes. So while it shares some of the basic Factory Method characteristics, it is clearly a different pattern than the Factory Method.
Since the Abstract Factory may appear to be daunting, the color-coded the product instantiations (dashed lines) in the file diagram (appearing in the Play window) help show where each concrete factory method calls. Experiment with different combinations of factories (devices) and products (page parts) and look at the diagram so that you can see the path. Phone instantiations are in green, Tablet in red, and Desktop in blue. Experiment with the different single products first, and then click the bottom button to see what different “pages” each device factory displays.
Implementing the Abstract Factory in PHP
To see how this implementation of the Abstract Factory design pattern works, click the Play button. You will see both the interactive Abstract Pattern tester and the of the file diagram of this implementation of the Abstract Factory for the evolving Sandlight CMS. Click the Download button to see all of the files in the diagram. For this particular post, downloading all of the files is more important than usual because there are lots of them, and rather than having listings for all in this write-up, I’ve just selected representative ones.
![]()
![]()
In addition to the Abstract Factory file diagram (viewed when you click the Play button), the following quick overview of the participants’ roles and how the CMS implements the Abstract Factory explain how this implementation works:
Client client: Only uses interfaces declared by IAbFactory (interface) and IProducts (abstract classes IHeaderProduct, IImageProduct and ITextProduct.) This means that the Client can only use the classes and methods implemented from those two interface types—factory or products. In other words, it should not directly implement a product (a page element) by directly using a product independent of the factory and product interfaces. Figure 2 illustrates this point:
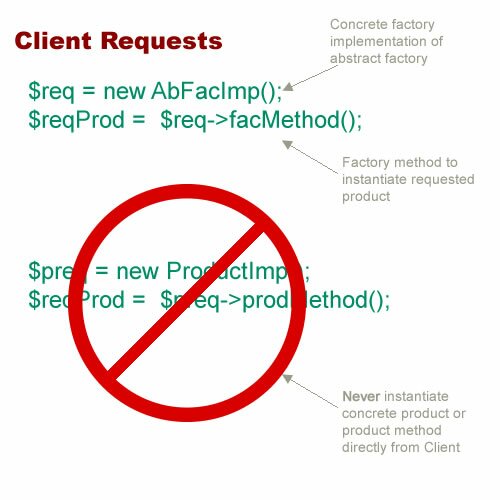
Figure 2: Client works through Abstract Factory implementations
In going over the other participants below, keep in mind that the Client can only implement concrete implementations of the IAbFactory to request products (page parts for different devices.)
IAbFactory interface: Establishes the methods for the concrete factories.
- PhoneFactory implements operations to create phone products
- TabletFactory implements operations to create tablet products
- DesktopFactory implements operations to create desktop products
IHeaderProduct: abstract class Establishes the method for concrete header products and adds protected property for returning completed product.
- PhoneHeader defines phone object to be created by the PhoneFactory and
implements the IHeaderProduct interface - TabletHeader defines tablet object to be created by the Tabletactory and
implements the IHeaderProduct interface - DesktopHeader defines desktop object to be created by the DesktopFactory and
implements the IHeaderProduct interface
IImageProduct: abstract class Establishes the method for concrete image and/or video products and adds protected property for returning completed product.
- PhoneImage defines phone object to be created by the PhoneFactory and
implements the IImageProduct interface - TabletImage defines tablet object to be created by the Tabletactory and
implements the IImageProduct interface - DesktopImage defines desktop object to be created by the DesktopFactory and
implements the IImageProduct interface
ITextProduct: abstract class Establishes the method for concrete text products and adds protected property for returning completed product.
- PhoneText defines phone object to be created by the PhoneFactory and
implements the ITextProduct interface - TabletText defines tablet object to be created by the Tabletactory and
implements the ITextProduct interface - DesktopText defines desktop object to be created by the DesktopFactory and
implements the ITextProduct interface
Comparing the above outline with the Abstract Factory file diagram (seen when you click the Play button) shows that the Abstract Factory is bound to the idea of a factory implementing a product. The specific classes (products) requested are never directly referenced by the Client; rather it is through a factory. The CMS application requires factories for the different device categories; Phone, Tablet and Desktop. Each factory should be able to build the necessary parts (products) for each device. In this case (and for this example) the products are a Header, Graphic and Text. Each factory can build its own version of the products; so requesting a header, for example, is through a concrete factory, and depending on which concrete factory the clients requests, it builds the appropriate product.
Continue reading ‘Sandlight CMS III: PHP Abstract Factory’
 Bring in the MySql
 Web Pages in Classes
Recent Comments