Tag Archive for 'heredoc'

Sandlight CMS II : Mobile First!

mobileFirstI’m not a graphic designer, and so I depend on others for the graphic elements and arrangement of my Web pages. However, I strive to make a site that is clear, easy to understand and useful. My focus is on good user experience (UX) and information design—clear communication with the user. In order to have good UX, you need to know something about , and if you don’t, check out the RWD link. Further, if you are unfamiliar with the approaches to RWD, I’m sold on the Mobile First approach, but possibly for different reasons than designers. Let me explain.

In designing my own site, my focus is on content categories, ease of maintenance, which includes updates and changes, and device flexibility. So I have to keep all of those in mind. I want PHP to handle regular updates by using content from a MySql database (the Content Management of CMS), and I need it to work on different devices. By tackling mobile first, I have to create a diamond-tipped focus on exactly what I want the user to view because even with the new “Phablets,” I’m not dealing with a lot of screen real estate. Currently, my old working mobile phone has a CSS resolution of 320 x 480, and my Phablet is 414 x 736. That’s less that 100 units different. (By CSS resolution, I’m referring to what CSS reads as far as screen width is concerned. See this table.)

Choosing the Devices

In an another sniffer program using a Chain of Responsibility (CoR) design pattern and a PHP user agent ($_SERVER['HTTP_USER_AGENT']) posted on this blog, the sniffer detected the user agent and then found the handler responsible for that agent. Now that user agents have been replaced by CSS screen width (as determined by a JavaScript function) for determining the device, we can use the same CoR pattern making the necessary changes. However, instead of getting real pages, we can use stand-ins that only have the roughest page content. All of the content will be encapsulated into PHP classes using heredoc strings. Near-future posts cover the mechanics of working out the MySql to provide dynamic content for the pages, along with other details necessary for the CMS. For now, though, the dummy pages will only contain enough material to demonstrate that each is appropriate for the selected device. Use the buttons below to see the current state of the CMS and download the files for this portion:
PlayDownload

Note that all devices can now access the Flag Counter. Where is your country on the Flag Counter? (See the note about the Flag Counter at the end of this post.)

Back to the Chain of Responsibility Pattern (CoR)

The CoR pattern is handy because it’s easy to update and change. For example, suppose that having three device categories (e.g., phone, tablets and desktops) proves to be inadequate and you want to add two more; one for laptops and another for phablets. It’s a simple matter to add to the chain and add device classes to handle the new devices. Figure 1 shows the first design pattern to be used in the CMS:
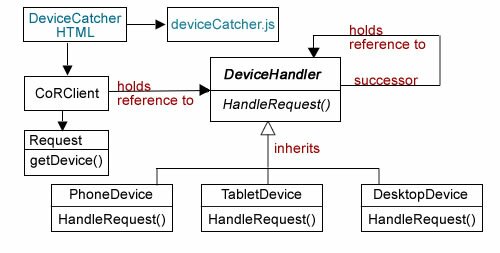
Figure 1: Chain of Responsibility Implementation

Figure 1: Chain of Responsibility Implementation

In Part I of this series, you can see how the device width and height is determined using a JavaScript closure (object) to pass the information to HTML and on to PHP. Since we only need to find the width, the JavaScript code has been slightly altered and placed in a separate file (deviceCatcher.js) in case it needs to be reused.

?View Code JAVASCRIPT
//deviceCatcher.js
function getWide()
{
        var wide = screen.width;
        return function()
        {
                return wide;
        }
}
var w = getWide();
//Send data to PHP class, CoRClient.php       
var lambdaPass= function() {window.location.href = "CoRClient.php?hor=" + w();};

The HTML file simply calls the closure function which passes the values to PHP:

?View Code HTML

        
                Device Catcher


The HTML file is a trigger to get the ball rolling with the client class (CoRClient).

Starting the Chain

The client pulls the viewing device’s width from the superglobal, and passes it to a PHP variable. Given the variability in the width of device screens, I made the decision to work with three sizes to get started: 1) phone, 2) tablet, and 3) desktop. So, depending on the width, the request would be handled by one of those three device groups. I used the following cutoff sizes:

  1. Phone: >= 480
  2. Tablet: >=481 and < 900
  3. Desktop: >= 900

I used this table as a guide, but cutoff points can be anything you want.

Getting the width from the superglobal is easy enough using a static variable:

self::$wide=$_GET['hor'];

The, using the cutoffs, the program needs to generate three strings, phone, tablet, and desktop to send to the Request class that stores the appropriate string. The most obvious way is to use conditional statements (if or switch) to generate the correct string for Request. For example an imperative algorithm such as the following would do the trick:

if(self::$wide < = 480)
{
        return "phone";
}
elseif (self::$wide >= 900)
{
        return "desktop";
}
else
{
        return "tablet";
}

However, a functional program would be more compact, and like the JavaScript closure used in Part I, it would be an “object.” Transformed into a functional closure, the operation would look like the following:

$beta = self::$wide >= 900 ? 'desktop' : 'tablet';
$lambda = function($x) use ($beta) {
        $alpha =  $x < = 480 ? 'phone' : $beta;
        return $alpha;};

Using ternary operations ?: , $alpha and $beta both have function-like qualities. for example, $beta could have been written as a function beta() as shown in Figure 2:

Figure 2: "Functional" variables

Figure 2: “Functional” variables

As you can see in Figure 2, $beta provides the same functionality as beta(), and $beta can be used as a reference in the $lambda function along with $alpha in a PHP closure. (For some reason, when $beta is assigned an anonymous function, I was unable to get it to be added as a closure in the $lambda anonymous function.)
Continue reading ‘Sandlight CMS II : Mobile First!’

PHP Observer Design Pattern: The Basics

observeThe Observer design pattern is one of those patterns that is easy to understand in terms of practical utility, and it’s pretty easy to implement. The idea behind the Observer pattern is to have one main object with other objects depending on the main one to notify them when changes occur. For PHP, the Observer utility is so fundamental, there’s a built-in SplObserver interface. (Using the SplObserver along with the SplSubject will be covered in a future post.)

For example, suppose you have a data source such as an inventory saved in a MySql database. You check on the database periodically to see when you need to purchase more inventory of different products. To make it practical, you want a graph that you can tell at a glance what items need replacement and which ones don’t. However, you also want a table to give you a precise breakdown of the exact numbers in inventory. This example may sound familiar because it’s similar to the one that the Gang of Four use in Design Patterns: Elements of Reusable Object-Oriented Software in illustrating the Observer pattern. What a lot of people don’t realize is that they use the same example at the beginning of their book (page 5) to examine the Model View Controller (MVC). For those of you still using the MVC, the data is supplied by the model, and the views are the displays in different formats (a table, a bar chart, and a pie chart). To get started Play the two examples and Download the source code:
Play
playMul
Download

The Observer Class Diagram

The Observer’s class diagram is a bit perplexing. Take a look at Figure 1, and you’ll see why:

Figure 1: Observer Class Diagram

Figure 1: Observer Class Diagram

The diagram itself is pretty simple, two interfaces (Subject and Observer) and two concrete implementations (ConcreteSubject and ConcreteObserver). What’s a little confusing is the Subject interface: all three methods indicate a concrete implementation because they are not italicized. Italicized method and class (interface) names indicate abstract classes and methods or interfaces. In PHP, the SplSubject is an interface (all methods are abstract), but the diagram clearly shows some concrete implementation in the notify() method—including the pseudo code for it. Neither the attach() nor the detach() are italicized, but the book (p. 295) indicates that the Subject provide attach/detach interfaces—abstract methods. In order to meet the intent of the Subject interface, I created an abstract class that has abstract methods for attaching and detaching Observer objects. However, I also included a concrete notify() method along the lines suggested.

< ?php
abstract class Subject
{
    //Abstract attach/detach methods
    public abstract function attach(Observer $observer);
    public abstract function detach(Observer $observer);
 
    //Concrete protected arrays and  public method
    protected $observerSet=array();
    protected $dataSet=array();
    public function notify()
    {
        foreach($this->observerSet as $value)
        {
            $value->update($this);
        }
    }
}
?>

The idea of the Observer is to have a concrete Subject class (or classes), and have Observer objects subscribe to the data in the Subject. It’s something like a News Service used by Television, Radio, Newspapers and News Blogs. The News Service is the Subject and the news outlets are subscribers — concrete Observers. Notice in Figure 1 that the arrow from the Subject to the Observer ends with a solid ball. That means that the relationship is one (Subject) to many (Observers.) In the example provided, you can add data to a hypothetical “inventory” program that then forwards it to a Subject, and the Subject makes it available to different Observers. In this case there are only two: one that uses the Subject information to create a bar chart, and another that uses the data to display a data table.

Next, look at the ConcreteSubject named, HardwareSubject.

< ?php
class HardwareSubject extends Subject
{
    public function attach(Observer $observer)
    {
        array_push($this->observerSet,$observer);
    }
 
    public function detach(Observer $observer)
    {    
        $counter=0;
        foreach($this->observerSet as $value)
        {
            if($this->observerSet[$counter]==$observer)
            {
                unset($this->observerSet[$counter]);
            }
            $counter++;
        }
    }
 
    public function getState()
    {
        return $this->dataSet;
    }
    public function setState($data)
    {
        $this->dataSet=$data;
    }
}
?>

As an extension of the Subject abstract class, it must implement the attach/detach (think subscribe/unsubscribe) methods. The inherited notify() method is concrete; so it’s available for use with no modifications—not seen in the class. The getter/setter methods are used to make the data to the attached Observers (subscribers)— getState() and the setState($data) methods receives the data to be made available to subscribers. In this example, the data are made available through a UI directly, but the data could come from any source—especially a MySQL database. As you will see, the data for the dataSet array (inherited from Subject) gets it data from the array storing the data provided by the Client.

The Observers

The real work horses for this pattern are the concrete Observer objects. The concrete subject takes the data and tosses it out to the subscribed (attached) observers and they’re the ones who really do something with the data from the Subject. Take a look at the Observer interface:

< ?php
interface Observer
{
    function update(Subject $subState);
}
?>

As you can see, it’s quite simple with a single method that expects a Subject object as an argument. However, this part can be a bit tricky since the notify() method of the Subject interface includes an update call that uses the current concrete subject as a parameter. That is, the update($sub) is called from a Subject object and includes itself in the form of a $this statement in the parameter.

The Bar Chart
The concrete Observers can be as simple or complex as you want. I went for medium complex. First, take a look at the BarChartObserver. It takes the Subject’s data and makes bar charts using SVG graphics.

< ?php
class BarChartObserver implements Observer
{
    private $obState=array();
    private $barChart;
    private $bar;
    private $color;
    public function update(Subject $subState)
    {
        $this->obState=$subState->getState();
        $this->makeChart();
    }
 
    private function makeChart()
    {
        $this->color=array('#0D3257','#97A7B7','#B2C2B9','#BDD6E0','#65754D','#C7DBA9');
        $spacer=0;
        $maxVal=max($this->obState);
        $mf = function($x){return 220/$x;};
        foreach($this->obState as $value)
        {
            $adjSize=$mf($maxVal) * $value;
            $this->buildChart($spacer,$adjSize);
            $spacer+=36.6;
        }
      }
 
      private function buildChart($pos,$barSize)
      {
        $cc= array_pop($this->color);
        $base = 220-$barSize;
        $SVG ="";
        $this->bar ="$pos y=$base width='36.6' height=$barSize fill=$cc stroke='#888' stroke-width='1'>";
        $this->barChart=$SVG . $this->bar;
        echo $this->barChart;
      }
}
?>
svg>

Whenever making charts, you have to take in several considerations. I’ll touch on two here. First, the values have to be relative to the largest element in your numerical array. This can be used to set up relative sizes by using the max() method with your array, and the little lambda function stored in $mf. When iterating through the array with a foreach() loop each value is set to the size of the window (220). By using the lambda function with the maximum value as a parameter, the maximum value divided is by 220 is the factor, and that value is multiplied by the factor times the actual value of the data point. That gives you values that will fit in the 220 pixel window relative to the size of the maximum value. (If you have a spiked maximum value, the other value tend to flatten out on the chart.)
Continue reading ‘PHP Observer Design Pattern: The Basics’

PHP Introduction to OOP: UI-Client-Request

clientBasicAn Easy Start

A lot of starting concepts in OOP seem designed to confuse and warn off developers who want to move up to OOP from sequential and procedural programming. This post is to give you a bit of what was presented at the NE PHP & UX Conference and to provide a simple yet clear introduction to OOP applied to PHP.

The easiest way (and least confusing) is to begin with the idea of “objects” and communication between objects. As you may know, objects are made up of classes containing “properties” and “methods.” Properties look a lot like PHP variables and methods like functions. So, think of properties as things a car has–like headlights, a steering wheel and bumpers, and think of actions your car can take, like turning left and right or going forward and reverse as methods.

The “blueprint” for an object is a class, and when a class is instantiated in a variable, it becomes an object. Objects communicate with one another by access to public properties and methods.

At the 2014 NE PHP & UX Conference in Boston, I told those at my session that I’d have some materials for them, and so you can download them here. One is a folder full of examples from my session and the other is an introductory book (in draft form) for getting started in OOP for PHP users. Also, the Play buttons runs the little example program for this post.
PlayconfFilesoopBook

A Request-Fulfill Model

At the heart of OOP is some system of communication. The simplest way to think about communication between objects is a request-fulfill model. A client makes a request to an object to get something. The request can originate in the user UI, and it is passed to a client who finds the correct class and method to fulfill the request. Figure 1 shows a file diagram with an overview of this model:

Figure 1: Object communication

Figure 1: Object communication

In Figure 1, you can see that the only non-object is the CSS file (request.css), and so in a way, you’re used to making requests for an external operation if you’ve used CSS files. However, CSS files are not objects but rather depositories. Likewise, external JavaScript (.js) files can be called from HTML documents for use with Web pages, but they too are not objects.

Encapsulating HTML in a Class

With PHP, the UI is handled by HTML, but that does not mean that it cannot be encapsulated in a PHP object. Encapsulation is not accomplished by simply adding a .php extension to the file name, but rather, fully wrapping the HTML in a PHP class. The easiest way to do that is with a heredoc string. The following example shows how a fully formed HTML5 document is encapsulated:

Listing #1:

< ?php
class RequestUI
{
    private $ui;
 
    public function request()
    {
        //Heredoc wrapper
        $this->ui=< <<UI
        DOCTYPE html>
<html>
<head>
    <link rel="stylesheet" type="text/css" href="request.css"/>
    <title>Requesttitle>
head>
 
<body>
    <h3>Mathster Mind:<br /> The UI Class & Method Requesterh3>
<form name='require' action='Client.php' method='post' target='feedback'>
    <input type='hidden' name='class' value='MathsterMind'/>&nbsp;MathsterMind Class<br />
    <input type='text' name='num' size='6'/>&nbsp;Enter value <br />
 
    <fieldset>
        <legend>Methodslegend>
    <input type='radio' name='method' value='doSquare'/>&nbsp;Square the value<br />
    <input type='radio' name='method' value='doSquareRoot'/>&nbsp;Find the squareroot of the value<br />
    fieldset><br />
    <input type='submit' name='send' value='Make Request'/>  
form>
<iframe name='feedback'>Feedbackiframe>
 
body>
html>
UI;
    echo $this->ui;
    }  
}
//Instantiate an object from the class
$worker=new RequestUI;
//Call the public method from the instantiated object
$worker->request();
?>

The key aspect of encapsulating HTML in a class is the heredoc wrapper:

//Heredoc wrapper
$this->ui=<< //HTML Code
UI;

A heredoc string begins with three less-than symbols (they look like chevrons laid on their side), the name you give the heredoc string and it ends with heredoc string name fully on the left side of the source code and terminated with a semi-colon. Typically, the heredoc string is assigned to a variable ($this->ui). The great thing about using heredoc, is that you can develop and debug your HTML document, and once it’s all ready, you just paste it into a heredoc wrapper. Now, instead of a free range chicken running around with snippets of PHP code, you have a fully encapsulated object. Thus, your UI is a PHP class with all of the possibilities and security of a well formed class. (Click below to see how requests are “caught” by a PHP client.)
Continue reading ‘PHP Introduction to OOP: UI-Client-Request’

PHP Memento Design Pattern Part II: Store & Retrieve

mementoWith a Little Help from Our Friends

As you saw in Part I of the Memento Design Pattern post, the design itself is fairly simple; at least judging from the class diagram. Also, in the first example, you saw how a state could be preserved in a Caretaker array and recalled upon request. However, I wanted to use the Memento with a more practical implementation of remembering a previous state to which users could return. For instance, the capacity to remember a choice on a Web page after looking at a series of choices would be an ideal use of the Memento pattern. The idea is to build an encapsulated set of objects that encompasses the UI, and the previous post shows how that can be accomplished. The latest problem encountered using the Memento pattern with PHP is that PHP doesn’t have the necessary UI event handlers, and the UI event handlers in JavaScript, while able to pass data, must do so through a PHP file; not an object.

The result is that each time JavaScript passes a bit of data, it also re-instantiates a class in a file. When that happens, all of the stored states are reset to null. So while the Memento is great at storing data in an array (or scalar for that matter), getting that state back with another call via JavaScript (even if it’s encapsulated in a PHP object) nulls all of the stored states.

So, while JavaScript is OK for handling UI events and passing states to PHP, every state passed resets any saved states because the participants have to be re-instantiated. After trying out different methods, I eventually reached the conclusion that I was going to have to stash the Memento’s current state in a JSON (JavaScript Object Notation) file. PHP includes JSON methods, and while this does not exactly solve the problem of passing data without resetting the state, it can preserve the state stored in a Memento object. Take a look at the example and download the files to see all of the code employed:
PlayDownload

JSON and PHP

For those of you unfamiliar with JSON and PHP, you can find it here in the PHP Manual. As noted, to work with PHP and a Memento design pattern the way I wanted to implement it required that I have some way to provide a persistent record of a “saved state.” In a nutshell, JSON is a faster-loading version of XML with hooks into PHP where data can be exchanged. That is an oversimplification to be sure, but as far as I was concerned if a state could be saved and retrieved quickly when wanted, my requirements would be met. I did not want to involve MySQL, XML or simple text files (even though JSON files [ext .json] are text files). JSON was the fastest in saving and retrieving, and PHP has methods for parsing JSON data.

The Caretaker

If you have not done so already, read Part I of the Memento Design Pattern. That will bring you up to speed on the structure and participants of the Memento design pattern.

The Caretaker participant in the Memento pattern is the warehouse for the saved Memento objects passed through the Originator. Essentially, the Memento is passed to the Caretaker where it is stored until called for retrieval. However, a PHP object cannot be stored as a straight JSON file, and so once the Memento object is passed to the Caretaker (in this example), I passed the Memento value to a JSON file. The second Caretaker method returns the stored JSON value directly to the client rather than re-loading a Memento object and returning it. You can see how this all works in the Caretaker class code:

< ?php
class Caretaker
{
    private $storage;
    private $caretakerStore;
    private $caretakerStorage;
 
    public function addMemento (Memento $m)
    {
        $jsonData["hold"][0] = $m->getState();
        $this->caretakerStore="store.json";
        file_put_contents($this->caretakerStore,json_encode($jsonData,JSON_UNESCAPED_UNICODE));
    }
 
    public function getMemento()
    {
        $this->caretakerStorage = file_get_contents("store.json");
        $jsonData = json_decode($this->caretakerStorage,true);
        $this->storage= $jsonData["hold"][0];
        return $this->storage;
    }
}
?>

The two methods in the Caretaker are pretty straightforward getter/setter ones. The addMemento($m) method expects to receive a Memento object. (The type hint enforces it to.) However, instead of storing the entire Memento as was done in the example in Part I, the Caretaker uses the Memento’s getState() method to access the saved state. Then the state is stored in an associative array element named “hold.” ($jsonData[“hold”][0]). Written to a .json file the saved state might look like the following:

{"hold":["7"]}

The value “7” is the saved string that is used to recall the correct file (dp7.jpg) in the patterns folder. While this might appear to be breaking encapsulation, the value is returned in a Caretaker private property, $this->storage.

To get a better sense of the Caretaker in the context of this particular implementation take a look at Figure 2:

Figure 2: File diagram of Memento used for recalling Web image

Figure 2: File diagram of Memento used for recalling Web image

The PhpCatcher class is an attempt to encapsulate the HTML UI into an object and have methods available to set and retrieve Memento object values using the Caretaker as a warehouse. To set the Memento and send it to the Caretaker, the exact same object communications are used as in Part I. However, the Caretake extracts the value from the Memento and stores it in the .json file instead of in a PHP array that stays extant through UI interactions. So, to recall a Memento value, the PhpCatcher goes directly to the Caretaker’s getMemento() method. (Perhaps a more accurate name for the getter would be getMementoValue().) In any event, at the time of this posting, I was unable to find a way to store the Memento in a JSON object and retrieve it; so the PHPCatcher communicates directly with the Caretaker as a client.

You need to use PHP 5.4+ and you need to set your .json file permissions

  • The PHP built-in JSON methods and constants used require PHP 5.4. If you find it impossible to install 5.4, instead of using JSON, you can use a text file, an XML file or even a MySQL file for storing the Memento value.
  • File permissions are grouped into three categories:

    1. Owner
    2. Group
    3. Everyone

    Further, each permission has three levels:

    1. Read
    2. Write
    3. Execute

    You need to set your .json file so that everyone can read, write and execute the .json file. I set mine for ‘777’ so that all groups and the owner had total access. On your computer or LAN, there’s not a lot to worry about; however, if you are nervous about opening up your .json file to the world on your hosting service, you need to read up on permissions security to see if doing so will cause unwanted problems.

If you’re using a Raspberry Pi, you can find out how to change your permissions for this implementation here.

Continue reading ‘PHP Memento Design Pattern Part II: Store & Retrieve’

PHP OOP: Encapsulating & Communicating with JavaScript and HTML5

EncapDocCan We Talk?

The initial discussion of the Memento design pattern illustrated how a state could be saved in a different object than the one in which the state originated. A Caretaker object holds the saved state and when requested, it returns the state to the Originator, all without breaking encapsulation. A practical example of employing the Memento that comes to mind is where the user is looking through a list. As she goes through the list, she sees different items (flowers in this case) that she is considering. However, because it’s a long list, she cannot remember which one she likes; so she tags those she is considering. After going through the whole list (all of the different flowers), she can easily recall those that she had tagged–recall them from a Memento. Play the little app and download the source code before going further:
PlayDownload

Communicating with HTML and JavaScript

Working HTML and JavaScript into PHP is no great shakes, and most PHP developers probably have done so at one time or another. However, most of the time I find myself creating horrible mixes of code for a one-off use with nothing encapsulated. The goal here is to see how everything in the application can be encapsulated and at the same time communicate. The purpose here is to find a single state variable that is used by HTML, JavaScript and PHP. Further, that state must be available for placing into a Memento object and stored for later use. (This post simply examines one way to encapsulate everything and have them communicate; however, material from this post will be used in developing a Memento example in a future post.) Also, I wanted to import all of the JavaScript and CSS separately. Figure 1 shows the general plan. (The ‘gardner’ folder contains the flower JPEG images.)

Figure 1: Encapsulating JavaScript, CSS and HTML into EncapDoc PHP class

Figure 1: Encapsulating JavaScript, CSS and HTML into EncapDoc PHP class

The CSS is just the stylesheet and it contained no functionality that you often find when it is used in conjunction with jQuery. I needed the JavaScript for clicking through the images. Had I swapped images using PHP I’d probably have to reload an HTML page with every swap and that seem prohibitively expensive. So I wrote the most simple JavaScript swap program I could think of with two functions for swapping and an added JavaScript function to get the initial starting picture (an integer value) passed from PHP. The following JavaScript listings shows how simple the script is:
Continue reading ‘PHP OOP: Encapsulating & Communicating with JavaScript and HTML5’