Tag Archive for 'oop php'

OOP PHP III: Properties and Variables

oop3From Variable to Class Property

All classes in all programming languages are made up of two fundamental elements, 1) Methods and 2) Properties. In this installation of learning OOP in PHP, I want to look at properties.

To understand properties in a PHP class, it’s important to understand (at this stage) that we’re dealing with variables. Variables inside of a class can act as properties of that class or properties of a method within a class. In OOP, we speak of visibility of variables/properties. You will find an earlier post on this blog that explains private variables in detail, and future posts delve into visibility in greater detail. For now variables in PHP (and virtually every other programming language) have two basic types:

  • local
  • global

Generally speaking any variable declared outside of a function in a sequential or procedural listing is global, and any variable declared inside of a function is local. The same is true to some extent in OOP programming, but variables (or properties) require a different sense. Take a look at the video, and you’ll see the basics of variables within classes.

The video touches on the most fundamental aspects of variables and properties. However, as every PHP programmer knows, there’s no substitute for some clear practical OOP PHP code. The following examples show several different aspects of creating and using variables and properties.

All of these examples use a Client->Request->Class model. The first is similar to the one in the video except it has a client make the request:
Client 1
Client1


//Client1.php
include_once('OneProp.php');
class Client1
{
 
        public function __construct()
        {
            //$oneProp is a local variable
            $oneProp = new OneProp();
            echo $oneProp->showProperties();
        }
}
//$worker is a global variable in this program
$worker = new Client1();
?>

OneProp


//OneProp.php
class OneProp
{
        private $magicWord;
 
        public function showProperties()
        {
            $this->magicWord = "

Alacazam!

"
; return $this->magicWord; } } ?>

More Properties and a Little JavaScript inside PHP Class

This last example is a little more involved. One of the properties is assigned an entire Web page using heredoc. Two more properties serve as labels and instructions. Here we use a little JavaScript, and the JavaScript event handler (onClick) uses the this statement and property reference using a dot:

this.src

Because the JavaScript is part of a heredoc string in a PHP property ($this->document), PHP does not attempt to execute the JavaScript or find an error in its format. (In other words it doesn’t throw an error when this.src appears instead of $this->src is in the JavaScript listing.)

Client2


include_once('ImageSwap.php');
class Client2
{
        private $light;
        public function __construct()
        {
            $light = new ImageSwap();
        }
}
$worker = new Client2();
?>

ImageSwap


//ImageSwap.php
ini_set("display_errors","1");
ERROR_REPORTING( E_ALL | E_STRICT );
class ImageSwap
{
    private $document;
    private $turnOff;
    private $howTo;
 
    public function __construct()
    {
        $this->document = <<


        Light Switch


LIGHTSWITCH;
        $this->turnOff = "

Turn off the light!

"
; $this->howTo = "

(Just click the image!)

"
;   echo $this->turnOff; echo $this->document; echo $this->howTo; } } ?>

To run this, you’ll need to download the following two graphic files:
onoff

Put the two graphic files into the same directory as the classes you’ll be using. Notice how the three different properties in the ImageSwap class are employed. Also note that in the two Client classes, the $worker variable (not a property because it does not belong to a class) is assigned an object. To download the two graphic files, just right click to download them and then move them to the same directory (folder) with your ImageSwap.php file. In the next installment of OOP PHP, we’ll look at the visibility that properties and methods can have and how to use them.

OOP PHP II: Arithmetic Operators and Communicating Objects

oop2Object Communication

Hope to get up the final CMS post by tomorrow (July 9), but in the meantime, I wanted to get this next OOP PHP post up. One of the essential elements of OOP in any language is that it is written as communication between objects. Design patterns are simply ways to help arrange that communication process so that things don’t get tangled up. Sequential and procedural programming are never far from the abyss of tangle, and as long as the scripts or code blocks are short, you can get away with it. But for both the sequential and procedural programmers, spaghetti code is lurking like a vulture on the programmer’s shoulder. So in learning OOP, one of the very first things to understand and use is how objects communicate with one another.

In learning PHP or any other language, one of the first things to understand is how to use the arithmetic operators. The six such operators in PHP are – (negation) + (add), – subtract, * (multiply), / (divide) and % (modulus). Usually the next step is to learn about precedence and how to use parentheses to re-order precedence. However, other than a quick mention that modulus refers to finding the remainder in division, there’s usually not a lot of discussion about it. However, for programmers there’s a huge number of uses of modulus. Check out some articles on modular arithmetic. (You’ll never have problems working with 12-hour clocks again using $value % 12.)

Some examples

I put together some simple code examples of using object communication and math operators. It might help to have them handy when viewing the video. Each listing below should be saved as a separate file with the .php extension.

Call to single method object

Client.php


//Client.php
ini_set("display_errors","1");
ERROR_REPORTING( E_ALL | E_STRICT );
include_once('EZMath.php');
 
class Client
{
    public function __construct()
    {
       $math = new EZMath();
       echo $math->doAdd(7, 22);    
    }  
}
$worker = new Client();
?>

EZMath.php


//EZMath.php
ini_set("display_errors","1");
ERROR_REPORTING( E_ALL | E_STRICT );
 
class EZMath
{ 
   public function doAdd($alpha,$beta)
   {
        return $alpha + $beta;
   }  
}
?>

Call to multiple method object

Client1.php


//Client1.php
ini_set("display_errors","1");
ERROR_REPORTING( E_ALL | E_STRICT );
include_once('EZMath1.php');
 
class Client1
{
    public function __construct()
    {
       $cr = "
"
; //Enter your own birth year $bday = 1985;   $math = new EZMath1(); echo $math->doNegate(44) . $cr; echo $math->doAdd(12, 26) . $cr; echo $math->doSubtract(2013, $bday) . " years old $cr"; echo $math->doMultiply(12, 26) . $cr; echo $math->doDivide(500, 25) . $cr; echo $math->doModulus(14, 12) . " pm o'clock $cr"; }   }   $worker = new Client1();   ?>

EZMath1.php


//EZMath1.php
ini_set("display_errors","1");
ERROR_REPORTING( E_ALL | E_STRICT );
 
class EZMath1
{
 
   public function doNegate($alpha)
   {
        $alpha = -$alpha;
        return $alpha;
   }
 
   public function doAdd($alpha,$beta)
   {
        return $alpha + $beta;
   }
 
   public function doSubtract($alpha,$beta)
   {
        return $alpha - $beta;
   }
 
   public function doMultiply($alpha,$beta)
   {
        return $alpha * $beta;
   }
 
   public function doDivide($alpha,$beta)
   {
        return $alpha / $beta;
   }
 
   public function doModulus($alpha,$beta)
   {
        return $alpha % $beta;
   }
}
 
?>

Coin Flip Game Using Modular Arithmetic

CoinClient.php


//CoinClient.php
ini_set("display_errors","1");
ERROR_REPORTING( E_ALL | E_STRICT );
include_once('CoinFlip.php');
 
class CoinClient
{
    public function __construct()
    {
       //Instantiates instance
       $flipper = new CoinFlip();
       //Makes a request
       echo $flipper->doFlip();   
    }   
}
$worker = new CoinClient();
?>

CoinFlip.php


//CoinFlip.php
class CoinFlip
{
   public function doFlip()
   {
    //rand is built-in PHP method for generating random number
    $coin = rand(1,200);
    //Uses modulo operator (%) to generate 1 or 0
    //When you divide by 2 the remainder is always 1 or 0
    //tests for true (1) or false (0)
    $results = $coin % 2;
    if($results)
    {
        $flip="Heads";
    }
    else
    {
        $flip = "Tails";   
    }
    return $flip;
   }
}
 
?>

You can play around with these examples, and you should get the fundamental idea of objects communicating with one another. See if you can create some of your own.

PHP Graphic CMS Class with Template Method

uploadLoad Up the Graphic Files
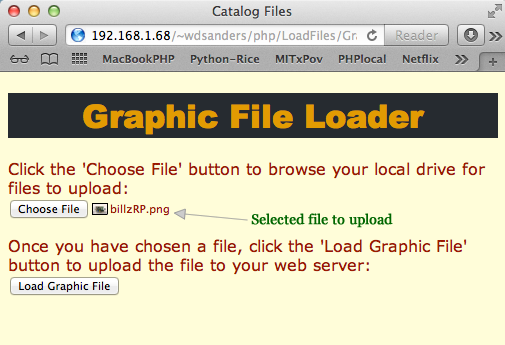
In Part IV of the Content Management System (CMS) series, I noted that I wanted to have a separate post on uploading graphics to a web server. This post addresses the issues involved in getting graphics in place on a web server that will be included in a Web page, whether you’re using a CMS or not. In the case of selecting a graphic from your desktop and uploading it to a server, most of the important work is done by HTML. So, we’ll start with the HTML assuming that HTML5 is in use. Be advised at the outset that you will need to do a little system administration to set your file privileges in the folders where you will store the graphic files. In the development process, I used a local host, a different computer on my LAN, and two different web servers at remote locations.

Choosing a File to Upload

HTML5 (and possibly earlier versions) has some very nice built-in form attributes that make selecting a graphic file from your computer to place in an “uploadable” state quite easy. All you need are a couple of lines of HTML. Within a form container, the line:

generates the following button when you load the code into a browser:

In the

tag, you will need to include an enctype assignment:

That’s about it, and you’re all set to select a file that can be accessed through the PHP superglobal variable $_FILES.

The following HTML code generates the CSS first the then HTML portion of the little graphic CMS:

@charset "UTF-8";
/* CSS Document */
/* upload.css */
body
{
    font-family: Verdana, helvetica, arial, futura, sans-serif;
    color:#991C00;
    background-color:#FFFCDB; 
}
 
h1
{
    font-family: "Arial Black", futura, sans-serif;
    color:#E09A25;
    background-color:#262B30;
    text-align: center;
}
?View Code HTML
< !doctype html>


        Catalog Files


Graphic File Loader

Click the 'Choose File' button to browse your local drive for files to upload:

Once you have chosen a file, click the 'Load Graphic File' button to upload the file to your web server:

I added separation between the Choose File button and Load Graphic File submit button so that the HTML and PHP portions are more clearly defined. Figure 1 shows the initial web page for the upload:

Figure 1: Selecting and calling PHP Script

Figure 1: Selecting and calling PHP Script

Since the goal of having a CMS is to make updates simple, this initial example does not have any whistles and bells (e.g., folder selection), and it does nothing more than to prepare a selected file for upload to a server.

A Little PHP

On the PHP side of the equation, you have only two code elements:

  1. $_FILES: Superglobal array with selected file information in elements
  2. move_uploaded_file(): Stores uploaded file (in $_FILES) to in specified server location.

Creating a class, using the minimum code and no error, type or size checking, is quite simple. To keep it even simpler, the following trigger script instantiates the Upload class:

< ?php
//triggerUpload.php
include_once("Upload.php");
$worker = new Upload();
?>

After testing the initial Upload class, we’ll see how it can be enhanced. First, though, take a look at the code:

< ?php
//Upload.php
class Upload
{
    private $fileNow;
    public function __construct()
{
        if ($_FILES)
        {
            $this->fileNow=$_FILES["file"]["name"];
 
            //The following line does all the work
            move_uploaded_file($_FILES["file"]["tmp_name"],"images/$this->fileNow");
 
            echo $this->fileNow . " has been uploaded to the images folder:";
        }
    }
}
?>

That simple class does everything you need to upload and store a file in a folder named “images” in the directory where the script is launched. It’s pretty basic, but you should be able to see exactly what is required to upload a file to a web server without having to use an FTP client.

Template Method for Details

Note: Before you get started on this section, download all of the files that are involved:
Download

As you saw, the Upload class is quite easy. However, you will want to make sure that not just any file type is loaded and you’ll want to make sure that you don’t have giant files loaded that may fill up your disk space. (You also want to protect against maliciously uploaded files.) The $_FILES array has information to use for checking type and size. Using the $_FILES array information we can boil the process down to three steps:

  1. checkSize(); See how big it is and compare to a maximum allowable size.
  2. checkType(); Add a set of acceptable file types used with a Web page and check to see if the file type is acceptable.
  3. uploadFile(); If the file type and size are okay, upload the file.

Click below to continue:
Continue reading ‘PHP Graphic CMS Class with Template Method’